Advertisement
Quick Links
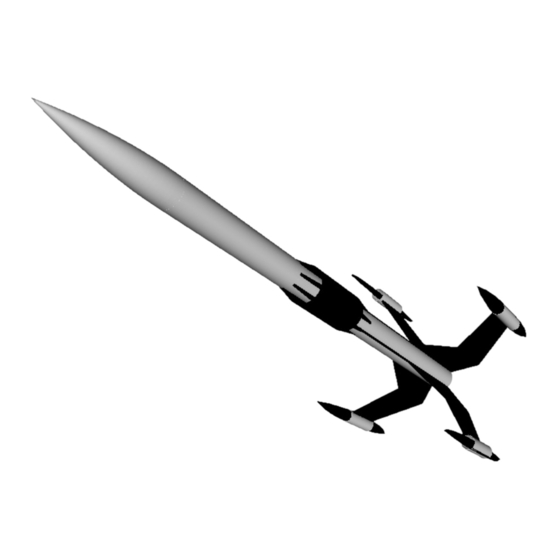
Skill Level 3
Image created with RockSim v8
Main Nose Cone....................BNC-50Y
Main Body Tube......................BT-50
Pod Nose Cone.................(4) BNC-5AX
Pod Tail Cone..................(4) BNC-5E
Pod Body Tube..................(4) BT-5BJ
Reactor Shroud.....................BT-55J
Motor Tube.........................BT-20J
Centering Rings...............(2) CR-2050
Thrust Ring........................CR-520
Main Parts List
Engine Hook..........................EH-2
Main Fin Stock...........1/8" Balsa Sheet
Cooling Vanes...........1/16" Balsa Sheet
Launch Lug.......................(2) LL-2
Parachute....................18" Diameter
Shock Chord.........................SC-24
Shock Chord Mount..................SCK-24
Screw Eye............................SE-1
Snap Links........................(2) #12
Antares
Designed By C. P. McGraw
Revision Date: Dec 14, 2005
Length
23.75"
Diameter
0.976"
Fin Span
8.075"
Weight
2.13 oz
Advertisement

Subscribe to Our Youtube Channel
Summary of Contents for BARCLONE Antares
- Page 1 Antares Designed By C. P. McGraw Skill Level 3 Revision Date: Dec 14, 2005 Length 23.75” Diameter 0.976” Fin Span 8.075” Weight 2.13 oz Image created with RockSim v8 Main Parts List Main Nose Cone....BNC-50Y Engine Hook......EH-2 Main Body Tube......BT-50 Main Fin Stock...1/8”...
- Page 2 Fin Templates Main Fins (Make 4 each from 1/8” balsa sheet) Reactor Cooling Vanes (Make 8 from 1/16” balsa sheet)
- Page 3 Alignment Guides Reactor Cooling Vanes Alignment Tool Parts List RCV Alignment Guide End Pieces..(2) 0.05” Fiberboard RCV AG Connecting Tube.......BT-5BJ Reactor Cooling Vane Alignment Guide (Make 2 from 0.05” fiberboard) (Make 1 from 0.05” fiberboard) Fin Tip Pod Alignment Tool Main Fin Marking Guide (Make 1 from 0.05”...
- Page 4 Alignment Guides Main Fin Alignment Tool Parts List Guide Supports.........(2) 0.05” Fiberboard Sliding Tube Holders......(3) 0.05” Fiberboard Clamping Tubes.........(6) BT-3, 9” Main Fin Rear Support Piece -- Sliding Tube Holder -- (Make 3 from 0.05” fiberboard) Main Fin Front Support Piece (Make 2 from 0.05”...
- Page 5 Painting Guide...
- Page 6 glue the smaller end pieces in place. Set this General Assembly Sequence aside for about 20 minutes to dry. Reactor Vane Alignment Tool Read this instruction guide carefully several times before starting the actual Step 5 Test-fit the pieces together and ...
- Page 7 Apply thinned lightweight filler from the bottom edge, aligning the flat compound to the entire pod and allow to notch over the hook. Keep the hook aligned dry. BARCLONE recommends Elmer's parallel to the tube. Fill-N-Finish for this. Sand with 220-grit ...
- Page 8 then pull the slip knot down tight with the Insert into the slots of the Reactor Vane first knot. Even out the two legs of the Alignment Tool all eight of the primed balsa thread, then apply a layer of glue around the vanes, with the wide root edges pointing back side of the forward “B”...
- Page 9 edges of all eight pieces. Glue the fin halves Step 35 Cut four strips of masking tape together as shown in Fig. 5 above. Use pins, 1/8” wide and 4” long. Carefully apply these clamps, or weights to hold the pieces in to the body tube directly over the fin alignment while the glue dries.
- Page 10 Tack-rag the dust and inspect for scratches, these areas to protect the glue layer for a gouges, or voids. Repeat this sequence as later step. needed to achieve a smooth, unblemished surface. Figure 7 Step 41 Tie a slip knot with about a 1” ...
- Page 11 leading edges of the fin. Rotate the guide, Step 48 Gather the shroud lines together and repeat this sequence for each of the and attach them to the swivel end of one of remaining three main fins. the snap links. Attach the swivel end of the ...
- Page 12 220-grit paper until the all the two or three days, spray the model with a surfaces appear sealed. Tack-rag the model clear gloss coat. BARCLONE recommends and inspect the surfaces for voids and Future Floor Finish, as this product does scratches.
- Page 13 Preflight Sequence the nose cone. Step 66 The BARCLONE Antares is not a high-performance model, therefore you will not achieve the same altitudes with this design that you might otherwise reach with lower-drag model. We have selected a set of...
- Page 14 Size: My model rocket will not weigh more than 1,500 grams (53 oz) at liftoff, and will not contain more than 125 grams (4.4 oz) of propellant or 320 N-sec (71.9 lb-sec) of total impulse. If my model weighs more than one pound (453 grams) at liftoff, or has more than four ounces (113 grams) of propellant, I will check and comply with Federal Aviation Administration (FAA) regulations before flying.
Need help?
Do you have a question about the Antares and is the answer not in the manual?
Questions and answers