Table of Contents
Advertisement
Quick Links
Advertisement
Table of Contents

Summary of Contents for MAK AL-2016A
-
Page 2: Table Of Contents
12. Accessories- - - - - - - - - - - - - - - - - - - - - - - - - - - - - - - - - - - - - (23) 1. Basic Configure AL-2016A... -
Page 3: Words Explain
2. Word Explain Set to be Armed(Anti - Burglar), Armed or Make Alarm Disarm Exit the status of Armed or Stop Alarming In Armed status, when being triggered, the siren will be warning and dial the Normal Vocal Arm preset phone number In Armed status, when being triggered, the siren w ill not be warning but dial Mute Arm the preset phone number... -
Page 4: Main Part & Instruction
(4) Billion Code (5) Available to connect w ith CMS (6) Available to set each zone to be ON/OFF (7) Arm/disarm by remote, 2 groups Auto Arm/Disarm, remote to Arm/Disarm, Arm/Disarm by keypad (8) 72pcs alarm log, show i n g event detail & date (year, month, day, hour, minute). (9) Available to monitor Local, when alarming. - Page 5 If more than two, before connect with mainf rame, please connect the detectors in series. ⑥Wired 3 zone, wiring same as above. ⑦Wired 2 zone, wiring same as above. ⑧Wired 1 zone, wiring same as above. AL-2016A GSM ① : Power ON/OFF Power Button :Insert SIM ②...
- Page 6 CMS No. & User ID, it will dial CMS, when Arm/Disarm. Pull to “3”, it will not dial CMS when Arm/Disarm. Undefined AL-2016A GSM Function Setting Switch f or restoring password(Def ault is “1”), when f orgot password, please open the cover of mainf rame, pull the switch f rom “1”...
- Page 7 6. System Setting and Operation Pow er on, LCD w ill be on, then operating as below: Ⅰ. NORMAL (1). PHONE (2). CMS (3). P ASSWORD (4). TIME&DATE Ⅱ. ADVANCED...
- Page 8 (1). LEARN CODE (2). REMOVE...
- Page 9 (3). SETTING (4). SELF CHECK (5). ALARM LOG (6). AUTO ARM/DISARM...
- Page 10 (7)Default setting 1.Delay to be Armed: 5.Built-in Buzzer & EXT Siren: 0sec. SYNC. 2.Delay to be Disarmed: 6.The 1 zone: 0sec. Normal Zone 3.When Armed, default is: Global Armed 7.Alarm Phone default is: Null 4.default password: 000000 7. Receive the Alarming call In armed status, i f any accessories are being triggered, the system will make alarm after delay time.
-
Page 11: Remote Control Function
Phone Button Function Press“3#”key When monitoring the alarming place, it is ok to press “3#” for 20sec more. Press“5#”key Sw itch into Vocal Alarming and hang up, then dial next number Exit current alarming and hang up, But mainframe is still in Armed status, if being Press“1#”key triggered, it will make alarm again. - Page 12 AL-2016A AL-2016A GSM...
-
Page 13: Technology Parameter
10. Technology Parameter: (1) Power Voltage:AC:110V ~ 245V (2) Standby Current of Mainframe:≤35mA (3) Operating Current:≤120mA (4) Alarming Current:≤300mA(not connecting w ith EXT siren) (5) Receiving Frequency:433.92±0.5MHz (6) Preset Phone Number:3pcs phone number, 1pcs CMS NO and 1pcs User ID (7) Built-in Siren:>85dB (8) Standby Time:≥8 hours (9) Si z e:20x14.5x6.6cm... -
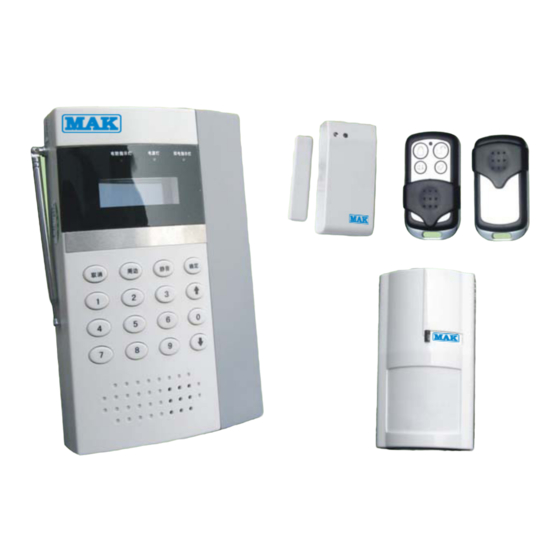
Page 14: Accessories
11. Accessories Instruction D-106 / D-102A Door Sensor Instruction Overview: D-106 / D-102A Door Sensor using imported CPU, more stable. D-106 Instruction D-102A Instruction Technology Parameter: Technology Parameter: Battery: 12V/23A Battery: 12V/185MAH; Static Current: 0uA; Static Current: 0uA; Transmitting Current: ≤15mA; Transmitting Current: ≤12mA;... - Page 15 AL-413W / PIR-102A Instruction 1.Overview AL-413W (PIC1A) / PIR-102A (PIC1B) wall mounting w i r eless PIR Detector make up of w i r eless sending circuit & infrared detecting device. Features: A. Anti-fal s e alarm & outstanding detecting function. B.
- Page 16 3.Installation & Usage of Detector 3.1 Installing guide to avoid false alarm A. Avoid sunshine or strong light B. Using high-powered alkaline battery C. Avoid the floating subject, e.g. clothes or curtain, strong wind may cause false alarming. D. Avoid facing heating unit, such as air conditioner, refrigerator, fan and so on. 3.2 Installing Use screw to fi x the bracket on the wall, about 2.1m to 2.8m from the ground.
- Page 17 4. NOTE A. Avoid to drop or impacts, or w ill cause damage. B. Avoid touching sensor to keep mirror surface clean. C. After testing, please set to normally work mode. D. Do regularly checking for better status.
Need help?
Do you have a question about the AL-2016A and is the answer not in the manual?
Questions and answers