Table of Contents
Advertisement
Quick Links
Advertisement
Table of Contents

Summary of Contents for Till Pro
- Page 1 Till Pro User Guide W W W . T I L L P A Y M E N T S . C O M...
-
Page 2: Table Of Contents
Page5 3.2 Inserting Secure Case Page 6 3.3 Loading Float Page 7 3.3.1 Via the front screen of the Pro Page 7 3.3.2 Via the back screen - determined denominations Page 8 3.3.3 Via the back screen - determined amount Page 9 3.4 Accepting Payment (without Point of Sale) -
Page 3: Scope
This document sets the guidelines on how to create a User Guide. The User Guide provides the information and instructions needed to set up and use a product or service of Till Pay- ments. A User Guide includes written and visual information (such as diagrams or screen shots) to assist the user in completing tasks associated with the product or service. -
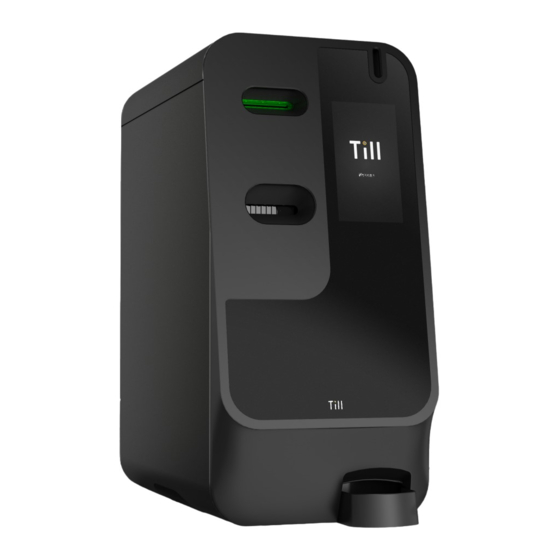
Page 4: Till Pro - Quick Specs
Merchant screen/float management/totals etc NFC touch point for authentication Power button SecureCase door Ideally bolted to counter. Cable management through hole in counter under Pro. Optionally cables can run out the side by removing plastic covers. 4 Till Pro User Guide... -
Page 5: Process
3. Process 3.1 Powering On the TIll Pro 1. Press the power button to power up the Pro. 2. Powering up may take 60 seconds. Once powered, click on the screen to unlock. 5 Till Pro User Guide... -
Page 6: Inserting Secure Case
3.2 Inserting the Secure Case On the Till Access Card, press the power button to activate the card. Press ‘0’ and ‘OK’. Repeat this three (3) times. Press ‘OK’ and this will generate a unique code for you. Unique code will appear here ‘OK’... -
Page 7: Loading Float
3.3 Loading Float Once you have logged in, you are able to load float through various ways. 3.3.1 Via the front screen of the Pro Back Screen Press the ‘Till’ tab On the main tab, locate and memorise the PIN Code generated. -
Page 8: Via The Back Screen - Determined Denominations
3. Adjust the float with + or - 4. Press ‘Save’ to complete the process 5. Select Add to load float 6. You will be prompted to Add Float at the front of the Pro. Select Done when completed. 8 Till Pro User Guide... -
Page 9: Via The Back Screen - Determined Amount
4.4 Accepting Payment (without Point of Sale) 1. Touch screen to begin 2. On the Till Access Card, press the power button to activate the card. Press ‘0’ and ‘OK’. Repeat this three (3) times. Press ‘OK’ and this will generate a unique code for you. - Page 10 3. Place Till Access Card on top of Till logo to commence authentication. Cancel button 4. Once authenticated, you will be automatically be taken 5. Enter the amount you wish to accept and select OK. to the home screen. Select the first tab.
- Page 11 6A. Cash payment option: the customer will insert 6B. Card payment option: the customer will be their cash payment here. referred to pinpad via the Till Pro screen. 7. Once payment is recieved, this screen will appear to the customer. 11 Till Pro User Guide...
-
Page 12: Accepting Payment (With Integrated Point Of Sale)
1. Power up the POS system. This will automatically turn on the device. 2. Select “mypos” to run the application. 3. Once the application starts, select “register”. Your POS & weight scale is now integrated with Till Pro. 4. Place item on weight scale or select predetermined sale amount. - Page 13 6A. Cash payment option: the customer will insert 6B. Card payment option: the customer will be their cash payment here. referred to pinpad via the Till Pro screen. 7. Once payment is recieved, this screen will appear to the customer. 13 Till Pro User Guide...
-
Page 14: End Of Day
2. Select EOD Dump 3. On the Till Access Card, press the power button to activate the card. Press ‘0’ and ‘OK’. Repeat this three (3) times. Press ‘OK’ and this will generate a unique code for you. -
Page 15: Removing Secure Case
3.7 Removing Secure Case 1. Ensure this tab is 2. Click selected ‘Logout’ LOG OUT 3. Click ‘Logout’ again - This will prompt the Secure Case to close 4. The below screen will then appear. Click ‘Eject’ 15 Till Pro User Guide... - Page 16 5. On the Till Access Card, press the power button to activate the card. Press ‘0’ and ‘OK’. Repeat this three (3) times. Press ‘OK’ and this will generate a unique code for you. Unique code will appear here ‘OK’ button...
-
Page 17: Powering Off Pro
Pro to power off the device. 3.9 Opening/Closing Secure Case 1. On the Till Access Card, press the power button to activate the card. Press ‘0’ and ‘OK’. Repeat this three (3) times. Press ‘OK’ and this will generate a unique code for you. -
Page 18: Charging The Secure Case
Model SC004: Capability to charge up to 4 Secure Cases at a time. 1. Slide the Secure Case into a charging slot ensuring that the Till logo on Secure Case the is facing the NFC reciever. 2. When the NFC detects the Secure Case, the indicator light will change from red to green. -
Page 19: Troubleshooting
3. The authenticate screen will then appear. Commence authentication process 4. On the Till Access Card, press the power button to activate the card. Press ‘0’ and ‘OK’. Repeat this three (3) times. Press ‘OK’ and this will generate a unique code for you. - Page 20 7. Firmly press the eject button and slide the B2B cassettes outwards to remove; and 8. Finally rotate the gear towards yourself to bring the blocked note to the surface. Eject button Cassette is located here Front door latches 20 Till Pro User Guide...
-
Page 21: Removing Blocked Notes From Note Mechanism
3. The authenticate screen will then appear. Commence authentication process 4. On the Till Access Card, press the power button to activate the card. Press ‘0’ and ‘OK’. Repeat this three (3) times. Press ‘OK’ and this will generate a unique code for you. - Page 22 5. You will hear a click indicating the door has been unlocked. Gently pull the door out and lock it in place. 6. Gently pull any notes that appear stuck to remove the blockage. Note Mechanism 22 Till Pro User Guide...
-
Page 23: Removing Blocked Coins From Currenza
3. The authenticate screen will then appear. Commence authentication process 4. On the Till Access Card, press the power button to activate the card. Press ‘0’ and ‘OK’. Repeat this three (3) times. Press ‘OK’ and this will generate a unique code for you. - Page 24 5. You will hear a click indicating the door has been unlocked. Gently pull the door out and lock it in place. 6. Check the coin return slot for any blockages. 7. Slide the Currenza out from the Pro. 8. Check the coin entrance slot for any blockages. 9. Check the coin organiser for any blockages. 24 Till Pro User Guide...
- Page 25 Need a bit of help? Please contact support@tillpayments.com This user guide is intended to provide all the necessary information regarding the Till Pro. For further support please contact support@tillpayments.com. www.tillpayments.com | 1300 369 692 | support@tillpayments.com...
Need help?
Do you have a question about the Pro and is the answer not in the manual?
Questions and answers