Table of Contents
Advertisement
Quick Links
RP-3000
Microcomputer
PH
Oxidation-reduction potential
Transmitter
Apure
Apure
Apure
Apure
1000
1000
1000
1000
7.00
7.00
7.00
7.00
AM 12:00
AM 12:00
AM 12:00
AM 12:00
2017.01.01
2017.01.01
2017.01.01
2017.01.01
Down
Down
Down
Up
Up
Up
ESC
ESC
ESC
ESC
ESC
Industrial pH/ORP controller
Industrial pH/ORP controller
Industrial pH/ORP controller
Industrial pH/ORP controller
Initial password:0000
RP-3000
RP-3000
RP-3000
RP-3000
mV
mV
mV
mV
Relay1
Relay1
Relay1
Relay1
16.00mA
16.00mA
16.00mA
16.00mA
pH
pH
pH
pH
Relay2
Relay2
Relay2
Relay2
12.00mA
12.00mA
12.00mA
12.00mA
MTC
MTC
MTC
MTC
25.0 ℃
25.0 ℃
25.0 ℃
25.0 ℃
Right
Right
Right
Enter
Enter
Enter
Enter
Enter
Advertisement
Table of Contents

Summary of Contents for Apure RP-3000
- Page 1 RP-3000 Microcomputer Oxidation-reduction potential Transmitter Apure Apure Apure Apure RP-3000 RP-3000 RP-3000 RP-3000 1000 1000 1000 1000 Relay1 Relay1 Relay1 Relay1 16.00mA 16.00mA 16.00mA 16.00mA 7.00 7.00 7.00 7.00 Relay2 Relay2 Relay2 Relay2 12.00mA 12.00mA 12.00mA 12.00mA AM 12:00 AM 12:00...
- Page 2 Note: Please kindly read this operation manual Thank you for purchasing our products, to continuously improve quality and enhance the function of the analyzer, the company reserves the right to modify the content and display of icons at any time, the actual display and operation manual may have differences, so the actual situation of the machine as the subject.
-
Page 3: Table Of Contents
Catalog 一. Summary 二. Combination and installation 2.1 Host fixed 2.2 Cabinet installation reference drawing 2.3 Wall mounted installation reference drawing 2.4 Electrode and protection tube Electrode and electrical wiring 三. 3.1 Wiring diagram 3.2 Back contact function 3.3 Terminal wiring instructions 四.... - Page 4 一. Summary It is new model, intelligent and flexible, which can simultaneously measure the temperature and PH/ORP, widely used in the city sewage treatment plant, water supply, electricity, medicine, chemical, food and other industries, the value of continuous measurement of solution PH/ORP. Basic function 1.
- Page 5 Model RP-3000 Test item PH/ORP/TEMP 0.00~14.00PH Test range -2000~2000mv TEMP -30.0~130.0℃ 0.01 PH Resolution 1 mV 0.1 ℃ TEMP ±0.01 PH(±1 Digit) Accuracy ±0.1%(±1 Digit) ±0.2 ℃(±1 Digit) TEMP Temperature NTC30K/PT1000 Automatic temperature compensation compensation Manual temperature compensation Custom single and double point correction and preset Tech, NIST...
-
Page 6: 二. Combination And Installation
Contact RELAY ON/OFF contact, 240VAC 0.5A Max output Control Setting HI/LO Two independent control points Cleaning settings Contact output, ON 0~9999 seconds/OFF 0~999.9 hours Voltage output DC±12 V Protection level IP65 Power supply 100 V~240 VAC±10%, 50/60 Hz Installation Wall mounted/Pipeline type/Panel method Dimension 144 mm×144 mm×115 mm (H×W×D) -
Page 7: Wall Mounted Installation Reference Drawing
2.3 Wall mounted installation reference drawing... -
Page 8: Electrode And Protection Tube
2.4 Electrode and protection tube 2.4.1 Electrode cable line and wiring method 1. The central axis of outer layer transparent conductive rubber layer and the metal net layer, the line must be stripped of the conductive rubber layer, and a metal mesh layer rolled wire. 2. - Page 9 Pass cables and electrodes through the protective tube and into the junction box. (main purpose: to prevent electrode line from contacting liquid)
- Page 10 Glass body sensor method: The sensor (glass) sheathed rubber holder, a glass electrode is about 5cm, then PVC and sleeve screwed on the protection tube. Plastic body sensor method: Black (plastic) need to add a small amount of electrode rib tape, can be directly screwed on the protection tube.
-
Page 11: 三. Electrode And Electrical Wiring
三. Electrode and electrical wiring 3.1 Wiring diagram 1 2 3 1 2 3 10 11 10 11 10 11 10 11 12 13 12 13 12 13 12 13 14 15 16 14 15 16 17 18 19 17 18 19 L NC N L NC N REL2... -
Page 12: Back Contact Function
3.2 Back contact function POWER POWER GLASS GLASS RS485 RS485 RS485 D+(B) D+(B) D+(B) D-(A) D-(A) D-(A) 4/20mA 4/20mA INPUT INPUT POWER POWER 4/20mA 4/20mA ±12V ±12V 3.3 Terminal wiring instructions 1 2 3 10 11 12 13 14 15 16 17 18 19 20 L NC N REL2 REL1... - Page 13 10: Channel 2 current output positive terminal 11: Channel 2 current output negative terminal 12: Channel 1 current output positive terminal 13: Channel 1 current output negative terminal 14: T/P: PT1000 Temperature resistance interface 1 15: T/P: PT1000 Temperature resistance interface 2 16: NC: no need 17:Glass channel 1 PH/ORP electrode transparent interface positive end...
-
Page 15: 四. Panel Introduction
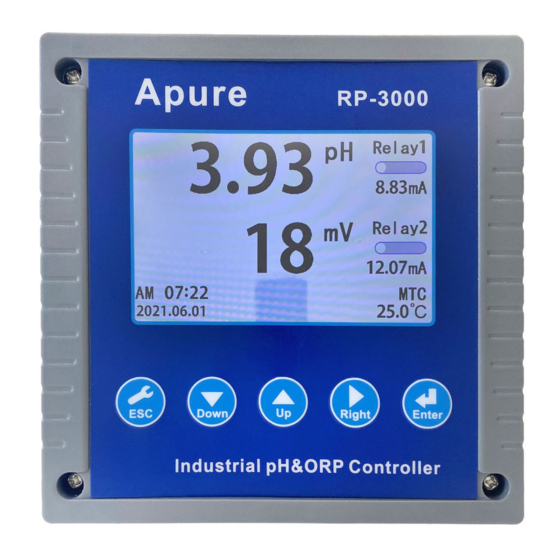
四. Panel introduction 4.1 Panel introduction Apure Apure Apure Apure RP-3000 RP-3000 RP-3000 RP-3000 1000 1000 1000 1000 Relay1 Relay1 Relay1 Relay1 16.00mA 16.00mA 16.00mA 16.00mA 7.00 7.00 7.00 7.00 Relay2 Relay2 Relay2 Relay2 12.00mA 12.00mA 12.00mA 12.00mA AM 12:00... -
Page 16: Display Screen Description
Down Down Down In the measurement mode, the historical alarm information is viewed, and the switching of the menu and the adjustment of the numerical value are provided at the interface Switching and numerical adjustment for menu at home interface Right Right Set the interface to the next layer menu... -
Page 17: Measuring
五. Operation 5.1 Measuring Confirm that all wiring has been completed and correct, the instrument is powered up, automatic access to the original factory preset or final set of measurement mode, start monitoring. 1000 1000 Relay1 Relay1 16.00mA 16.00mA 7.00 7.00 Relay2 Relay2... - Page 18 六. Setting Serial Menu name Menu introduction Set the language (Chinese or English) Language Set the password Password Channel Set system channel 1 measurement mode measurement mode Channel Set system channel 2 measurement mode measurement mode Correcting for system channel 1 corresponding Channel measurement mode correction...
-
Page 19: Enter Parameter Setting Mode
settings Restore factory settings Reset 6.1 Enter parameter setting mode In the measurement interface, press key to enter the password Down Down Down verification interface. Press adjust to the correct Enter Enter password and press the key to enter the setting interface. Factory original password is 0000. -
Page 20: Language Setting Mode
6.2 Language setting mode Down Down Down In the measurement interface, press adjust to language Enter Enter setting mode. Press key to enter the setting interface. Press Enter Enter Down Down Down adjust to the need language, then press key to ensure. -
Page 21: Password Setting Mode
6.3 Password setting mode Down Down Down In the measurement interface, press adjust to password Enter Enter setting mode. Press key to enter the setting interface. Press Enter Enter Down Down Down adjust to the need password, then press to ensure. Factory original password is 0000. Specific process as shown below: 设置... -
Page 22: Electrode Type Setting Mode
6.4 Electrode type setting mode Down Down Down In the measurement interface, press adjust to Enter Enter measurement mode. Press key to enter the setting interface. Down Down Down Press adjust to the corresponding electrode options, Enter Enter then press key to ensure. -
Page 23: Calibration Setting Mode
6.5 Calibration setting mode The interface of the system is divided into pH and ORP according to the different types of electrodes. PH automatic correction, the users can select 4.00-7.00, 7.00-10.00, 4.01-6.86, 6.86-9.86, four types two-point correction mode and 4.00-7.00-10.00, 4.01-6.86-9.18, and two types three point correction mode. - Page 24 Three point correction mode: 设置 设置 设置 语言-Language 语言-Language 语言-Language 密码 密码 密码 按ESC键-输入密码-通道1 按ESC键-输入密码-通道1 通道1测量模式 通道1测量模式 通道1测量模式 校正 校正 通道2测量模式 通道2测量模式 通道2测量模式 通道1校正 通道1校正 通道1校正 通道2校正 通道2校正 通道2校正 Enter Enter Enter 通道1pH校正模式 通道1pH校正模式 校正点数 校正点数 校正点数 校正类型以 校正类型以 4.00-7.00-10.00 pH 4.00-7.00-10.00 pH 4.00-7.00-10.00 pH Enter...
- Page 25 In the process of ORP correction, the green is adjusted by the user, the black value is adjusted. The users can adjust the offset by Down Down Down so that the adjusted value is consistent with the ORP standard liquid value. The correction interface as shown below: ORP calibration: 设置...
-
Page 26: Temperature Setting Mode
6.6 Temperature setting mode Down Down Down In the setup interface, press key to adjust to Enter Enter temperature setting options. Press key to enter the setting menu. The system displays the MTC and ATC display interfaces depending on the selected temperature compensation mode. - Page 27 设置 设置 设置 温度 温度 温度 电流校正 电流校正 电流校正 通道1电流 通道1电流 通道1电流 通道2电流 通道2电流 通道2电流 继电器1 继电器1 继电器1 继电器2 继电器2 继电器2 Enter Enter Enter 温度设置 温度设置 温度设置 温度设置 自动 自动 自动 自动 手动 手动 手动 手动 手动 37.6 37.6 37.6 37.6 37.6 37.6...
-
Page 28: Relay Setting Mode
6.7 Relay setting mode Down Down Down In the setting interface, press key to adjust to relay Enter Enter setting option. Press key to enter the relay setting menu. Through the operation of the above process once completed the relay switch, relay operating mode setting. -
Page 29: Current Output Setting Mode
6.8 Current output setting mode Down Down Down In the setting interface, press key to adjust to current Enter Enter setting option. Press key to enter the setting menu. The system displays the ORP and PH display interfaces according to the selected electrode. - Page 30 Enter Enter press key to finish the corresponding current output setting. Specific process as shown below: 设置 设置 设置 设置 温度 温度 温度 温度 电流校正 电流校正 电流校正 电流校正 通道1电流 通道1电流 通道1电流 通道1电流 通道2电流 通道2电流 通道2电流 通道2电流 继电器1 继电器1 继电器1 继电器1 继电器2 继电器2 继电器2...
-
Page 31: Real Time Clock Setting Mode
6.9 Real time clock setting mode Down Down Down In the setting interface, press key to adjust to the clock Enter Enter option, press key to enter the setting menu. Down Down Down Press key and right key to adjust to the required setting Enter Enter and press... - Page 32 设置 设置 设置 设置 时钟 时钟 时钟 时钟 背光 背光 背光 背光 通讯设置 通讯设置 通讯设置 通讯设置 恢复出厂 恢复出厂 恢复出厂 恢复出厂 Down Down Down Down Enter Enter Enter 上下键调节数值 上下键调节数值 上下键调节数值 时钟 时钟 时钟 时钟 . 01.01 . 01.01 . 01.01 01.01 01.01 2017...
-
Page 33: Backlight Setting Mode
6.10 Backlight setting mode Down Down Down In the setting interface, press key to adjust to the Enter Enter backlight option, press key to enter the setting menu. Down Down Down In the backlight interface, press key to adjust the delay time, high brightness setting and low brightness setting corresponding Enter Enter... - Page 34 设置 设置 设置 设置 时钟 时钟 时钟 时钟 背光 背光 背光 背光 通讯设置 通讯设置 通讯设置 通讯设置 恢复出厂 恢复出厂 恢复出厂 恢复出厂 Down Down Down Down Enter Enter Enter 上下键调节数值 上下键调节数值 上下键调节数值 上下键调节数值 背光 背光 背光 背光 背光 延时时间 延时时间 延时时间 延时时间 延时时间...
-
Page 35: Communication Setting Mode
6.11 Communication setting mode Down Down Down In the setting interface, press key to adjust to the Enter Enter communication option, press key to enter the setting menu. Down Down Down In the confirmation interface, press key to adjust to Enter Enter select the communication address and baud rate, press... - Page 36 设置 设置 设置 设置 时钟 时钟 时钟 时钟 背光 背光 背光 背光 通讯设置 通讯设置 通讯设置 通讯设置 恢复出厂 恢复出厂 恢复出厂 恢复出厂 Enter Enter Enter 通讯设置 通讯设置 通讯设置 通讯设置 通讯设置 地址 地址 地址 地址 地址 波特率 波特率 波特率 波特率 波特率 波特率 1 1 1 4800 4800 4800...
-
Page 37: Restore Factory Settings
6.12 Restore factory settings Down Down Down In the setting interface, press key to adjust to the restore Enter Enter factory option, press key to enter the setting menu. Down Down Down In the confirmation interface, press key to adjust to Enter Enter select cancel or restore the factory, press... - Page 38 设置 设置 设置 设置 设置 设置 设置 设置 时钟 时钟 时钟 时钟 时钟 时钟 时钟 时钟 背光 背光 背光 背光 背光 背光 背光 背光 恢复出厂 恢复出厂 恢复出厂 恢复出厂 恢复出厂 恢复出厂 Enter Enter Enter 恢复出厂 恢复出厂 恢复出厂 恢复出厂 恢复出厂 恢复出厂 恢复出厂 恢复出厂...
-
Page 39: 七. Default Factory Settings
七. Default factory settings Menu Setting range Factory default Electrode type PH/ORP/Antimony Temperature Manual/Auto Manual compensation 0 ~ 100 ℃ 25 ℃ pH: 0.00 ~ 14.00 pH pH: 12.00 pH High reported trigger value ORP:- 1999 ~ + 1999 mV ORP:+ 900 mV pH: 0.00~14.00 pH pH: 1.00 pH... - Page 40 八. Maintain The transmitter in the normal circumstances, do not need to do any maintenance, the only electrode need regular cleaning and correction, to ensure that accurate and stable measurement of the value and maintain the normal system. The cleaning cycle electrode to the degree of pollution in a sample of water and, in general, the best can regularly every week cleaning and maintenance time: the following table for different types of pollution, the cleaning liquid used to introduce commentary, provided as a reference for...
- Page 41 least once a week. Or in accordance with the electrode operation instructions and original factory recommended cleaning the electrode. Schedule 1 Address Factory Address Description Type Range Instruction Correspondence (HEX) Default 0x32 LO alarm READ Set valid 1 trigger 0x33 HI alarm READ Set valid...
- Page 42 Address Factory Address Description Type Range Instruction Correspondence (HEX) Default 0x66 Device address READ 1-255 1:1 0x67 Baud rate READ 1:1 0x68 Instrument model READ RP1500 ASCii 0x69 ph/orp-MA high alarm READ ASCii ℃-MA low alarm 0x6A READ ASCii 0x6B System language READ/WRITE 1:1...
- Page 43 Relay 2 PH high trigger 0X80 READ/WRITE 0—1400 1000 100:1 value Relay 2 PH low trigger 0X81 READ/WRITE 0—1400 100:1 value Relay 2 ORP high 0X82 READ/WRITE -2000—+2000 1000 1:1 trigger value Relay 2 ORP low 0X83 READ/WRITE -2000—+2000 -1000 1:1 trigger value Relay 2 PH hysteresis...
- Page 44 ℃-4MA 0X8B corresponding READ/WRITE 0℃ 10:1 value Backlight delay 0X8C READ/WRITE 10-60 1:1 time Backlight high 0X8D brightness READ/WRITE 10-99 100:1 percentage Backlight low 0X8E READ/WRITE 10-99 100:1 brightness percent 0X8F 0X90 Measured channel 0X91 READ 1:1 number Determined 0X92 READ "...
- Page 45 measurement patterns Determined Channel 2 100:1 0X99 READ measuring values measurement or 1:1 patterns 0X9A Temperature value READ -100—+100 10:1 Channel 1 ORP 0X9B READ/WRITE -2000—2000 1:1 correction value Channel 2 ORP 0X9C READ/WRITE -2000—2000 1:1 correction value Channel 1 PH 0X9D READ/WRITE 0-1400...
- Page 46 Function code 01H response format Instruction Number of Type Example bits Slave address In response to discrete values, if Function code the read is not a multiple of 8, the Byte count remaining bits are replaced by 0. Data Discrete area N bytes quantity...
- Page 47 Function code 05H send format Instruction Type Number of bits Example Slave address Function code The function writes a discrete Start 003AH amount to the remote device. address Data area Discrete FF00H quantity CRC check AC37H Function code 05H response format Instruction Number of Type...
- Page 48 Function code 06H response format Instruction Number of Type Example bits Slave address Function code The normal response format is a Start copy of the request. 008CH address Data area Register 003CH value CRC check 4830H Exception response format Instruction Number of Type Example...
Need help?
Do you have a question about the RP-3000 and is the answer not in the manual?
Questions and answers