Table of Contents
Advertisement
Quick Links
Advertisement
Table of Contents

Related Manuals for Milieu Labs Milieu Climate


Summary of Contents for Milieu Labs Milieu Climate
- Page 2 Welcome to...
- Page 3 HUMIDITY MOTION TEMPERATURE SOUND Let’s design your environment. AIR QUALITY PRESSURE LIGHTING...
- Page 4 Congratulations on choosing Milieu!
- Page 5 The Milieu Climate is more than just a smart ® thermostat. It allows you to design your environment by controlling the room temperature and monitoring air quality, humidity, pressure, sound, lighting and motion. With its built-in sensors and practical portability, you can maximise your comfort and your energy savings all in one step.
-
Page 6: Table Of Contents
Contents. What can Milieu Climate do? What’s in the box? Hub — getting to know the features. What your wire connections mean. App — control from anywhere. Cable labels. Safety information. Other things you might need. System compatibility. Where to install? - Page 7 Distance between Hub and Smart Base. Using a spare wire for the “C” wire. Have an Adapter Kit? No “C” wire or spare wire. Let’s get started! Troubleshooting. Do you have a “C” wire? Need more help? Use your existing “C” wire. Warranty.
-
Page 8: What Can Milieu Climate Do
AIR QUALITY PRESSURE Monitor the health of your home and Identify pressure levels in your home and detect if the air quality in a room surroundings with the Milieu Climate’s ® is poor, fair, good or great. barometric sensor. - Page 9 Apple or Android mobile app. Use voice control with MOTION Google Assistant or Amazon Alexa. Improve energy efficiency with the Milieu Climate’s motion sensors. It detects ® if someone is in the room or not and adjusts the temperature accordingly.
-
Page 10: Hub - Getting To Know The Features
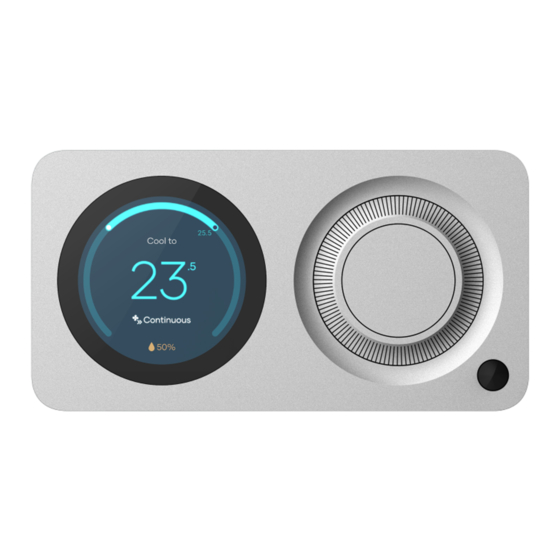
Hub — getting to know the features. → Thread Smart Base Button → — Move through AC modes — Select and start Pairing mode — Select and start Override mode LED to display status White is off Purple is auto heat/cool Blue is cooling Green is fan Red is heating... - Page 11 Colour screen to display status Thread Wi-Fi Dual to navigate menu → Air quality sensor → Speaker → Sound sensor Time of flight sensor → Light sensor → → Button for selection → Pressure sensor → Temperature/Humidity → Occupancy sensor Accelerometer to orientate screen...
-
Page 12: App - Control From Anywhere
App — control from anywhere. The Milieu app allows you to control your environment at any time, from anywhere. With the app you can manage multiple hubs, and multiple locations. Hubs can be grouped together under properties, and you can switch between Hub for easy control of all of your climate systems in one place. - Page 13 Key features. Climate Control Environmental Display Advanced schedule allows you to program The climate control gives The environmental the Hub to automatically you complete control of display shows real-time set the system mode, your system. sensor readings. fan option, and Timers and Schedules Change operating temperature at specific...
-
Page 14: Safety Information
Safety information. WARNING Please read the safety information carefully before installing the air conditioning equipment and be sure to install it correctly. Improper installation may result in electric shocks or fire. WARNING: RISK OF ELECTRIC SHOCK If you come across mains voltage wiring, professional installation required. Always perform installation work with the power shut-off. - Page 15 Follow the relevant local and national codes and regulations when installing the thermostat. Use a qualified installer, if required, for working on high voltage. Make sure connections are properly secured and wiring is as per local codes. Use only with compatible systems. Use with incompatible systems can cause damage to the thermostat and fire.
-
Page 16: System Compatibility
Follow this guide if you have a 24VAC (non-communicating) system. If you have a communicating system, follow the “Installation Guide” available in the Adapter Kit. Milieu Climate works with 24VAC heating and cooling systems including gas, ® electric, oil systems, add-on cooling systems and heat pumps (forced air) with/without auxiliary and emergency heating. - Page 17 + Power: 1 and 2 transformers (heating and cooling transformers) *These systems may work with the addition of a 240v to 24v relay. See website or contact Milieu Labs + Systems with and without C wire (use Power Base) for more detail.
-
Page 18: What's In The Box
What’s in the box? Trim Plate Smart Base Smart Base Cover Power Base Power Base Cover... - Page 19 USB-C Cable Solid Core Wires Wire Connectors Mounting Screws Wall Anchor Security Screw...
-
Page 20: What Your Wire Connections Mean
What your wire connections mean. 485 Data + 485 Data - Fan relay Second stage cooling (conventional) Second stage heating/cooling (heat pump) First stage cooling (conventional) First stage heating/cooling (heat pump) Future use for accessories/options 24VAC power (always required) - Page 21 Second stage heating (conventional) Aux heating (heat pump) First stage heating (conventional) 24VAC common (always required) Heat pump reversing valve O setting — on during cooling B setting — on during heating 24VAC heat transformer Only used when there are two transformers...
-
Page 22: Cable Labels
Cable labels. | AUX | AUX... - Page 23 | AUX | AUX...
- Page 24 Other things you might need.
-
Page 25: Other Things You Might Need
Other things you might need. Drill Parallel Pliers Wire Strippers Screwdriver Pencil... -
Page 26: Where To Install
Where to install? If this is a new installation, select a location with good air circulation. Do not install near doors, windows or areas with high draught. Do not install in direct sunlight. If you are replacing an existing thermostat you may want to select a new location. You can use the Power Base to install the thermostat at a new location, still using the old location and wiring for the Smart Base. - Page 27 If you are installing at the The Hub can be installed vertically or horizontally. same location as your The screen will automatically rotate. old thermostat, you can reuse existing wiring. You may need to run new wiring depending on the type of install you had.
- Page 28 Distance between Hub and Smart Base. To ensure there is a good wireless connection between the Hub and the Smart Base, make sure the distance between the two is not more than 15m. The presence of walls and objects can affect the performance of the connection between the devices.
- Page 29 Distance between smart base. SMART BASE WITH COVER 15m maximum for best wireless connection WALL PLUG (Not provided)
- Page 30 Have an Adapter Kit? If so, please follow the instructions in your Adapter Kit instead. Otherwise → Adapter Kits are not required for 24VAC systems.
- Page 31 Let’s get started! Please follow these instructions to install your new Milieu Climate ® Smart Thermostat.
- Page 32 Switch off power. For safety and security please switch off the power to your air conditioner system. This can be done through the master switch on your HVAC system or your circuit breaker box.
- Page 33 Remove old cover. Remove the cover off your old thermostat. Keep the wires connected for now. Some covers will pop off while others might require you to unscrew them. Please refer to the instructions for your old thermostat.
- Page 34 Do you have a “C” wire? Please check if you have a “C” wire connected. Your new thermostat will need one. This should be labeled RC RH G Y W RC RH G Y W “C” on the wire terminals and is typically a blue or Yes, I have a “C”...
- Page 35 G Y W RC RH G Y W RC RH G Y W RC RH G Y W RC RH G Y W RC RH G Y W No “C” wire, but I have a spare wire. No “C” wire and no spare wire. Go to page 45 Go to page 59...
- Page 37 Use your existing “C” wire. Please follow these instructions for using your existing “C” wire with your new thermostat.
- Page 38 Your wire connections. Take a picture of the wire connections on your old thermostat. Use this for reference when you reconnect the wires to your new thermostat.
- Page 39 Label wires. With the wires still connected, use the labels provided on page 16 to label the wires on your old thermostat. If you have jumper wires connected, don’t worry about RC RH G Y W C them as they won’t be needed. These labels will be useful for reference when reconnecting Jumper wires...
- Page 40 Remove old thermostat. Disconnect the wires and remove your old thermostat base from the wall. Again, don’t worry about the jumper wires. Remove them along with the old thermostat.
- Page 41 Prepare to install your Smart Base. Use the Smart Base to mark positions for screws on the wall. You can use a bubble level to make sure Smart Base is level. Depending on your wall material, a drill might be needed to secure your wall anchors.
- Page 42 Using the Trim Plate? You might want to use the Trim Plate to cover up the holes in your wall from the old thermostat. If so, place it on the wall first and screw the Smart Base over the top of the Trim Plate.
- Page 43 Screw in your Smart Base. Bring the wires through the centre opening in the Smart Base and attach the Smart Base to the wall using the supplied screws. Again, depending on your wall material you may want to use the supplied wall anchors as well.
- Page 44 Connect wires. Connect the wires to the Smart Base terminals, matching them with the labeled wires. NOTE: The Smart Base has magnets so it might pull your metal tools towards it – that’s normal.
- Page 45 Bulging wires? Wires should Carefully push any excess, not stick out bulging wires back through the hole so that they are not sticking out past the Smart Base. NOTE: The Hub will be placed over the Smart Base. Any wires sticking out might prevent the Hub from powering up.
- Page 46 Attach the Hub. Place the Hub on the Smart Base. This can be placed with the screen on the left or on the right; as you like. The Hub will magnetically attach to the Smart Base. If needed, you can also secure the Hub with the supplied security screw.
- Page 47 Switch the power back on. You can now switch the power back on to your HVAC system. This can be done through the master switch on your HVAC system or your circuit breaker box.
- Page 48 Power on! Congratulations! You just installed your new Milieu Climate ® Smart Thermostat. Press and hold the front button to power the unit on. Please follow the on-screen instructions to set up your device.
- Page 51 Using a spare wire for the “C” wire. Please follow these instructions for using use your spare wire as a “C” wire for your new thermostat.
- Page 52 Label wires. Use the sticky labels provided on page 16 to label your spare wire as the “C” wire. Label the other wires as they are connected on your old thermostat. RC RH G Y W C If you have jumper wires connected, don’t worry about them as they won’t be needed.
- Page 53 Remove your old thermostat. Disconnect the wires and remove your old thermostat base from the wall. Again, don’t worry about the jumper wires. Remove them along with the old thermostat.
- Page 54 Prepare to install your Smart Base. Use the Smart Base to mark positions for screws, on the wall. You can use a bubble level to make sure Smart Base is level. Depending on your wall material, a drill might be needed to secure your wall anchors.
- Page 55 Using the Trim Plate? You might want to use the Trim Plate to cover up the holes in your wall from the old thermostat. If so, place it on the wall first and screw the Smart Base over the top of the Trim Plate.
- Page 56 Screw in your Smart Base. Bring the wires through the centre opening in the Smart Base and attach the Smart Base to the wall using the supplied screws. Again, depending on your wall material you may want to use the supplied wall anchors as well.
- Page 57 Connect wires. Connect the wires to the Smart Base terminals, matching them with the labeled wires. NOTE: The Smart Base has magnets so it might pull your metal tools towards it – that’s normal.
- Page 58 Bulging wires? Wires should Carefully push any not stick out bulging, excess wires back through the hole so that they are not sticking out past the Smart Base. NOTE: The Hub will be placed over the Smart Base. Any wires sticking out might prevent the Hub from powering up.
- Page 59 Attach the Hub. Place the Hub on the Smart Base. This can be placed with the screen on the left or on the right; as you like. The Hub will be magnetically attached to the Smart Base. If needed you can also secure the Hub with the supplied security screw.
- Page 60 Go to your AC indoor unit. Go to your indoor air conditioner unit and open the access panel to the electronics board.
- Page 61 Connection of spare wire. Locate the spare wire that was used for the “C” wire connection to your Smart Base. Connect it to the “C” terminal on the indoor unit board. Close the door panel when finished.
- Page 62 Switch the power back on. You can now switch the power back on to your HVAC system. This can be done through the master switch on your HVAC system or you circuit breaker box.
- Page 63 Power on! Congratulations! You just installed your new Milieu Climate ® Smart Thermostat. Press and hold the front button to power the unit on. Please follow the on-screen instructions to set up your device.
- Page 65 No “C” wire or spare wire. We will need to re-purpose wires in order to get power, and control of your air conditioner.
- Page 66 Re-label wires. With the wires still connected, select any 2 wires and use the sticky labels provided on page 16 to label them as “R” and “C”. TIP: If you have an “R” RC RH G Y W wire you should simply label this as “R”.
- Page 67 Your wire connections. Take a picture of your wire connections with your labels on your old thermostat. It will be important to know what wires you labeled “R” and “C”. Write them below. RC RH G RC RH G Y W My R label wire is connected to: My C label wire is connected to:...
- Page 68 Remove old thermostat. Disconnect the wires and remove your old thermostat base from the wall. Don’t worry about any jumper wires connected. Remove them along with the old thermostat. Jumper wires not needed...
- Page 69 Prepare to install your Power Base. Use the Power Base to mark positions for screws, on the wall. You can use a bubble level to make sure Power Base is level. Depending on your wall material, a drill might be needed to secure your wall anchors.
- Page 70 Using the Trim Plate? You might want to use the Trim Plate in order to cover up holes in your wall from the old thermostat. If so, place it on the wall first and screw the Power Base over the top of the Trim Plate.
- Page 71 Screw in your Power Base. Bring the 2 labeled wires through the centre opening in the Power Base and attach the Power Base to the wall using the supplied screws. Again, depending on your wall material you may want to use the supplied wall Make sure unused wires are capped/terminated anchors as well.
- Page 72 Connect wires. Connect the R and C labeled wires to the “R” and “C” sockets in the Power Base. All other wires can be pushed back into the wall. You do not need them. NOTE: The Smart Base has magnets so it might pull your metal tools towards it –...
- Page 73 Bulging wires? Wires should Carefully push any excess, not stick out bulging wires back through the hole so that they are not sticking out past the Power Base. NOTE: The Hub will be placed over the Power Base. Any wires sticking out might prevent the Hub from powering up.
- Page 74 Go to your AC indoor unit. Go to your indoor air conditioner unit and open the access panel to the electronics board.
- Page 75 Repurpose wires. Locate where your wire connections are. Open the photo or check your notes to see which wires you labeled “R” and “C”. If needed you will have to reconnect those wires to the Example showing “R” and “C” terminals on your user moving “W”...
- Page 76 Prepare to install your Smart Base. Select a location to install your Smart Base. This should be relatively close to your indoor unit as you will need to connect wires to it. A wood or plasterboard panel where you have access to the back for wiring is one suggestion.
- Page 77 Mark your drill holes. Using your Smart Base as a template, mark out the following holes: → 2 x holes on the corners for the screw locations. → 1 x hole in the centre for the cabling to come through.
- Page 78 Screw in your Smart Base. Screw the Smart Base in place using the supplied screws. Again, depending on the material your screwing the Smart Base to, you may want to use the supplied wall anchors as well.
- Page 79 Wire Smart Base to indoor unit. We will now wire up connections from your indoor unit to the Smart Base. You will need several spare wires long enough to connect the Smart Base to the indoor unit terminals. Please see the next page for a detailed wiring diagram.
- Page 80 Heat/cool conventional system. POWER BASE SMART BASE Installed on your wall Installed near AC INDOOR UNIT where your Hub will go. your indoor unit.
- Page 81 Heat pump system Heat pump system. OB C OB C POWER BASE SMART BASE Installed on your wall Installed near AC INDOOR UNIT where your Hub will go. your indoor unit.
- Page 82 Gas system Gas system. R G W C RC G W POWER BASE SMART BASE Installed on your wall Installed near AC INDOOR UNIT where your Hub will go. your indoor unit.
- Page 83 Attach the Smart Base Cover. Once you have finished wiring make sure any bulging wires are carefully pushed back through the hole so that they are not sticking out past the Smart Base. You can now place the cover onto the Smart Base. You can also close the panel door for your indoor unit.
- Page 84 Switch the power back on You can now switch the power back on to your HVAC system. This can be done through the master switch on your HVAC system or you circuit breaker box.
- Page 85 Attach the Hub. Place the Hub on the Power Base. This can be placed with the screen on the left or on the right; as you like. The Hub will be magnetically attached to the Power Base. If needed you can also secure the Hub with the supplied security screw.
- Page 86 Power on! Congratulations! You just installed your new Milieu Climate ® Smart Thermostat. Press and hold the front button to power the unit on. Please follow the on-screen instructions to set up your device.
- Page 88 Troubleshooting. Reboot the Hub and Hub does not power up Air con does not start Smart Base in the selected mode a. Check the Smart Base LED is on a. Hub – press and hold a. Check Smart Base LED is button for 10 seconds the correct colour for the b.
- Page 89 Mobile IOS and c. If modes do not sync → Go to Settings > Wi-Fi between Hub and and check you are Android App Smart Base: connected to your router a. If your app says, property or go to Settings > →...
- Page 90 Need more help?
- Page 91 Visit milieulabs.com.au/support Email support@milieulabs.com.au Call +61 2 9659 7438...
- Page 92 “You”, the purchaser of the as updated from time to time parts (not labour) for a period of (the Terms). A copy of our Terms newly manufactured Milieu Climate ® 2 years from the date of purchase and Conditions may be found here: Smart Thermostat (the Product), (Warranty Period).
- Page 93 Statutory Guarantees You can find more information Milieu Labs will repair or replace ® about the Australian Consumer Law the defective parts of the Product, Milieu Labs goods come with ® on the ACCC website: accc.gov.au or the Product itself, with new or guarantees that cannot be excluded (see under “For Consumers”...
- Page 94 ® If the Product is under Warranty, for predefined solutions, before You hereby agree to transfer the contacting the customer service. ownership of replaced defective parts and such parts shall automatically become the property of Milieu Labs ®...
- Page 95 Product. manufacture date of the Product → If the problem is not solved Milieu Labs shall have no ® as recorded by Milieu Labs ® remotely, Milieu Labs will ® liability for the loss, damage or will be deemed to be the date...
- Page 96 → damage to the Product caused components or accessories by war, terrorism, fire, accident, limited Warranty has been altered, cancelled natural disaster, intentional Milieu Labs does not warrant ® or removed; or accidental misuse, abuse, uninterrupted or error-free operation neglect or improper maintenance, →...
- Page 97 ® and to the maximum extent stored on or used with the Product. check the validity of Your Warranty permitted by law, Milieu Labs ® The foregoing limitation shall not and Your request for Warranty service. not responsible for direct, special,...
- Page 98 You to return the Product. the invoice. In the event that You returned the To return the Product, You can do one Product to the Milieu Labs Repair of the following things: ® Making a Warranty Claim...
- Page 99 ® back to You at our own cost. You will accessible by mail carriers. For more → providing a copy to Milieu Labs ® need to provide us with Your contact information please contact our team Service Centre staff if You return details so that we can return the on +61 2 9659 7438.
- Page 101 is a product designed by in Sydney, Australia. ® ® © Copyright . All rights reserved. ® JULY 2021 / MCUG100-2...
- Page 102 milieulabs.com.au...
Need help?
Do you have a question about the Milieu Climate and is the answer not in the manual?
Questions and answers