Advertisement
Available languages
Available languages
Quick Links
by elecgator
1
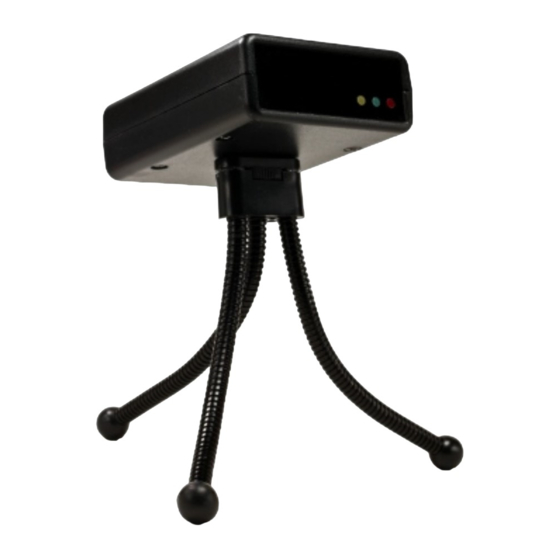
Screw the Vmarker sensor II on the
included mini tripod or ceiling mount at a
distance of about 1.5x the width of the
projected image.
Point the Vmarker sensor II
with the front (the side of
the LEDs) to the projection
surface.
2
Connect the Vmarker sensor II with the
supplied USB cable to a free USB port of
your computer and wait until the red LED
on the sensor is continuously lit.
3
Switch on the Vmarker pen II, with the
on / off switch: the position nearest to the
tip is on. Give the pen several seconds to
initialize.
left mouse button
on
off
left mouse button
right mouse button
(GYRO)
(GYRO)
VMARKER II QUICK START GUIDE
4
Download vmarkerUtility from the web:
http://www.vmarker.org/en/downloads
Unzip the files from the compressed folder
on your hard disk or USB stick. Go to the
location of the files and start vmarkerUtility
5
Click Sensor alignment to help you with
the alignment of the sensor.
1
Select the mounting: tripod or ceiling.
1
2
2
Point to the center mark
with an IR-pen
(with tip-switch or button)
Turn the sensor according to the arrows, until
everything is green.
6
Use Calibrate sensor to calibrate the
sensor. Mark the point of the red arrow with
an IR-pen (with tip-switch or button)...
until all arrows are green.
√
You can now close the application.
Use the buttons on the side of the Vmarker
pen or the tip-switch to control the
computer from the screen.
Default button functions:
tip switch = left mouse button
on
off
left mouse button
right mouse button
(GYRO)
(GYRO)
√
The button-actions are also active from a distance.
With the 2nd action of the buttons the GYRO is
activated and the 'movement' of the pen is translated
into movement of the cursor.
√
Advertisement

Summary of Contents for elecgator VMARKER sensor II
- Page 1 USB stick. Go to the location of the files and start vmarkerUtility Screw the Vmarker sensor II on the included mini tripod or ceiling mount at a distance of about 1.5x the width of the projected image.
- Page 2 Pak het ZIP-bestand uit op je harde-schijf drukknop) of USB-stick. Ga naar de locatie waar je de bestanden geplaatst hebt, en start Schroef de Vmarker sensor II op het mini- vmarkerUtility statief of de plafondbeugel op een afstand van ca1.5x de breedte van het geprojecteerde beeld.
- Page 3 Visez le capteur Vmarker II à votre mini l’utilitaire VMarker. trépied ou au support plafond, aux distance 1.5x le largeur du image projectée. Dirigez le Vmarker Sensor II en direction de la surface de projection. Jusqu'à ce que toutes les √...
Need help?
Do you have a question about the VMARKER sensor II and is the answer not in the manual?
Questions and answers