Table of Contents
Advertisement
Quick Links
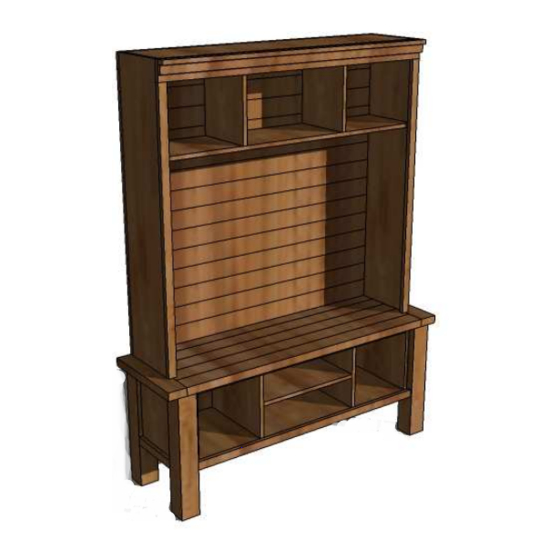
PLANS: Tryde Media Console
Compare to: Pottery Barn Hyde Media Console
Skill Level: Intermediate
Storage Bed Tower
Following the great success of so many readers with the Tryde Collection, inspired by Pottery
Barn's popular Hyde Collection, the Tryde Media console is substantial and rustic, built with
pine, and will be heavy and strong. Plans for the Coffee Table, End Table and Console Table
available at www.knock-offwood.com.
Copyrighted Material
www.knock-offwood.com
See
for full disclaimer
Page 1
Advertisement
Table of Contents

Related Manuals for ANAWHITE Knock-OffWood Tryde Media Console

Summary of Contents for ANAWHITE Knock-OffWood Tryde Media Console
- Page 1 PLANS: Tryde Media Console Compare to: Pottery Barn Hyde Media Console Skill Level: Intermediate Storage Bed Tower Following the great success of so many readers with the Tryde Collection, inspired by Pottery Barn’s popular Hyde Collection, the Tryde Media console is substantial and rustic, built with pine, and will be heavy and strong.
- Page 2 PLANS: Tryde Media Console SHOPPING LIST Quantity Description ¾” Plywood or MDF, cut into strips 15 ½” wide, 8’ long (these will be called 1x16 boards) 1x12, 6’ Long 1x2, 8’ Long 2x4s, 9’ Stud Length 1x3, 8’ Length ½ Sheet of ¼” Plywood 4x4 Post, Untreated (additionally, you could use sandwiched 2x4s, but the dimensions will change slightly) 1x2, 8’...
- Page 3 PLANS: Tryde Media Console IN GENERAL Refer to the blog at www.knock-offwood.com for any comments of suggestions for this plan. Always wear necessary safety equipment and take safety precautions. Check for square after each step. Measure all joints out and mark clearly with a square on BOTH sides of the joint (so you know where to nail).
- Page 4 PLANS: Tryde Media Console STEP 2: BACK Attach the back with 1 ¼” finish nails and glue. Also nail to all of the shelves to add strength to the shelves. TIP: If you drill is large, you may wish to NOT attach the back until after you have attached the leg structure, as a large drill might not be able to squeeze into the cubby.
- Page 5 PLANS: Tryde Media Console STEP 4: LEGS Attach the spacers to the legs as shown above. Use 1 ¼” nails and glue. STEP 5: SIDE PANELS Attach the side panels to the spacers using 1 ¼” nails and glue as shown above. Check for square. Copyrighted Material www.knock-offwood.com for full disclaimer...
- Page 6 PLANS: Tryde Media Console STEP 6: ASSEMBLY Screw the box to the legs as shown above. If you left the back off, attach the back during this step. Use glue and adjust for square. TIP: Turn everything upside down to attach the legs to the box on a level surface.
- Page 7 PLANS: Tryde Media Console STEP 8: TABLETOP BOARDS TIP: Cut your boards to size instead of cutting to the cut list for a perfect fit. Screw the Tabletop boards to the top using 2” screws and glue. TIP: Mark a screw pattern on the ends of the tabletop boards so that the boards look symmetrical and screws look...
Need help?
Do you have a question about the Knock-OffWood Tryde Media Console and is the answer not in the manual?
Questions and answers