Table of Contents
Advertisement
Quick Links
Advertisement
Table of Contents

Summary of Contents for AIMGOOD HF100AB01AAB
- Page 1 Rehabilitation Machine for Limbs OWNER’S MANUAL...
-
Page 2: Table Of Contents
Contents Product functions ......................2 Specification ......................... 3 Considerations ......................4 Installation Instruction ....................5 4.1. Parts List ......................5 4.2. Parts bag ......................5 Installation Steps ......................6 Bandage ........................8 6.1. Fixing the wheelchair with bandage..............8 6.2. -
Page 3: Product Functions
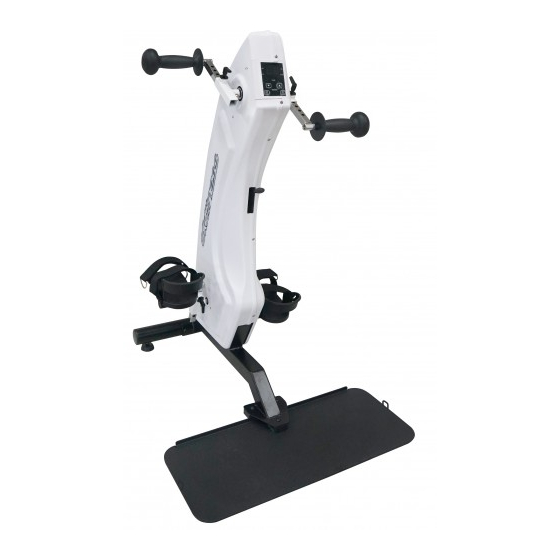
1. Product functions A special physical fitness machine for the old with active exercise and also passive. Small size require little savage space, simple operation let you exercise easily at any time. All of these help you exercise to make longer life expectancy. Safety design for harmless exercise With extensible in hand and foot part for different body shapes. -
Page 4: Specification
2. Specification CONSOLE TIME. SPEED. DISTANCE. CALORIES. LED DISPLAY AUTO.MANU. TURN+. TURN- PRODUCT SPEC HAND FIXING STRAPS LEG FIXING STRAPS WHEELCHAIR FIXING STRAPS LENGTH (HORIZONTAL) 900MM HEIGHT (VERTICAL) ADJUSTABLE (990-1150 MM) TECHNICAL SPECS MOTOR AC230 50/60 HZ (CW,CCW) SPEED LEVEL (PASSIVE EXERCISE) 15 LEVELS FROM 10 RPM TO 25 RPM RESISTANCE LEVEL 1~ 15 (MOTOR-ASSISTED EXERCISE) -
Page 5: Considerations
3. Considerations Notice! Violation of the following matters may cause product damage and endanger personal safety. Before usage, please check the handle and other connection points whether they are fixed and without damage. And periodic inspection is demanded. Check the connection points among rehabilitation machine, handle, etc. regularly to see if they are solid or damaged. -
Page 6: Installation Instruction
4. Installation Instruction 4.1. Parts List ITEM Description Main frame set Front stabilizer Base board set Handrail set (left) Handrail set (right) Pedal board (left) Pedal board (right) 4.2. Parts bag ITEM Description 15mm Opening wrench 5mm x 30mm x 120mm L-shaped hex wrench 2019/11/12 V1.2+V1.0... -
Page 7: Installation Steps
5. Installation Steps Step1 Firstly, take off the screws on the front stabilizer, and then place the front stabilizer tube (B) to the main frame set (A), and lock with the screws taken off before. Step2 Firstly, take off the screws and washers from the base bard set (C) and then install the base bard set (C) to the main frame... - Page 8 Step3 Follow the image, lock the left and right handrail sets (D E ) and the left and right pedal (F ¢ ¢ G) with opening wrench, then fix to the main frame set (A). Attention: when do installation, please distinguish the left (L) and right ( R), just as the figure 3-1 and figure 3-2.
-
Page 9: Bandage
6. Bandage 6.1. Fixing the wheelchair with bandage. STEP 1 STEP 2 The wheelchair is pushed to be As shown in the figure, the wheelchair is fixed on the close to the rehabilitation rehabilitation machine with bandage. machine . 6.2. Fixing hands with bandage. Left and rights hands are fixed on the rehabilitation machine according to the order shown in the above figure,... -
Page 10: Fixed Ways Of Foot Bandages
6.3. Fixed ways of foot bandages First fixed way: used for people who have Second fixed way: used for people who have the habit of splay-foot the habit of pigeon-toed 7. Supporting base and tilting adjustment According to the order in the figure, press the driving lever of the gas spring downward;... -
Page 11: Adjustment Of Extension Handle Bar
8. Adjustment of extension handle bar According to the orders in the figure, Fasten the handle knob in clockwise direction. loosen the handle knob in anti-clockwise direction, and then adjust the extension handle bar to the proper position. 2019/11/12 V1.2+V1.0... -
Page 12: Machine Transportation
9. Machine Transportation it can start to transport the machine after hold the machine well by both hands. tilt the machine to let feet pad off the ground. 10. Operation instruction for computer console 2019/11/12 V1.2+V1.0... -
Page 13: Key Function
10.1. Key function Button instruction Position Button instruction Function description Switch key for Press once to start and press two times to back to the start or stop standby status. Under standby or operation status, switch AUTO or MANU randomly and LED light will change accordingly. If without Switch for setting, the preset is AUTO mode, and when choose automatic or... -
Page 14: Regular Operation
without setting, after pressing, the preset is speed; during operation, press SCAN key again, then the display screen will show the current chosen items. 10.2. Regular operation After turning on the power switch of the recovering machine, enter into the controller wire connection mode, at that time, the beeper will make “beep”... - Page 15 During operation, press the SCAN key manually to choose, and speed time show orderly. After pressing start, the display data is speed screen. After pressing SCAN key again, then the display screen will show the current chosen items. 2019/11/12 V1.2+V1.0...
Need help?
Do you have a question about the HF100AB01AAB and is the answer not in the manual?
Questions and answers