
Summary of Contents for Asnish PJ-168
- Page 1 MODEL NO. : PJ-168 Home Theater Projector with Bluetooth INSTRUCTION MANUAL PLEASE READ BEFORE OPERATING THIS EQUIPMENT...
- Page 2 Important Safety Instructions 1. Read these Instructions. 2. Keep these Instructions. 3. Heed all Warnings. 4. Follow all instructions. 5. Do not use this apparatus near water. 6. Clean only with a dry cloth. 7. Do not block any ventilation openings. Install in accordance with the manufacturer’s instructions.
-
Page 3: Additional Warnings And Precautions
Additional Warnings and Precautions Do not look directly into the projector light. 2. Don’t touch the project lens Mains adapter is used as disconnect device and it should remain readily operable during intended use. In order to disconnect the apparatus from the mains completely, the mains plug should be disconnected from the mains socket outlet completely. -
Page 4: Fcc Warning
FCC Warning Any Changes or modifications not expressly approved by the party responsible for compliance could void the user's authority to operate the equipment. This device complies with Part 15 of the FCC rules. Operation is subject to the following two conditions: (1) this device may not cause harmful interference, and (2) this device must accept any interference received, including interference that may cause undesired operation. -
Page 5: Table Of Contents
Table of Contents Important Safety Instructions - - - - - - - - - - - - - - - - - - - - - - - - - - - P1 Additional Warnings and Precautions - - - - - - - - - - - - - - - - - - - - - P2 FCC Warning - - - - - - - - - - - - - - - - - - - - - - - - - - - - - - - - - - - - - - - - P3 In The Box - - - - - - - - - - - - - - - - - - - - - - - - - - - - - - - - - - - - - - - - - P3 Table of Contents - - - - - - - - - - - - - - - - - - - - - - - - - - - - - - - - - - - - ... -
Page 6: Remove & Close The Lens Cover
Remove & Close The Lens Cover Remove the lens cover before using Close the lens cover when unit is not using Placing of Your Projector Your projector can be installed in four different configurations (see picture below): Front Table: Select this location with the projector placed near the floor in front of the screen. This is the most common way to position the projector for quick setup and portability. -
Page 7: To Reduce Image Distortion
To reduce Image Distortion Move the projector as close to the center of the screen as possible. The light beam from the projector should be perpendicular to the screen for a rectangular or square image. Distance Between The Projector And Screen Measure the distance between the projector and where you want to position the screen. -
Page 8: Adjust The Vertical Location
Adjust The Vertical Location Follow below picture to adjust the vertical location. Adjust The Focus And Keystone Follow below picture to adjust the focus and trapezoidal screen. Adjust the focus by turning the knob while observing the image pixels near the center of the screen. -
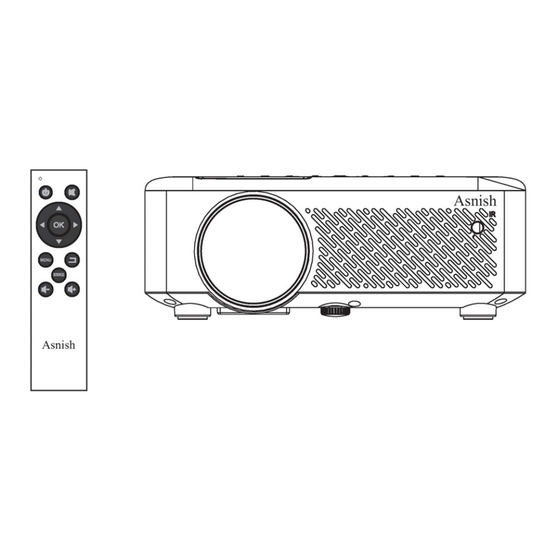
Page 9: Controls Of Remote
Controls of Remote Install / Remove Batteries of Remote Remove the battery compartment cover on the back of your remote by carefully sliding to open. The battery cover can then be lifted away. Fit the correct batteries (included), referring to the polarity markings. -
Page 10: Controls Of Projector
Controls of Projector LENS Button IR Sensor (Front) Buttons ANGEL ADJ. Knob RETURN Button VGA IN Port POWER Button IR Sensor (Rear) POWER Indicator SPEAKER TF Card Slot FOCUS ADJ. Knob Audio Out Jack TRAPEZOIDAL ADJ. Knob AV IN Jack HDMI 1 & 2 Ports SOURCE Button MENU... -
Page 11: Install Power Adapter
Install Power Adapter Follow below picture to connect power adapter Connect small end of adapter FIRST. Plug the adapter body to power outlet. WARNING: Before connecting to the power supply, ensure that the supply corresponds to the information on the rating label at the back of the apparatus. Main Button Operation ... -
Page 12: Connect Hdmi Show The Image On Projector Screen
Connect HDMI Show The Image On Projector Screen Refer to the following picture to connect a set top box, a BD/DVD player or a streaming player to the HDMI input. button to standby mode before connect HDMI cable. Press the After connection, press the button to turn on unit and power indicator will light GREEN Press the / SOURCE button to home screen, use buttons to select... -
Page 13: Connect Vga Show The Image On Projector Screen
Connect VGA Show The Image On Projector Screen Follow below picture to connect VGA cable and device. button to standby mode before connect VGA cable. Press the After connect, press the button to turn on unit and power indicator will light GREEN. In home screen, use buttons to select VGA icon and press the button to enter VGA mode. -
Page 14: Connect Audio Output (Aux Out / Line Out / Earphones)
Connect Audio Output ( Aux Out / Line Out / Earphones) Follow below picture to connect audio cable and device. Press the button to standby of your projector before connection. Use audio cable to connect follow below figure. After connect and turn on both units. Your projector sound from external device now. -
Page 15: Using Tf Card And Usb Playback (Media Player)
Using TF Card And USB Playback (Media Player) Install USB / TF device: 1. Press the button to standby before install USB / TF card. 2. Install the USB device into USB port / Install the TF device into TF slot. 3. After install, press the button to turn on unit and the power indicator light GREEN. -
Page 16: Using Bluetooth Playback
Using Bluetooth Playback Pairing is the term used when two Bluetooth devices are connected wirelessly for the first time. This allows the devices to see each other and sets up a one to one communication channel between both devices. Bluetooth Connection 1. Press the button to turn on unit and power indicator will light GREEN. -
Page 17: Multi-Screen Interactive Connection For Phone And Projector
Multi‐screen interactive connection for phone and projector Wireless Projection First, ensure the projector and the mobile is connected to the same wireless network. Following below steps. Connect local WiFi router 1. Press the button to turn on unit and power indicator will light GREEN. 2. Press the / SOURCE button to select Miracast icon and press button to enter Miracast / Airplay page on the screen. - Page 18 iOS mobile Screen Mirroring Function (no need to connect the WiFi router) 1. Press the / SOURCE button to select Miracast icon and press button to enter Miracast / Airplay page 2. Click the Wi-Fi menu to search, select “Display_XXXX” (XXXX is numbers and letters which show on the Miracast / Airplay page on the screen) on the mobile device and enter Pin “12345678”...
-
Page 19: Using Projector Menu 0
Using Projector Menu 0 Press /MENU button to enter projector menu. This Screen menu showed on right upper of view screen. (Active in VGA mode) buttons to adjust Horizontal Pos. level -16 to 16. buttons to adjust Vertical Pos. level -16 to 16. buttons to adjust Clock digit -30 to 30. -
Page 20: Using Projector Menu 2
Using Projector Menu 2 Press /MENU button to enter projector menu, press buttons to select SOUND menu. This sound menu showed on right upper of view screen. to select different sound effect Standard / Movie / Music / Sports / User. Use to select and adjust Treble and Bass digit if chose User item. -
Page 21: Specifications
Specifications 5.1 (Transmitter) Bluetooth Version Light Source Type Display Native Resolution 1280 x 720 RGB HDMI Input Supported 1080p , 1080i , 720p, 576i , 480p, and 480i Video Resolution. Power Consumption Included Adapter Input AC100-240V,50/60Hz Connect DC input of unit Output DC26V, 2.7A.
Need help?
Do you have a question about the PJ-168 and is the answer not in the manual?
Questions and answers