Advertisement
Quick Links
Advertisement

Subscribe to Our Youtube Channel
Summary of Contents for Heltec Automation HT-M00
- Page 1 Heltec Automation Docs Release V0.0.1 Heltec Oct 20, 2021...
- Page 3 LANGUAGE 1 Nodes 2 Gateways 3 General Docs Contents ..........Contents .
- Page 5 Heltec Automation Docs, Release V0.0.1 This is the documentation for Heltec Automation products. LANGUAGE...
- Page 6 Heltec Automation Docs, Release V0.0.1 LANGUAGE...
- Page 7 CHAPTER NODES CubeCell ESP32+LoRa STM32+LoRa ESP32+Arduino ESP8266+Arduino...
- Page 8 Heltec Automation Docs, Release V0.0.1 Chapter 1. Nodes...
- Page 9 CHAPTER GATEWAYS HT-M00 HT-M01 HT-M01S HT-M02_4G/LTE HT-M02_POE...
- Page 10 Heltec Automation Docs, Release V0.0.1 Chapter 2. Gateways...
- Page 11 CHAPTER THREE GENERAL DOCS General Docs 3.1 Contents Heltec LoRa Gateways 3.1.1 SX130x Module The SX130x LoRa gateway module includes two baseband models, SX1301 and SX1308. Their performance, drivers, interface packaging, and functions are completely the same. The difference is the operating temperature range. SX1301 is positioned as an outdoor type, and SX1308 is positioned as an indoor type.
- Page 12 Heltec Automation Docs, Release V0.0.1 SX130x LoRa Gateway Module Quick Start Summary The SX130x LoRa gateway module includes two baseband models, SX1301 and SX1308. Their performance, drivers, interface packaging, and functions are completely the same. The difference is the operating temperature range. SX1301 is positioned as an outdoor type, and SX1308 is positioned as an indoor type.
- Page 13 Heltec Automation Docs, Release V0.0.1 Electrical characteristics Running SX130x module with SPI mode (Raspberry Pi) The Raspberry Pi SPI bus is disabled by default. Enter the following command in putty to open the Raspberry Pi configuration interface and enable the SPI bus.
- Page 14 Heltec Automation Docs, Release V0.0.1 mkdir lora lora sudo apt-get update sudo apt-get install git git clone https://github.com/Lora-net/lora_gateway.git # LoRa Gateway drivers git clone https://github.com/Lora-net/packet_forwarder.git # packet forwarding software git clone https://github.com/HelTecAutomation/lorasdk.git # This package will create a "lrgateway" service in Raspberry Pi...
- Page 15 Heltec Automation Docs, Release V0.0.1 Confirm Installation Run sudo systemctl status lrgateway in Raspberry Pi, if all goes well, the service is running: 3.1. Contents...
- Page 16 Heltec Automation Docs, Release V0.0.1 Connect to LoRa Server SX130x module working with Raspberry Pi is most similar with HT-M01 gateway with Raspberry Pi in SPI mode. Steps to connect to a LoRa server, please refer to this document: https://heltec-automation-docs.readthedocs.io/en/latest/gateway/ht-m01/connect_to_server.html Relevant Offical Resources •...
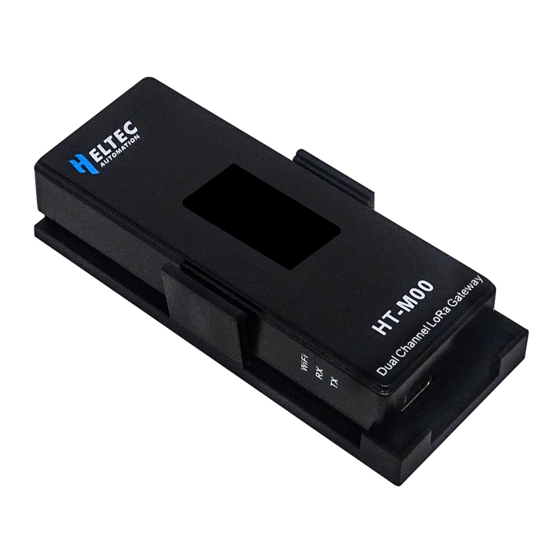
- Page 17 Tip: When using the HT-M00 gateway, using nodes other than the company’s CubeCell series, you need to change the node’s preamble length to 16 (default is 8). If the preamble length is 8, the minimum SF and the maximum SF need to be set equal, otherwise only the minimum SF will be received.
- Page 18 Modify the preamble length in this function to 16 as shown in the figure above. Configure the gateway The HT-M00 gateway has already downloaded the relevant program when it leaves the factory, you can use it with just a few simple operations.
- Page 19 Heltec Automation Docs, Release V0.0.1 • At this time, find the WiFi named “M00_XXXX”, connect to the WiFi with the password “heltec.org”, then enter “192.168.4.1” through the browser, enter the gateway configuration page. 3.1. Contents...
- Page 20 Heltec Automation Docs, Release V0.0.1 Chapter 3. General Docs...
- Page 21 • In the page shown above, configure the WiFi information that HT-M00 needs to connect to, gateway channel frequency, sf, server address and port, time zone, and click “Submit” after the configuration is complete. At the same time, we will put the relevant firmware of HT-M00 on this webpage, and click “Firmware Update” to update accordingly.
- Page 22 “CFG” button. • At this time, find the WiFi named “M00_XXXX”, connect to this WiFi, and enter “192.168.4.1” through the browser, and log in to the gateway configuration page with the user name “HT-M00” and password “heltec.org”. Chapter 3. General Docs...
- Page 23 Heltec Automation Docs, Release V0.0.1 3.1. Contents...
- Page 24 “Submit” after the config- uration is complete. At the same time, we will put the relevant firmware of HT-M00 on this webpage, and click “Firmware Update” to update accordingly.
- Page 25 Heltec Automation Docs, Release V0.0.1 3.1. Contents...
- Page 26 Heltec Automation Docs, Release V0.0.1 • Press the “STA” button to switch the display content. • By pressing the “STA” button, you can switch the display content. You can view information such as time, latest sending and receiving time, gateway ID, server address, channel frequency, etc. For firmware version V2.0 and above, you can see “Local IP”...
- Page 27 LoRa devices. HT-M00 is a dual-channel gateway. To ensure good communication between the node and the gateway, the channel used by the node must correspond to that of the HT-M00 gateway. This document takes CN470 as an example.
- Page 28 Heltec Automation Docs, Release V0.0.1 Channel Frequency CN470 corresponds to a total of 96 channels from 470.3MHz to 489.3MHz. For every 200kHz increase in frequency, the channel code increases by 1, namely: freq=470.3+0.2*NN is the channel coding 0-95 Let’s look at the code: (in the .ino file corresponding to LoRaWAN) Refer to “LoRaWAN”...
- Page 29 7, which is 471.7MHz, When you modify “userChannelsMask[0]=0xFF00”, it means that the channels are changed to 8-15, which are 471.9MHz, 472.1MHz, 472.3MHz. . . 473.3MHz. Instructions for Use The web configuration interface of HT-M00 is as follows. 3.1. Contents...
- Page 30 Heltec Automation Docs, Release V0.0.1 In the configuration interface of HT-M00, the two channel frequencies of the gateway will be configured. We need to make the channel used by the node correspond to these two channels, that is, modify the channel mask in the...
- Page 31 LoRa server, such as TTN, ChirpStack, Heltec Cloud Server, which facilitates secondary development and rapid deployment of LoRa devices. Before all operation, make sure the HT-M00 is runing well . If not, please refer to this HT-M00 Quick Start document. Connect to TTN Register a LoRa gateway in TTN Create and active an account in TTN.
- Page 32 Fill in the HT-M00 information as shown below and complete the addition. • Gateway EUI – The unique ID of HT-M00 gateway, view from the display screen of the HT-M00 or view through the serial port (the gateway ID will be printed through the serial port when the HT-M00 starts);...
- Page 33 Heltec Automation Docs, Release V0.0.1 Connect to TTN Users need config the server address, port and channel in the HT-M00 gateway. The server address, port and channel are configured in the “HT-M00 Config” interface, Please refer to HT-M00 Quick Start document.
- Page 34 Heltec Automation Docs, Release V0.0.1 View gateway status, it is runing: Chapter 3. General Docs...
- Page 35 Fill in the HT-M00 information as shown below and complete the addition. • Gateway ID – The unique ID of HT-M00 gateway, view from the display screen of the HT-M00 or view through the serial port (the gateway ID will be printed through the serial port when the HT-M00 starts).
- Page 36 Heltec Automation Docs, Release V0.0.1 View gateway status, it is runing: Chapter 3. General Docs...
- Page 37 Heltec Automation Docs, Release V0.0.1 Connect to HelTec server Register LoRa Gateway in HelTec Cloud Server Fill in the HT-M00 information as shown below and complete the addition. 3.1. Contents...
- Page 38 Heltec Automation Docs, Release V0.0.1 • Gateway ID – The unique ID of HT-M00 gateway, view from the display screen of the HT-M00 or view through the serial port (the gateway ID will be printed through the serial port when the HT-M00 starts).
- Page 39 Heltec Automation Docs, Release V0.0.1 The server addresses corresponding to different regions are as follows: CN470 – cn01.cloud.heltec.cn EU868 – eu01.cloud.heltec.org US915 – us01.cloud.heltec.org AU915 – au01.cloud.heltec.org AS923 – as01.cloud.heltec.org View gateway status, it is runing: 3.1. Contents...
- Page 40 HT-M00 Firmware Upgrade Summary This article aims to describe how to upgrade the HT-M00 firmware and the processing method of overwriting the HT-M00 firmware. Tip: Since the HT-M00 firmware version V1.8 has updated the gateway activation code algorithm. Therefore, up- grading from V1.7 and below to V1.8 and above requires reactivating the HT-M00 gateway.
- Page 41 – Timing check SX1276 working status, if the SX1276 chips working not normal, system auto reset. • V1.9 – Add preamble length parsing function. If the json package sent by the server has a pream field, HT-M00 will parse and forward it.
- Page 42 Heltec Automation Docs, Release V0.0.1 Chapter 3. General Docs...
- Page 43 Heltec Automation Docs, Release V0.0.1 Click “Select firmware” to select the corresponding upgrade firmware that has been downloaded, and click “Update” to upgrade. After the upgrade is complete, a corresponding prompt will pop up and restart the gateway. 3.1. Contents...
- Page 44 After the modification is completed, run “M00_Vx_x.bat” to complete the gateway firmware upload. Activate the Gateway After the firmware download is complete, open the serial port corresponding to the HT-M00 and read the corresponding ESP32 chip ID of the gateway.
- Page 45 Heltec Automation Docs, Release V0.0.1 Enter https://resource.heltec.cn/search, enter the ESP32 chip ID to query the serial number corresponding to the gate- way. Open serial port corresponding HT-M00, send command “AT+CDKEY=xxxxxxxxxxxxxxxxxxxxxxxxxxxxxxxx” through serial port activate gate- way. Among them, “xxxxxxxxxxxxxxxxxxxxxxxxxxxxxxxx” is the 32-bit license.
- Page 46 Heltec Automation Docs, Release V0.0.1 Tip: For lower version firmware, the firmware can be upgraded according to the “firmware upgrade” method. 3.1.3 HT-M01 Evaluation LoRa Gateway HT-M01 is a Pico cell gateway. When we designing it, we wanted to provide users with an SX1308 gateway that can quickly verify communication solutions and support the standard LoRaWAN protocol.
- Page 47 Heltec Automation Docs, Release V0.0.1 SPI mode Have a PRI to HT-M01 converter will make your operation more easy. The wiring diagram of the Raspberry Pi and the adapter board is shown in the figure below. 3.1. Contents...
- Page 48 Heltec Automation Docs, Release V0.0.1 The Raspberry Pi SPI bus is disabled by default. Enter the following command in putty to open the Raspberry Pi configuration interface and enable the SPI bus. sudo raspi-config Chapter 3. General Docs...
- Page 49 Heltec Automation Docs, Release V0.0.1 Choose Interfacing Options Yes and may need restart Raspberry Pi. Install HT-M01 relevant application and services via following commands: mkdir lora lora sudo apt-get update sudo apt-get install git git clone https://github.com/Lora-net/lora_gateway.git # LoRa Gateway drivers git clone https://github.com/Lora-net/packet_forwarder.git...
- Page 50 Heltec Automation Docs, Release V0.0.1 “global_conf_CN470.json”, “global_conf_US915.json”, etc., respectively corresponding to the corresponding frequency bands. USB mode Before proceeding with the following operations, use a high-quality Micro USB cable to connect the HT-M01 Gateway to the Raspberry Pi, otherwise it will cause a lot of problems! Enter the following commands:...
- Page 51 Heltec Automation Docs, Release V0.0.1 Confirm Installation Run sudo systemctl status lrgateway in Raspberry Pi, if all goes well, the service is running: 3.1. Contents...
- Page 52 Heltec Automation Docs, Release V0.0.1 Use HT-M01 with Windows® USB mode Install PicoGW UI before connect HT-M01 to a Windows® computer. then with HT-M01 connected, you will see a serial device in Windows® device manager. Chapter 3. General Docs...
- Page 53 Heltec Automation Docs, Release V0.0.1 Open PicoGW_UI and choose suitable region and click Save my choice. The default region didn’t cover your loca- tion? please refer to this document. Choose Packet Forwarder. 3.1. Contents...
- Page 54 Heltec Automation Docs, Release V0.0.1 Configuration PicoGW Tools Click Global Conf to open the Properties_UI window, the parameters in this window are relative to the global_conf.json in C:\Users\user name\AppData\Roaming\Semtech\PicoGW_UI path. We just need pay attention to this three parts, others keep default.
- Page 55 Heltec Automation Docs, Release V0.0.1 Connect HT-M01 to a LoRa Server Summary This article aims to describe how to connect HT-M01 Gateway to a LoRa server, such as TTN, ChirpStack, which facilitates secondary development and rapid deployment of LoRa devices.ff Before all operation, make sure the HT-M01 is runing well with a Raspberry Pi (Linux) or Windows computer.
- Page 56 Heltec Automation Docs, Release V0.0.1 • Gateway EUI – The unique ID of HT-M01 gateway; • I’m using the legacy packet forwarder – Must select this; • Frequency Plan – Must matach the LoRa band configuration (global_conf.json) in HT-M01. • Router – Must use the default router allocated by TTN system.
- Page 57 Heltec Automation Docs, Release V0.0.1 HT-M01 in Linux (Raspberry Pi) Fix parameters in global_conf.json: nano /home/pi/lora/packet_forwarder/lora_pkt_fwd/global_conf.json Configure gateway ID, server address, port. At the end of the global_conf.json, make these changes: “gateway_ID”: “XXXXXXXXXXXXXXXX”, /*Your gateway ID, 16 characters*/ “server_address”: “router.cn.thethings.network”, /*The router addresses need matach your␣...
- Page 58 Heltec Automation Docs, Release V0.0.1 HT-M01 in Windows Select Use a cloud network, and fill in correct server address, keep Port default 1700. Click OK and Start Packet Forwarder. Chapter 3. General Docs...
- Page 59 Heltec Automation Docs, Release V0.0.1 View gateway status, it is runing: 3.1. Contents...
- Page 60 Heltec Automation Docs, Release V0.0.1 Connect to ChirpStack server ChirpStack is the most popular LoRa server open source project, widely used in many fields, and also the best choise for a private LoRa server. • ChirpStack Installation guide: https://www.chirpstack.io/overview/ • ChirpStack support forum: https://forum.chirpstack.io/...
- Page 61 Heltec Automation Docs, Release V0.0.1 Register LoRa Gateway in ChirpStack Fill in the HT-M01 information as shown below and complete the addition. • Gateway ID – The unique ID of HT-M01 gateway Connect to ChirpStack server In the HT-M01 gateway, need to configure the gateway ID, server address and port.
- Page 62 Heltec Automation Docs, Release V0.0.1 HT-M01 in Windows Fill in the correct ID, server address, keep Port default 1700. Click OK and Start Packet Forwarder. Chapter 3. General Docs...
- Page 63 Heltec Automation Docs, Release V0.0.1 View gateway status, it is runing: 3.1. Contents...
- Page 64 Heltec Automation Docs, Release V0.0.1 Connect to HelTec server Register LoRa Gateway in HelTec Cloud Server Fill in the HT-M01 information as shown below and complete the addition. • Gateway ID – The unique ID of the HT-M01 gateway, Connect to HelTec server In the HT-M01 gateway, need to configure the gateway ID, server address and port.
- Page 65 Heltec Automation Docs, Release V0.0.1 HT-M01 in Linux (Raspberry Pi) Fix parameters in global_conf.json: nano /home/pi/lora/packet_forwarder/lora_pkt_fwd/global_conf.json Configure gateway ID, server address, port. At the end of the global_conf.json, make these changes: “gateway_ID”: “XXXXXXXXXXXXXXXX”, /*Your gateway ID, 16 characters*/ “server_address”: “router.eu.thethings.network”, /*The router addresses need matach your␣...
- Page 66 Heltec Automation Docs, Release V0.0.1 Click OK and Start Packet Forwarder. Chapter 3. General Docs...
- Page 67 Heltec Automation Docs, Release V0.0.1 View gateway status, it is runing: 3.1. Contents...
- Page 68 Heltec Automation Docs, Release V0.0.1 Add More Region Support on PicoGW UI Summary PicoGW UI is provided by Semtech®, allow users running a Pico Cell LoRa Gateway (HT-M01) on Windows® with directly UI. But PicoGW_UI only provided four region support by default.
- Page 69 Heltec Automation Docs, Release V0.0.1 Now, the PicoGW_UI will work on the definition of global_conf.json. External resources 3.1.4 HT-M01S Indoor LoRa Gateway HT-M01S is positioned as a low-cost standard gateway for indoor use. LoRa part based on the SX1308 + 1255/7 structure, we innovatively use ESP32 as the main control chip, and completely transplant the hardware driver, data forwarding and message queue of SX1308 to the ESP32 platform.
- Page 70 Heltec Automation Docs, Release V0.0.1 Firmware version V1.2 and below • After powering on the gateway through Type-C or PoE, keep pressing the “+” button, then press the “RST” button, and then release the “RST” button. After the gateway enters the interface shown in the figure below, release the “+”...
- Page 71 Heltec Automation Docs, Release V0.0.1 • At this time, find the WiFi named “M01S_XXXX”, connect to the WiFi with the password “heltec.org”, then enter “192.168.4.1” through the browser, enter the gateway configuration page. 3.1. Contents...
- Page 72 Heltec Automation Docs, Release V0.0.1 Chapter 3. General Docs...
- Page 73 Heltec Automation Docs, Release V0.0.1 • Configure the HT-M01S gateway information on the page shown in the figure above, such as network mode, server address and port, regional frequency band, gateway channel, and time zone. Click “Submit” after the configuration is complete. If “NET MODE” selects “WiFi”, you need to configure the corresponding WiFi information, if “NET MODE”...
- Page 74 Heltec Automation Docs, Release V0.0.1 • At this time, find the WiFi named “M01S_XXXX”, connect to this WiFi, and enter “192.168.4.1” through the browser, and log in to the gateway configuration page with the user name “HT-M01S” and password “heltec.org”.
- Page 75 Heltec Automation Docs, Release V0.0.1 3.1. Contents...
- Page 76 Heltec Automation Docs, Release V0.0.1 • Configure the HT-M01S gateway information on the page shown in the figure above, such as network mode, server address, uplink port, downlink port, heartbeat period, regional frequency band, gateway channel, time zone, and click “Submit” after the configuration is complete. If “NET MODE” selects “WiFi”, you need to configure the corresponding WiFi information, if “NET MODE”...
- Page 77 Heltec Automation Docs, Release V0.0.1 3.1. Contents...
- Page 78 Heltec Automation Docs, Release V0.0.1 • Configure the HT-M01S gateway information on the page shown in the figure above, such as network mode, server address, uplink port, downlink port, heartbeat period, regional frequency band, gateway channel, time zone, and click “Submit” after the configuration is complete. If “NET MODE” selects “WiFi”, you need to configure the corresponding WiFi information, if “NET MODE”...
- Page 79 Heltec Automation Docs, Release V0.0.1 • By pressing the “+” button, you can control the TFT display switch, and by pressing the “-” button, you can switch the display content. 3.1. Contents...
- Page 80 Heltec Automation Docs, Release V0.0.1 • By pressing the “-” button, you can switch the display content. Check the sending and receiving situation of the gateway. Connect HT-M01S to LoRa Server Chapter 3. General Docs...
- Page 81 LoRa server, such as TTN, ChirpStack, Heltec Cloud Server, which facilitates secondary development and rapid deployment of LoRa devices. Before all operation, make sure the HT-M00 is runing well . If not, please refer to this HT-M01S Quick Start document. Connect to TTN Register a LoRa gateway in TTN Create and active an account in TTN.
- Page 82 Heltec Automation Docs, Release V0.0.1 • I’m using the legacy packet forwarder – Must select this; • Frequency Plan – Must matach the LoRa band configuration in HT-M01S • Router – Must use the default router allocated by TTN system.
- Page 83 Heltec Automation Docs, Release V0.0.1 View gateway status, it is runing: 3.1. Contents...
- Page 84 Heltec Automation Docs, Release V0.0.1 Connect to ChirpStack server ChirpStack is the most popular LoRa server open source project, widely used in many fields, and also the best choise for a private LoRa server. • ChirpStack Installation guide: https://www.chirpstack.io/overview/ • ChirpStack support forum: https://forum.chirpstack.io/...
- Page 85 Heltec Automation Docs, Release V0.0.1 View gateway status, it is runing: 3.1. Contents...
- Page 86 Heltec Automation Docs, Release V0.0.1 Connect to HelTec server Register LoRa Gateway in HelTec Cloud Server Fill in the HT-M01S information as shown below and complete the addition. Chapter 3. General Docs...
- Page 87 Heltec Automation Docs, Release V0.0.1 • Gateway ID – The unique ID of HT-M01S gateway, view from the display screen of the HT-M01S or view through the serial port (the gateway ID will be printed through the serial port when the HT-M01S starts).
- Page 88 Heltec Automation Docs, Release V0.0.1 The server addresses corresponding to different regions are as follows: CN470 – cn01.cloud.heltec.cn EU868 – eu01.cloud.heltec.org US915 – us01.cloud.heltec.org AU915 – au01.cloud.heltec.org AS923 – as01.cloud.heltec.org View gateway status, it is runing: Chapter 3. General Docs...
- Page 89 Heltec Automation Docs, Release V0.0.1 HT-M01S Firmware Upgrade Summary This article aims to describe how to upgrade the HT-M01S firmware. Tip: Since the V1.2 version of the firmware has added the HT-M01S to support frequency bands, when V1.1 and below are upgraded to V1.2 and above, the HT-M01S will display incorrect frequency bands in the web configuration interface, but It does not affect normal use.
- Page 90 Heltec Automation Docs, Release V0.0.1 Firmware Upgrade Logs • V1.2 – Increase EU433 frequency band support. • V1.3 – Add DHCP support in both Ethernet and Wi-Fi connection; – The upstream and downstream ports can be set separately; – Can modify the heartbeat cycle by yourself.
- Page 91 Heltec Automation Docs, Release V0.0.1 3.1. Contents...
- Page 92 Heltec Automation Docs, Release V0.0.1 Click “Select firmware” to select the corresponding upgrade firmware that has been downloaded, and click “Update” to upgrade. After the upgrade is complete, a corresponding prompt will pop up and restart the gateway. Chapter 3. General Docs...
- Page 93 Heltec Automation Docs, Release V0.0.1 The Processing Method of Overwriting the HT-M01S Firmware Download Firmware Download HT-M01S complete firmware Open the downloaded file and edit the “M01S_Vx_x.bat” file. Change the COM port to the corresponding COM port of HT-M01S. Open the serial port corresponding to the HT-M01S, press the “-” key -> press the “RST” key -> release the “RST” key ->...
- Page 94 Heltec Automation Docs, Release V0.0.1 Activate the Gateway After the firmware download is complete, open the serial port corresponding to the HT-M01S and read the correspond- ing ESP32 chip ID of the gateway. Enter https://resource.heltec.cn/search, enter the ESP32 chip ID to query the serial number corresponding to the gate- way.
- Page 95 Heltec Automation Docs, Release V0.0.1 Open serial port corresponding HT-M01S, send command “AT+CDKEY=xxxxxxxxxxxxxxxxxxxxxxxxxxxxxxxx” through serial port activate gate- way. Among them, “xxxxxxxxxxxxxxxxxxxxxxxxxxxxxxxx” is the 32-bit license. For example, if the license is 0x12345678, 0x12345678, 0x12345678, 0x12345678, the activation command is AT+CDKEY=12345678123456781234567812345678 After the screen displays normally, the gateway is activated successfully.
- Page 96 Heltec Automation Docs, Release V0.0.1 • No fan or motor heat dissipation structure. HT-M02 Edge LoRa Gateway 4G(LTE) Quick Start Summary HT-M02 has integrated operating system and LoRa related programs, so it can be used directly in applications. HT-M02 has two versions: PoE and 4G(LTE). The purpose of this article is how to use the 4G(LTE) version.
- Page 97 Heltec Automation Docs, Release V0.0.1 Power ON for the first time This version only supports 220 / 110V AC power supply. Before all operations, insert the Micro SIM card first, the card direction and interface are as shown below (SIM card chip facing down, notch facing outward):...
- Page 98 Heltec Automation Docs, Release V0.0.1 If everything goes well, the system will run automatically after power ON. When the system kernel starts successfully, the SYS LED light up. After the whole system initial complete, the TX LED will flash once, and the system enters the normal working status.
- Page 99 Heltec Automation Docs, Release V0.0.1 Get the Gateway EUI Generally, the EUI of the gateway will be pasted on the surface of the gateway. The Gateway EUI also can be read via this command: cat lora/packet_forwarder/lora_pkt_fwd/local_conf.json Connect to TTN Register a LoRa gateway in TTN Create and active an account in TTN.
- Page 100 Heltec Automation Docs, Release V0.0.1 Fill in the HT-M02 information as shown below and complete the addition. • Gateway EUI – The unique ID of HT-M02 gateway; • I’m using the legacy packet forwarder – Must select this; • Frequency Plan – Must matach the LoRa band configuration in HT-M02 •...
- Page 101 Heltec Automation Docs, Release V0.0.1 ctrl + O to save and ctrl + X to exit, and restart the service: sudo systemctl restart lrgateway Check whether the system running normally: sudo systemctl status lrgateway 3.1. Contents...
- Page 102 Heltec Automation Docs, Release V0.0.1 The TTN’s router addresses for different region: https://www.thethingsnetwork.org/docs/gateways/packet-forwarder/semtech-udp.html#router-addresses View gateway status, it is runing: Chapter 3. General Docs...
- Page 103 Heltec Automation Docs, Release V0.0.1 Connect to ChirpStack server ChirpStack is the most popular LoRa server open source project, widely used in many fields, and also the best choise for a private LoRa server. • ChirpStack Installation guide: https://www.chirpstack.io/overview/ • ChirpStack support forum: https://forum.chirpstack.io/...
- Page 104 Heltec Automation Docs, Release V0.0.1 • Gateway ID – The unique ID of the HT-M02 gateway. Connect to ChirpStack server In the HT-M02 gateway, only the server address and port need to be configured. config the server address and port in global_conf.json: sudo nano lora/packet_forwarder/lora_pkt_fwd/global_conf.json...
- Page 105 Heltec Automation Docs, Release V0.0.1 ctrl + O to save and ctrl + X to exit, and restart the service: sudo systemctl restart lrgateway Check whether the system running normally: sudo systemctl status lrgateway 3.1. Contents...
- Page 106 Heltec Automation Docs, Release V0.0.1 View gateway status, it is runing: Chapter 3. General Docs...
- Page 107 Heltec Automation Docs, Release V0.0.1 Connect to HelTec server Register LoRa Gateway in HelTec Cloud Server Fill in the HT-M02 information as shown below and complete the addition. • Gateway ID – The unique ID of the HT-M02 gateway. Connect to HelTec server In the HT-M02 gateway, only the server address and port need to be configured.
- Page 108 Heltec Automation Docs, Release V0.0.1 ctrl + O to save and ctrl + X to exit, and restart the service: sudo systemctl restart lrgateway Check whether the system running normally: sudo systemctl status lrgateway Chapter 3. General Docs...
- Page 109 Heltec Automation Docs, Release V0.0.1 The server addresses corresponding to different regions are as follows: CN470 – cn01.cloud.heltec.cn EU868 – eu01.cloud.heltec.org US915 – us01.cloud.heltec.org AU915 – au01.cloud.heltec.org AS923 – as01.cloud.heltec.org View gateway status, it is runing: 3.1. Contents...
- Page 110 Heltec Automation Docs, Release V0.0.1 HT-M02 System Upgrade Summary HT-M02 have two method to upgrade the system. • Via Micro TF Card; • Online upgrade. Via Micro TF card Warning: The power source for HT-M02 cannot be cut off during the upgrade process, or it may cause permanent damage to the HT-M02 gateway.
- Page 111 Heltec Automation Docs, Release V0.0.1 Preparation • Download the latest firmware from http://resource.heltec.cn/download/HT-M02/firmware • Win32DiskImager – Tool for flashing firmware to a Micro TF card; • SD Formatter – It’s not necessaryIf you need to format the TF card with an existing image, You need this tool •...
- Page 112 Heltec Automation Docs, Release V0.0.1 • Establish serial connection if need, system upgrade logs will be printed via the UART. Upgrade Make sure the Micro TF card already insert into the slot, press the REC key, and then power ON HT-M02. Generally speaking, the upgrade process should be: Insert TF card -->...
- Page 113 Heltec Automation Docs, Release V0.0.1 power ON next time, the new system will running from eMMC. • Default login username: debian • Default login password: temppwd Tip: Don’t forget remove the Micro TF card, or the system will running from TF card automatically in the next powe ON, and the system will be upgrade again.
- Page 114 Heltec Automation Docs, Release V0.0.1 HT-M02 Edge LoRa Gateway PoE Quick Start Summary HT-M02 has integrated operating system and LoRa related programs, so it can be used directly in applications. HT-M02 has two versions: PoE and 4G(LTE). The purpose of this article is how to use the PoE version.
- Page 115 Heltec Automation Docs, Release V0.0.1 Configuration HT-M02 When PoE supplies power to the HT-M02, it will provide Ethernet at the same time. The DHCP service is enabled by default in the HT-M02 system. If the connected router supports DHCP at the same time, it will automatically assign an IP address to the HT-M02.
- Page 116 Heltec Automation Docs, Release V0.0.1 Options in the Configuration Page • Status – HT-M02 running status; • Gateway_ID – The Unique ID of current HT-M02; • Band – Reginal frequency plans, strictly follow LoRaWAN™ 1.0.2 Regional Parameters • Channels – The listening channels of each bands, the...
- Page 117 Heltec Automation Docs, Release V0.0.1 Establish Serial/SSH Connection HT-M02 can provide serial/SSH connection if required. • Default login username: debian • Default login password: temppwd Establish SSH connection need make sure the client in a same LAN with HT-M02, SSH use default Port 22.
- Page 118 Heltec Automation Docs, Release V0.0.1 Recommended to use Putty, configured as shown in the following image. Chapter 3. General Docs...
- Page 119 Heltec Automation Docs, Release V0.0.1 Connect HT-M02 to a LoRa Server Summary This article aims to describe how to connect HT-M02 Gateway to a LoRa server, such as TTN, ChirpStack, which facilitates secondary development and rapid deployment of LoRa devices.
- Page 120 Heltec Automation Docs, Release V0.0.1 • Gateway EUI – The unique ID of HT-M02 gateway; • I’m using the legacy packet forwarder – Must select this; • Frequency Plan – Must matach the LoRa band configuration in HT-M02 • Router – Must use the default router allocated by TTN system.
- Page 121 Heltec Automation Docs, Release V0.0.1 ctrl + O to save and ctrl + X to exit, and restart the service: sudo systemctl restart lrgateway Check whether the system running normally: sudo systemctl status lrgateway 3.1. Contents...
- Page 122 Heltec Automation Docs, Release V0.0.1 The TTN’s router addresses for different region: https://www.thethingsnetwork.org/docs/gateways/packet-forwarder/semtech-udp.html#router-addresses View gateway status, it is runing: Chapter 3. General Docs...
- Page 123 Heltec Automation Docs, Release V0.0.1 Connect to ChirpStack server ChirpStack is the most popular LoRa server open source project, widely used in many fields, and also the best choise for a private LoRa server. • ChirpStack Installation guide: https://www.chirpstack.io/overview/ • ChirpStack support forum: https://forum.chirpstack.io/...
- Page 124 Heltec Automation Docs, Release V0.0.1 • Gateway ID – The unique ID of the HT-M02 gateway. Connect to ChirpStack server In the HT-M02 gateway, only the server address and port need to be configured. config the server address and port in global_conf.json: sudo nano lora/packet_forwarder/lora_pkt_fwd/global_conf.json...
- Page 125 Heltec Automation Docs, Release V0.0.1 ctrl + O to save and ctrl + X to exit, and restart the service: sudo systemctl restart lrgateway Check whether the system running normally: sudo systemctl status lrgateway 3.1. Contents...
- Page 126 Heltec Automation Docs, Release V0.0.1 View gateway status, it is runing: Chapter 3. General Docs...
- Page 127 Heltec Automation Docs, Release V0.0.1 Connect to HelTec server Register LoRa Gateway in HelTec Cloud Server Fill in the HT-M02 information as shown below and complete the addition. • Gateway ID – The unique ID of the HT-M02 gateway. Connect to HelTec server In the HT-M02 gateway, only the server address and port need to be configured.
- Page 128 Heltec Automation Docs, Release V0.0.1 ctrl + O to save and ctrl + X to exit, and restart the service: sudo systemctl restart lrgateway Check whether the system running normally: sudo systemctl status lrgateway Chapter 3. General Docs...
- Page 129 Heltec Automation Docs, Release V0.0.1 The server addresses corresponding to different regions are as follows: CN470 – cn01.cloud.heltec.cn EU868 – eu01.cloud.heltec.org US915 – us01.cloud.heltec.org AU915 – au01.cloud.heltec.org AS923 – as01.cloud.heltec.org View gateway status, it is runing: 3.1. Contents...
- Page 130 Heltec Automation Docs, Release V0.0.1 HT-M02 Internal LoRa Server User Manual Coming soon. HT-M02 System Upgrade Summary HT-M02 have two method to upgrade the system. • Via Micro TF Card; • Online upgrade. Chapter 3. General Docs...
- Page 131 Heltec Automation Docs, Release V0.0.1 Via Micro TF card Warning: The power source for HT-M02 cannot be cut off during the upgrade process, or it may cause permanent damage to the HT-M02 gateway. Making a System Recovery / Upgrade Card...
- Page 132 Heltec Automation Docs, Release V0.0.1 Upgrade System Preparation • Power OFF HT-M02 gateway and insert the Micro TF card into the TF card slot; • Establish serial connection if need, system upgrade logs will be printed via the UART. Upgrade Make sure the Micro TF card already insert into the slot, press the REC key, and then power ON HT-M02.
- Page 133 Heltec Automation Docs, Release V0.0.1 When RX stop blink, system upgrade complete. Power OFF HT-M02 and remove Micro TF card. When the HT-M02 power ON next time, the new system will running from eMMC. • Default login username: debian • Default login password: temppwd...
- Page 134 Heltec Automation Docs, Release V0.0.1 Tip: Don’t forget remove the Micro TF card, or the system will running from TF card automatically in the next powe ON, and the system will be upgrade again. 3.1.7 HeltecTM Gateway Series Frequently Asked Questions This page contains the most frequently questions from user.
- Page 135 Heltec Automation Docs, Release V0.0.1 Fix Preamble Length to Fit HT-M00 Dual-Channel Gateway Because the HT-M00 use two SX1276 LoRa chips and a digital base band program running in ESP32, so the node must fix preamble length to work with HT-M00.
- Page 136 Heltec Automation Docs, Release V0.0.1 The following gateways can use this command: • HT-M01 Evaluation Gateway driven by Raspberry Pi; • HT-M02 Edge LoRa Gateway. 3.2 Contents We believe the CubeCell Series is the best choice for LoRaWAN node applications. The following are some of the key features: •...
- Page 137 Heltec Automation Docs, Release V0.0.1 3.2.1 CubeCell Series Quick Start Summary CubeCell is based on ASR650x series, this page shown how to install and configuration CubeCell Arduino Framework, and how to uploading and running code (examples). Install CubeCell Relevant Framework there are two methods to install the CubeCell framework, choose one of them.
- Page 138 Heltec Automation Docs, Release V0.0.1 Input following json url to board manager URLs: https://github.com/HelTecAutomation/CubeCell-Arduino/releases/download/V1.3.0/package_CubeCell_index.json Click Tools->Board:->Boards Manager..., search Heltec cubecellin the new pop-up dialog, select the latest releases and click install Chapter 3. General Docs...
- Page 139 Heltec Automation Docs, Release V0.0.1 The source code of Heltec ASR650x series (ASR6501&ASR6502) framework available here: https://github.com/ HelTecAutomation/ASR650x-Arduino 3.2. Contents...
- Page 140 Heltec Automation Docs, Release V0.0.1 Via Git • For Windows: https://github.com/HelTecAutomation/ASR650x-Arduino/blob/master/ InstallGuide/windows.md • For MacOS: https://github.com/HelTecAutomation/ASR650x-Arduino/blob/master/ InstallGuide/mac.md • For Linux(Ubuntu/Debian): https://github.com/HelTecAutomation/ASR650x-Arduino/blob/ master/InstallGuide/debian_ubuntu.md Running an Example Connect your CubeCell board to computer via a high quality Micro USB cable (This is the most common reason we had encountered can’t program software).
- Page 141 Heltec Automation Docs, Release V0.0.1 – None -- Default; – Freq -- Sending/receiving frequency; – Freq && DIO -- Sending/receiving frequency, and DIO pin interrupt information. • COM Port – Device’s serial port in your computer. Note: LORAWAN_Net_Reservation: For example, a large-scale power outage in city, when power is restored, thousands of devices are connected to the network at the same time, which may cause the LoRa gateway or server to fail.
- Page 142 Heltec Automation Docs, Release V0.0.1 Chapter 3. General Docs...
- Page 143 Heltec Automation Docs, Release V0.0.1 Select an example 3.2. Contents...
- Page 144 Heltec Automation Docs, Release V0.0.1 Compile and upload New a sketch for CubeCell In Arduino IDE, click File --> new and copy the following code: // the setup routine runs once when starts up void setup(){ // Initialize the Heltec ASR650x object...
- Page 145 Heltec Automation Docs, Release V0.0.1 3.2.2 LoRaWAN CubeCell series LoRaWAN protocol usage and configuration. Config LoRaWAN Networking Parameters for CubeCell (Dev EUI, App Key, etc.) Summary No matter what LoRa management platform is used, DevEui, AppKey, etc. parameters are must needed. And ensure that it is consistent with the relevant settings on the server.
- Page 146 Heltec Automation Docs, Release V0.0.1 Via Modify Code The relevant parameters of the LoRaWAN network are in the corresponding .ino file: Chapter 3. General Docs...
- Page 147 Heltec Automation Docs, Release V0.0.1 Change the code and Compile/Upload again. Note: The follows two methods need AT-Command enable. Via AT Command In order to use AT command, need enable AT command in the “Tools” menu before upload. 3.2. Contents...
- Page 148 Heltec Automation Docs, Release V0.0.1 Serial Port Settings • Baud rate: 115200 • Stop bit: 1 • Data bits: 8 • DTR, RTS requirement: None • Ending characters: None Note: Make sure there is NO ending characters or new line in you serial monitor config! With AT command support, the CubeCell is sleeping by default.
- Page 149 Heltec Automation Docs, Release V0.0.1 AppEui Config AppEui to “0000000000000000”, send following command via serial port: AT+AppEui=0000000000000000 Command running success will print feedback: +AppEui=0000000000000000(For OTAA Mode) AppKey Config AppKey to “00000000000000000000000000000000”, send following command via serial port: AT+AppEui=00000000000000000000000000000000 Command running success will print feedback:...
- Page 150 Heltec Automation Docs, Release V0.0.1 DevAddr Config DevAddr to “00000000”, send following command via serial port: AT+DevAddr=00000000 Command running success will print feedback: +DevAddr=00000000(For ABP Mode) Duty Cycle LoRa Node’s default sending data period is 15 seconds, change this period to 60 seconds:...
- Page 151 Heltec Automation Docs, Release V0.0.1 Connect CubeCell to LoRaWAN Server In this document, all operations and tests must be performed with a standard LoRaWAN Gateway, In the CubeCell’s LoRaWAN library, for each working band, we are strictly follow LoRaWAN™ 1.0.2 Regional Parameters...
- Page 152 Heltec Automation Docs, Release V0.0.1 Summary LoRaWAN protocol is the essence of all LoRa applications. In our opinion, the most prominent benefits of LoRaWAN are as follows: • Very friendly for low power applications. For example, your application need send data to server every 10 minutes, then in a cycle, only ~1 second is in the state of sending, other 9 minutes and 59 seconds are in low sleep low power Consuming status.
- Page 153 Heltec Automation Docs, Release V0.0.1 Preparation • Correct installed Arduino IDE and CubeCell Framework. • A standard LoRaWAN gateway with at least 8 channels (based on SX1301/8 base band chip will be OK), and make sure your gateway had already connected to a LoRa server.
- Page 154 Heltec Automation Docs, Release V0.0.1 LoRa server must enable OTAA for relevant device. Connect to TTN Before that, make sure there is a LoRa Gateway active in your TTN’s account. Register a device Register a new device in TTN’s “Applications” page. The Device ID, Device EUI, App Key can be generated auto- matically.
- Page 155 Heltec Automation Docs, Release V0.0.1 Connect to ChirpStack Coming soon. 3.2. Contents...
- Page 156 Heltec Automation Docs, Release V0.0.1 Connect to HelTec server Before that, make sure there is a LoRa Gateway active in your HelTec’s account. Register a device Select “AppsCreate” in “Apps” to create a new application, fill in the corresponding information and click “CREATE APPLICATION”...
- Page 157 Heltec Automation Docs, Release V0.0.1 Correctly config LoRaWAN parameters for CubeCell, please refer to this document. If all goes well, we will be able to see the status of the device. Important Hints Please double check the following two things: 1.
- Page 158 Heltec Automation Docs, Release V0.0.1 HTCC-AB01 Dev-Board CubeCell Dev-Board HTCC-AB01 relevant documents. Connect a Solar Panel to HTCC-AB01 Please refer to the pinout diagram of HTCC-AB01. The VS pin is the solar panel input, any 5.5~7V solar panel can be connected to this VS and GND.
- Page 159 Heltec Automation Docs, Release V0.0.1 3.2. Contents...
- Page 160 Heltec Automation Docs, Release V0.0.1 Chapter 3. General Docs...
- Page 161 Heltec Automation Docs, Release V0.0.1 HTTC - AB01 Hardware Update Logs • First release • 2017-6-1 public sale • Pinout diagram of V1 • Schematic diagram of V1 3.2. Contents...
- Page 162 Heltec Automation Docs, Release V0.0.1 Relevant Offical Resources • AutoCAD drawing; • Schematic diagram. HTCC-AB02 Dev-Board Plus CubeCell Dev-Board Plus HTCC-AB02 relevant documents. HTTC - AB02 Hardware Update Logs • First release • 2020-04-30 public sale • Pinout diagram of V1 •...
- Page 163 Heltec Automation Docs, Release V0.0.1 Relevant Offical Resources • Schematic diagram. HTCC-AB02A 1/2AA Dev-Board CubeCell-1/2AA Dev-Board relevant documents. CubeCell-1/2AA Dev-Board Hardware Update Logs • First release • 2020-04-30 public sale • Pinout diagram of V1 • Schematic diagram of V1 Relevant Offical Resources •...
- Page 164 Heltec Automation Docs, Release V0.0.1 HTCC-AB02S GPS-6502 CubeCell-GPS-6502 relevant documents. CubeCell-GPS-6502 Hardware Update Logs V1.0 • First release. • 2020-04-30 public sale. • Pinout diagram of V1 • Schematic diagram of V1 V1.0_1 • 2020-10-08 public sale. • Change the GPS indicator pin from IO8 to IO12.
- Page 165 Heltec Automation Docs, Release V0.0.1 V1.1 • 2021-03-28 public sale. • Replace the GPS module from AIR530 to AIR530Z to further improve performance and optimize low power consumption. • Optimize the circuit and optimize the PCB layout. • Pinout diagram of V1.1 •...
- Page 166 Heltec Automation Docs, Release V0.0.1 Relevant Offical Resources • Schematic diagram. 3.2.4 CubeCell Capsule Seneor HTCC-AC01 Capsule Sensor CubeCell Capsule sensor HTCC-AC01 relevant documents. Capsule Sensor Quick Start Summary Pay attention to the following issues while using a capsule sensor •...
- Page 167 Heltec Automation Docs, Release V0.0.1 Capsule Sensor Test Basic Test In the example menu CubeCell - xxxx Sensor Examples, is the basic test program used by capsule sensors, which can be used to quickly verify the sensor and read the value from sensors: Heltec Produced Sensor Examples: Sensor modules made by Heltec.
- Page 168 Heltec Automation Docs, Release V0.0.1 In all sensor & LoRaWAN examples, the sensor data is read once before sending. For example, in the HDC1080 temperature and humidity sensor example: case DEVICE_STATE_SEND: PrepareTxFrame( AppPort ); //read data from HDC1080 sensor LoRaWAN.Send();...
- Page 169 Heltec Automation Docs, Release V0.0.1 Why convert data to byte? Everyone knows that float data occupies 4 bytes in memory, and unsigned int data occupies 2 bytes. Suppose you have a very accurate sensor, for example, the measured data is 12.34567890987654321, if send this data via string like char data[] = "27.313232421875", it will spend 15 bytes.
- Page 170 Heltec Automation Docs, Release V0.0.1 Battery specifications In the capsule sensor, it’s already integrates a charge management circuit, but does not have an over-discharge protection circuit, so the lithium battery must have a protection circute. Battery must include following features: •...
- Page 171 Heltec Automation Docs, Release V0.0.1 After the connection is completed, the sensor body and the debugging board are integrated into one body, and the pins are in a corresponding relationship, which is convenient for plugging in various sensors. 3.2. Contents...
- Page 172 Heltec Automation Docs, Release V0.0.1 “Capsule Master & Debugger Board & Sensor” correctlly assembled: Chapter 3. General Docs...
- Page 173 Heltec Automation Docs, Release V0.0.1 Sensor Pinout Diagram 3.2. Contents...
- Page 174 Heltec Automation Docs, Release V0.0.1 Chapter 3. General Docs...
- Page 175 Heltec Automation Docs, Release V0.0.1 3.2. Contents...
- Page 176 Heltec Automation Docs, Release V0.0.1 HTTC - AC01 Hardware Update Logs • First release • 2017-6-1 public sale • Pinout diagram of V1 • Schematic diagram of V1 Relevant Offical Resources • Schematic diagram. 3.2.5 CubeCell Module Chapter 3. General Docs...
- Page 177 Heltec Automation Docs, Release V0.0.1 HTCC-AM01 Module CubeCell Module HTCC-AM01 relevant documents. How to programming a CubeCell Module CubeCell module provide two version: • AT command only – For the flash size reason, the “AT command only” HTCC-AM01 only provide CN470-510MHz hardware versions, sending &...
- Page 178 Heltec Automation Docs, Release V0.0.1 3. Program via Arduino IDE; Enjoy. HTTC - AM01 Hardware Update Logs HTCC-AM01 only have ASR6501 and RF relevant circuit inside. In order to program it, need connect to an external UART-USB bridge. CH340G, CP2102 etc.
- Page 179 Heltec Automation Docs, Release V0.0.1 HTTC - AM02 Hardware Update Logs HTCC-AM02 only have ASR6502 and RF relevant circuit inside. In order to program it, need connect to an external UART-USB bridge. CH340G, CP2102 etc. • First release • 2020-04-30 public sale •...
- Page 180 Heltec Automation Docs, Release V0.0.1 Relevant Offical Resources • Sch_Pcb package; • HTCC-AM02 Reference Design(Arduino); • HTCC-AM02 Reference Design(AT). 3.2.6 HeltecTM CubeCellTM Series Frequently Asked Questions This page contains the most frequently questions from user. If this page’s detail can’t solve your problem, you can also talk in our forum: community.heltec.cn...
- Page 181 Heltec Automation Docs, Release V0.0.1 USER Pin map • Dev-Board – HTCC-AB01 – GPIO 7 – HTCC-AB02 – GPIO 11 or GPIO 16 – HTCC-AB02S – GPIO 11 or GPIO 16 – HTCC-AB02A – GPIO 11 or GPIO 16 • Module –...
- Page 182 Heltec Automation Docs, Release V0.0.1 In order to read other analog signal, user need remove the resistance BR1, then the ADC header will be free. Tip: the ADC of CubeCell uses internal 1.2V reference voltage Note: ADC input voltage can NOT higher than 2.4V.
- Page 183 Heltec Automation Docs, Release V0.0.1 • GPIO 6 --> LOW --> Vext(3.3V/300mA) ON • GPIO 6 --> HIGH --> Vext(3.3V/300mA) OFF 3.2.7 Relevant Offical Resources • ASR650x - Arduino repository; • CubeCell introduction page. 3.3 Contents This document branch is for...
- Page 184 Heltec Automation Docs, Release V0.0.1 • We also provide LoRaWAN-Node protocol Arduino library; Tip: ESP32’s BlueTooth and Wi-Fi antenna use a same pin, so BlueTooth and Wi-Fi can’t work at the same time. 3.3.1 Heltec ESP32+LoRa Series Quick Start Before all operation, please confirm whether the USB driver, Git and Arduino IDE has been installed correctly. If...
- Page 185 Heltec Automation Docs, Release V0.0.1 Input the last ESP32 package URL: https://github.com/Heltec-Aaron-Lee/WiFi_Kit_series/releases/download/0.0.5/package_heltec_es Click Tools --> Board --> Boards Manager..., search Heltec ESP32 in the new pop-up dialog, then click install 3.3. Contents...
- Page 186 Heltec Automation Docs, Release V0.0.1 The source code of Heltec ESP series (ESP32 & ESP8266) framework available here: https://github.com/Heltec-Aaron- Chapter 3. General Docs...
- Page 187 Heltec Automation Docs, Release V0.0.1 Lee/WiFi_Kit_series Step2. Download the Heltec ESP32 Library Open Arduino IDE, then Select Sketch->Include Library->Manage Libraries... Search Heltec ESP32 and install it. 3.3. Contents...
- Page 188 Heltec Automation Docs, Release V0.0.1 The source code of Heltec ESP32 library available here: https://github.com/HelTecAutomation/Heltec_ESP32 Via Git • For Windows: https://github.com/Heltec-Aaron-Lee/WiFi_Kit_series/blob/master/ InstallGuide/windows.md • For MacOS: https://github.com/Heltec-Aaron-Lee/WiFi_Kit_series/blob/master/ InstallGuide/mac.md • For Linux – Debian/Ubuntu: https://github.com/Heltec-Aaron-Lee/WiFi_Kit_series/blob/master/ InstallGuide/debian_ubuntu.md – Fedora: https://github.com/Heltec-Aaron-Lee/WiFi_Kit_series/blob/master/ InstallGuide/fedora.md – OpenSUSE: https://github.com/Heltec-Aaron-Lee/WiFi_Kit_series/blob/master/...
- Page 189 Heltec Automation Docs, Release V0.0.1 Example This section for verifying whether you can program with Arduino or not. Now, The USB cable connects to Heltec ESP32 board, then select your serial port which is connected to Heltec ESP32 board. Select a demo example, compile and upload.
- Page 190 Heltec Automation Docs, Release V0.0.1 Chapter 3. General Docs...
- Page 191 Heltec Automation Docs, Release V0.0.1 Compile & Upload New a Heltec ESP32 program Open Arduino IDE, create a new .ino file, then copy the below code. #include <heltec.h> // the setup routine runs once when starts up void setup(){ // Initialize the Heltec ESP32 object...
- Page 192 Heltec Automation Docs, Release V0.0.1 Both Sender and Receiver should config to a same BAND. • Set 20dBm maximum LoRa output power in your sender (some country or location not allow 20dBm, please refer to local laws): LoRa.setTxPower(20,RF_PACONFIG_PASELECT_PABOOST); //20dB output must via PABOOST like this: Chapter 3.
- Page 193 Heltec Automation Docs, Release V0.0.1 2. Important Tips • Antenna is very very important for RF communication, so you must have a good antenna with correctly working frequency. E.g. If working BAND in 868, you must have a 868MHz antenna.
- Page 194 Heltec Automation Docs, Release V0.0.1 “ESP32 + LoRa” Preparation & Config Parameters Preparation • Arduino IDE. How to install please click here. • This library must work with Heltec WiFi_Kit_series Arduino development framework. Installation manual please refer to here. • A gateway already connected a LoRa server.
- Page 195 Heltec Automation Docs, Release V0.0.1 Choose an example from menu File -- Examples -- ESP32_LoRaWAN -- OTAA. The LoRaWAN relevant parameters are in the .ino file, fix it in the code directly. Choose Frequency Band There are some options in the Arduino Tools menu:...
- Page 196 Heltec Automation Docs, Release V0.0.1 Board, Upload Speed, CPU Frequency, Core Debug Level, PSRAM are ESP32 chip’s normal option, just keep default. Special notice the LoRaWan Region and LoRaWan Debug Level: • LoRaWan Region – LoRaWAN protocol region definition, strictly follow LoRaWAN™...
- Page 197 Heltec Automation Docs, Release V0.0.1 Connect “ESP32 + LoRa” to LoRaWAN Server Before this operation, please read this document carefully: “ESP32 + LoRa” Node Preparation & Config Parameters 3.3. Contents...
- Page 198 Heltec Automation Docs, Release V0.0.1 Connect to TTN Before that, make sure there is a LoRa Gateway active in your TTN’s account. Register a device Register a new device in TTN’s “Applications” page. The Device ID, Device EUI, App Key can be generated auto- matically, users need make sure the relevant parameter in ESP32 LoRa node is the same with TTN.
- Page 199 Heltec Automation Docs, Release V0.0.1 Connect to ChirpStack Coming soon. 3.3. Contents...
- Page 200 Heltec Automation Docs, Release V0.0.1 Connect to HelTec server Before that, make sure there is a LoRa Gateway active in your HelTec’s account. Register a device Select “AppsCreate” in “Apps” to create a new application, fill in the corresponding information and click “CREATE APPLICATION”...
- Page 201 Heltec Automation Docs, Release V0.0.1 Correctly config LoRaWAN parameters for ESP32 LoRa node, please refer to this document. If all goes well, we will be able to see the status of the device. Important Hints Please double check the following two things: 1.
- Page 202 Heltec Automation Docs, Release V0.0.1 WiFi LoRa 32 Hardware Update Logs • First release • 2017-6-1 public sale • Pinout diagram of V1 • Schematic diagram of V1 Chapter 3. General Docs...
- Page 203 Heltec Automation Docs, Release V0.0.1 • 2018-9-15 public sale • 4MB (32M-bits) FLASH upgrade to 8MB (64M-bits) FLASH; • Use 40MHz HSE (V1 use 26MHz); • Basic low power design (800uA in deep sleep); • Add Vext power output pin, users can use this pin to drive some external device (sensor, motor etc.), when system need into deep sleep mode, Vext can be turn off.
- Page 204 Heltec Automation Docs, Release V0.0.1 V2.1 • 2019-6-15 public sale • Change the RF switch from PE4259 to UPG2179, and change the RF part to the official recommended value; • Change the power detection pin from 13(ADC2: 4) to 37(ADC1: 1).
- Page 205 Heltec Automation Docs, Release V0.0.1 Relevant Offical Resources • AutoCAD drawing; • drawing; • Schematic diagram – WiFi_LoRa_32_V2.1(433,470-510); – WiFi_LoRa_32_V2.1(868-915). 3.3.5 Wireless Stick Wireless Stick relevant documents. Wireless Stick Hardware Update Logs 3.3. Contents...
- Page 206 Heltec Automation Docs, Release V0.0.1 • First release • 2017-6-1 public sale • Pinout diagram • Schematic diagram The schematic diagram of Wireless Stick is restricted technical data,it will become downloadable after pur- chase.Please read this document:Get Limited Technical Resources...
- Page 207 Heltec Automation Docs, Release V0.0.1 Relevant Offical Resources • AutoCAD drawing; • drawing; 3.3.6 Wireless Stick Lite Wireless Stick Lite relevant documents. Wireless Stick Lite Hardware Update Logs 3.3. Contents...
- Page 208 Heltec Automation Docs, Release V0.0.1 • First release • 2017-6-1 public sale • Pinout diagram • Schematic diagram • The schematic diagram of Wireless Stick Lite is restricted technical data,it will become downloadable after purchase.Please read this document:Get Limited Technical Resources...
- Page 209 Heltec Automation Docs, Release V0.0.1 Relevant Offical Resources • AutoCAD drawing; 3.3.7 Wireless Shell Wireless Shell relevant documents. Wireless Shell Hardware Update Logs Wireless Shell is equivalent to Wireless Stick Lite without peripheral circuit,so peripheral circuit needs to be added when using,such as power supply part, serial port part,etc.
- Page 210 Heltec Automation Docs, Release V0.0.1 Wireless Bridge WiFi_LoRa Example User Manual Summary This document will briefly introduce the usage of Wireless_Bridge WiFi_LoRa example. Tip: loraWanClass should choose CLASS_C Usage Before starting the test, make sure that Wireless_Bridge can communicate with the gateway normally.
- Page 211 Heltec Automation Docs, Release V0.0.1 • The information issued by the webpage will be forwarded to LoRa and can be viewed in the node data. The information forwarded to LoRa needs to be decoded accordingly. • The corresponding decoding of this example is as follows:...
- Page 212 Heltec Automation Docs, Release V0.0.1 (continued from previous page) "char":{ "charValue":charValue, return result; Wireless Bridge BLE_LoRa Example User Manual Summary This document will briefly introduce the usage of Wireless_Bridge BLE_LoRa example. Tip: loraWanClass should choose CLASS_C Usage Before starting the test, make sure that Wireless_Bridge can communicate with the gateway normally. To view Blue- tooth messages, you need the corresponding Bluetooth debugging tools.
- Page 213 Heltec Automation Docs, Release V0.0.1 • After the Bluetooth connection is successful, the information sent through the Bluetooth debugging tool will be forwarded to LoRa. The information forwarded to LoRa needs to be decoded accordingly. 3.3. Contents...
- Page 214 Heltec Automation Docs, Release V0.0.1 • The information sent via LoRa will be forwarded to Bluetooth, and can be viewed in the Bluetooth debugging tool. Chapter 3. General Docs...
- Page 215 Heltec Automation Docs, Release V0.0.1 • The corresponding decoding of this example is as follows: function Decode(fPort, bytes) { charValue1= String.fromCharCode(bytes[0]); charValue2= String.fromCharCode(bytes[1]); charValue3= String.fromCharCode(bytes[2]); charValue4= String.fromCharCode(bytes[3]); charValue= charValue1 + charValue2 + charValue3 + charValue4; result={ "char":{ "charValue":charValue, (continues on next page)
- Page 216 Heltec Automation Docs, Release V0.0.1 (continued from previous page) return result; Wireless Bridge WiFi_BLE Example User Manual Summary This document will briefly introduce the usage of Wireless_Bridge WiFi_BLE example. Usage To view Bluetooth messages, you need the corresponding Bluetooth debugging tools.
- Page 217 Heltec Automation Docs, Release V0.0.1 • After the Bluetooth connection is successful, send information through the Bluetooth debugging tool, and the received data will be displayed on the web page via WiFi. The default web page refresh time is 10S, and the web page refresh time can be modified in the “setTimeout”...
- Page 218 Heltec Automation Docs, Release V0.0.1 Wireless Bridge Hardware Update Logs Chapter 3. General Docs...
- Page 219 Heltec Automation Docs, Release V0.0.1 • First release • 2021-04-01 public sale Relevant Offical Resources • AutoCAD drawing; 3.3.9 HeltecTM ESP32+LoRa Series Frequently Asked Questions This page contains the most frequently questions from user. If this page’s detail can’t solve your problem, you can also talk in our forum: community.heltec.cn...
- Page 220 Heltec Automation Docs, Release V0.0.1 Can’t Download Firmware • Use a better USB cable, or change a USB socket; • Check and make sure the CP210x drive had been correctly installed, users can refer to this document: Establish Serial Connection;...
- Page 221 Heltec Automation Docs, Release V0.0.1 We had use the TP4054 to replace MCP73831, the orange LED have new control logic: • Dim – Power on • Light – Charging • Turn OFF – Battery filled 3.3. Contents...
- Page 222 Heltec Automation Docs, Release V0.0.1 Another Communication Bus Usage Example • SPI0 / SPI1 / SPI2 / SPI3 • I2C0 / I2C1 • UART0 / UART1 System Reset All the Time According to the situation we have collected so far, the most likely to cause a constant reset problem may have two reasons: •...
- Page 223 Heltec Automation Docs, Release V0.0.1 Node to node communication On the premise of no hardware problem, LoRa nodes can communicate with each other node-to-node. The key to success node-to-node communication need make sure the following 7 points the same: 1. The same sending and listening frequency: LoRa.setFrequency(frequency);...
- Page 224 Heltec Automation Docs, Release V0.0.1 3.3.10 Relevant Offical Resources • Heltec ESP32 development framework source code; • Heltec ESP32 series Arduino library; • LoRaWAN-Node protocol Arduino library. 3.4 Contents This document branch is for Heltec STM32 + LoRa Node series.
- Page 225 Heltec Automation Docs, Release V0.0.1 Install STM32CubeProgrammer Please click this link to download the STM32CubeProgrammer. Download Link Install STM32CubeProgrammer correctly. 3.4. Contents...
- Page 226 Heltec Automation Docs, Release V0.0.1 3.4.2 LoRaWAN STM32 LoRa Node series LoRaWAN protocol usage and configuration. Get LoRaWAN Example Code Get Chip ID Please refer to this document:How to Get Chip ID Get LoRaWAN Example Code Some example code is restrictive technical data, it will become downloadable after purchase.Please refer to the follow- ing steps.
- Page 227 Heltec Automation Docs, Release V0.0.1 • You can see some informations about this board, clickRelevant Resource you can see the example code. Tip: Because some of the previous product data has not been synchronized to the server, if you cannot succeed in this method, please click this link https://docs.heltec.cn/...
- Page 228 Heltec Automation Docs, Release V0.0.1 – DevAddr – Device address on the network (big endian), uint32_t; Preparation • Install STM32CubeIDE STM32CubeProgrammer correctly. • A standard LoRaWAN gateway with at least 8 channels (based on SX1301/8 base band chip will be OK), and make sure your gateway had already connected to a LoRa server.
- Page 229 Heltec Automation Docs, Release V0.0.1 • Modify macro definition: Set working bandsworking mode and debugger. – ACTIVE_CLASS CLASS_A CLASS_B–NOT SUPPORT CLASS_C 3.4. Contents...
- Page 230 Heltec Automation Docs, Release V0.0.1 – ACTIVE_REGION LORAMAC_REGION_AS923 LORAMAC_REGION_AU915 LORAMAC_REGION_CN470 LORAMAC_REGION_CN779 LORAMAC_REGION_EU433 LORAMAC_REGION_EU868 LORAMAC_REGION_KR920 LORAMAC_REGION_IN865 LORAMAC_REGION_US915 LORAMAC_REGION_US915_HYBRID LORAMAC_REGION_AU915_SB2 LORAMAC_REGION_AS923_AS1 LORAMAC_REGION_AS923_AS2 – REGION_EU868 Set to the frequency band corresponding to ACTIVE_REGION – USE_DEBUGGER If define USE_DEBUGGER , default serial port(PA9-TX, PA10-RX) can print debugging information.
- Page 231 Heltec Automation Docs, Release V0.0.1 • Modify userChannelMask , access mode overTheAirActivation and other parameter. – overTheAirActivation true–OTAA false–ABP • Write the data you want to send in prepareTxFrame. 3.4. Contents...
- Page 232 Heltec Automation Docs, Release V0.0.1 Now, if download the program into your board, if everything is normal, it should be able to run. • You may need: How to Download Firmware into STM32 LoRa Node(LoRa Node 151, Turtle Board). Connect “STM32 + LoRa” to LoRaWAN Server...
- Page 233 Heltec Automation Docs, Release V0.0.1 Connect to TTN Before that, make sure there is a LoRa Gateway active in your TTN’s account. Register a device Register a new device in TTN’s “Applications” page. The Device ID, Device EUI, App Key can be generated auto- matically.
- Page 234 Heltec Automation Docs, Release V0.0.1 Connect to ChirpStack Coming soon. Chapter 3. General Docs...
- Page 235 Heltec Automation Docs, Release V0.0.1 Connect to HelTec server Before that, make sure there is a LoRa Gateway active in your HelTec’s account. Register a device Select “AppsCreate” in “Apps” to create a new application, fill in the corresponding information and click “CREATE APPLICATION”...
- Page 236 Heltec Automation Docs, Release V0.0.1 Correctly config LoRaWAN parameters for STM32 LoRa node, please refer to this document. If all goes well, we will be able to see the status of the device. Important Hints Please double check the following two things: 1.
- Page 237 Heltec Automation Docs, Release V0.0.1 Download Firmware Via DFU Mode STM32L151CCU6 had already included DFU Bootloader, it means just need a Micro USB cable, users can download .elf/.bin files into the board. • How to access DFU mode. – If the board is not connected to the computer —— press the “USER” button of the Lora node before inserting it into any USB port of the computer (press the “USER”...
- Page 238 Heltec Automation Docs, Release V0.0.1 The advantage of using the DFU mode is that you can easily find a Micro USB cable. But the disadvantage is that there is no way to simulate online. Via ST-LINK • How to connect to ST-LINK.
- Page 239 Heltec Automation Docs, Release V0.0.1 Tip: ST-LINK can provide power to target device! If the LoRa Node is connected to the computer via the Micro USB interface, the ST-LINK 3.3V can not connect to the VDD! Doing so may damage the development board! •...
- Page 240 Heltec Automation Docs, Release V0.0.1 The advantage of using the ST-LINK method is that it can be single-stepped debugging with the STM32CubeIDE , but the disadvantage is that the ST-LINK debugger tool is required. Establish Serial Connection The LoRa Node can print debugging information through USB-CDC (USB-Virtual Serial Poart) or UART, but the USB to UART chip is not integrated on the board.
- Page 241 Heltec Automation Docs, Release V0.0.1 3.4. Contents...
- Page 242 Heltec Automation Docs, Release V0.0.1 • Add USE_DEBUGGER in macro definitions, compile and download program. • Connect the board and USB-UART module correctly. Tip: The LoRa Node and USB-UART module are connect as below (if the LoRa Node is powered via USB or battery, the UART module s 3.3 / 5V pin do not need connect, just need TXD, RXD, GND).
- Page 243 Heltec Automation Docs, Release V0.0.1 Tip: When using UART, the TX and RX pins used in the program should be corresponding to the TX and RX pins on the board. In the routine we provide, we use TX-PA9 and RX-PA10. Therefore, TX of UART module should be connected to RX(PA10 of board, RX of UART module should be connected to TX(PA9 of board.
- Page 244 Heltec Automation Docs, Release V0.0.1 • Open serial port. Chapter 3. General Docs...
- Page 245 Heltec Automation Docs, Release V0.0.1 Use virtual serial port • Open the example of we provided. • Right-click the project to open Properties. 3.4. Contents...
- Page 246 Heltec Automation Docs, Release V0.0.1 Chapter 3. General Docs...
- Page 247 Heltec Automation Docs, Release V0.0.1 • Add USB_VCP and USE_DEBUGGER in macro definitions, compile and download program. • Connect LoRa Node to computer via a Micro USB cable and open serial port. 3.4. Contents...
- Page 248 Heltec Automation Docs, Release V0.0.1 LoRa Node 151 Pingpong test Prepare • Download LoRa Node 151 pingpong example: pingpong_CDC. • Download firmware to LoRa Node 151, Please refer to Download firmware. Start test After downloading the firmware correctly, connect the development board to the computer and open the serial port.
- Page 249 Heltec Automation Docs, Release V0.0.1 After opening the serial port, some parameters will be configured. If you do not configure them, the default parameters will be selected. • Configure Frequency Band • Configure Spreading Factor 3.4. Contents...
- Page 250 Heltec Automation Docs, Release V0.0.1 • Configure Coding Rate • Configure Output Power Chapter 3. General Docs...
- Page 251 Heltec Automation Docs, Release V0.0.1 When the configuration is complete, the node will enter a wait state. Then configure another Lora node 151 node in the same way. After configuration, the two nodes will enter the pingpong test. 3.4. Contents...
- Page 252 Heltec Automation Docs, Release V0.0.1 Tip: The frequency band and the spreading factor need to be configured with the same parameters, otherwise they will not be able to communicate. LoRa Node 151 Hardware Update Logs Chapter 3. General Docs...
- Page 253 Heltec Automation Docs, Release V0.0.1 • First release • 2017-6-1 public sale • Pinout diagram of V1 • Schematic diagram of V1 3.4. Contents...
- Page 254 Heltec Automation Docs, Release V0.0.1 V2.0 • 2019-10-20 public sale • Change the RF switch from PE4259 to UPG2179. • Pinout diagram of V2.0 • Schematic diagram of V2.0 V2.2 • 2020-04-01 public sale • Added version number on the board silk print.
- Page 255 Heltec Automation Docs, Release V0.0.1 – If enter DFU mode successfully (with the driver is installed correctly), you can see the STM32 flash in RadioShuttle STM32 Utility. – Drag the .bin file into the window. Warning: For Turtle Board, if you use “STM32CubeProgrammer” to download firmware, it may damage the bootloader of the Turtle Board, so we recommend using “RadioShuttle STM32 Utility”.
- Page 256 Heltec Automation Docs, Release V0.0.1 Via ST-LINK • How to connect to ST-LINK. Connect the ST-LINK to the LoRa Node correctly, please refer to this picture. Tip: ST-LINK can provide power to target device! If the LoRa Node is connected to the computer via the Micro USB interface, the ST-LINK 3.3V can not connect to the VDD! Doing so may damage the development board!
- Page 257 Heltec Automation Docs, Release V0.0.1 • Download firmware. After connecting ST-LINK correctly, click on this icon. 3.4. Contents...
- Page 258 Heltec Automation Docs, Release V0.0.1 The advantage of using the ST-LINK method is that it can be single-stepped debugging with the STM32CubeIDE , but the disadvantage is that the ST-LINK debugger tool is required Establish Serial Connection The LoRa Node can print debugging information through USB-CDC (USB-Virtual Serial Poart) or UART, but the USB to UART chip is not integrated on the board.
- Page 259 Heltec Automation Docs, Release V0.0.1 3.4. Contents...
- Page 260 Heltec Automation Docs, Release V0.0.1 • Add USE_DEBUGGER in macro definitions, compile and download program. • Connect the board and USB-UART module correctly. Tip: The LoRa Node and USB-UART module are connect as below (if the LoRa Node is powered via USB or battery, the UART module’s 3.3 / 5V pin do not need connect, just need TXD, RXD, GND).
- Page 261 Heltec Automation Docs, Release V0.0.1 Tip: When using UART, the TX and RX pins used in the program should be corresponding to the TX and RX pins on the board. In the routine we provide, we use TX-PA9 and RX-PA10. Therefore, TX of UART module should be connected to RX(PA10) of board, RX of UART module should be connected to TX(PA9) of board.
- Page 262 Heltec Automation Docs, Release V0.0.1 Use virtual serial port • Open the example of we provided. • Right-click the project to open Properties. Chapter 3. General Docs...
- Page 263 Heltec Automation Docs, Release V0.0.1 3.4. Contents...
- Page 264 Heltec Automation Docs, Release V0.0.1 • Add USB_VCP and USE_DEBUGGER in macro definitions, compile and download program. • Connect LoRa Node to computer via a Micro USB cable and open serial port. Chapter 3. General Docs...
- Page 265 Heltec Automation Docs, Release V0.0.1 RadioShuttle Protocol Resource The RadioShuttle Wireless Protocol • Peer-to-peer LoRa wireless protocol software The standard LoRaWAN protocol is inefficient, does not support direct node to node communication, and is too expensive and complex for many applications. Radioshuttle can send information efficiently and safely between simple LoRa modules.
- Page 266 Heltec Automation Docs, Release V0.0.1 – Messages only require 2 x 12 bytes (protocol overhead) – Narrow bandwidths allow for a longer range – Automatic transmitting power adjustment saves energy and reduces traffic on the neighboring stations • Support multiple MCU boards –...
- Page 267 Heltec Automation Docs, Release V0.0.1 V1.1 • First release • 2018-12-1 public sale • Pinout diagram of V1.1 Relevant Offical Resources • LoRaWAN example for Turtle Board – Refer to this document to get limited resource; • Factory test firmware –...
- Page 268 Heltec Automation Docs, Release V0.0.1 Can’t Download Firmware • Use USB cable. – Use a better USB cable, or change a USB socket. – Enter the DFU mode correctly. • Use ST-LINK. – Make sure that the development board is connected to ST-LINK correctly.
- Page 269 Heltec Automation Docs, Release V0.0.1 Serial port has no output • Use USB-CDC(USB-Virtual Serial Port) – USB-CDC is not configured correctly(You can refer to our examples). • Use USB-UART – Make sure that the development board is connected to USB-UART module correctly.
- Page 270 Heltec Automation Docs, Release V0.0.1 Input the last ESP32 package URL: https://github.com/Heltec-Aaron-Lee/WiFi_Kit_series/releases/download/0.0.5/package_heltec_es Chapter 3. General Docs...
- Page 271 Heltec Automation Docs, Release V0.0.1 • Click Tools->Board:->Boards Manager..., search Heltec ESP32 in the new pop-up dialog, then click install. 3.5. Contents...
- Page 272 Heltec Automation Docs, Release V0.0.1 The source code of Heltec ESP series (ESP32 & ESP8266) framework available here: https://github.com/Heltec-Aaron- Lee/WiFi_Kit_series Step2. Download the Heltec ESP32 Library Open Arduino IDE, then Select Sketch->Include Library->Manage Libraries... Search Heltec ESP32 and install it.
- Page 273 Heltec Automation Docs, Release V0.0.1 The source code of Heltec ESP32 library available here:https://github.com/HelTecAutomation/Heltec_ESP32 3.5. Contents...
- Page 274 Heltec Automation Docs, Release V0.0.1 Via Git • For Windows: https://github.com/Heltec-Aaron-Lee/WiFi_Kit_series/blob/master/ InstallGuide/windows.md • For MacOS: https://github.com/Heltec-Aaron-Lee/WiFi_Kit_series/blob/master/ InstallGuide/mac.md • For Linux – Debian/Ubuntu: https://github.com/Heltec-Aaron-Lee/WiFi_Kit_series/blob/master/ InstallGuide/debian_ubuntu.md – Fedora: https://github.com/Heltec-Aaron-Lee/WiFi_Kit_series/blob/master/ InstallGuide/fedora.md – OpenSUSE: https://github.com/Heltec-Aaron-Lee/WiFi_Kit_series/blob/master/ InstallGuide/opensuse.md Example This section is used to verify that Arduino programming can be used and that the environment is configured successfully.
- Page 275 Heltec Automation Docs, Release V0.0.1 • Select the corresponding example and upload. 3.5. Contents...
- Page 276 Heltec Automation Docs, Release V0.0.1 If the screen or serial port has output, it means that the board runs successfully! Chapter 3. General Docs...
- Page 277 Heltec Automation Docs, Release V0.0.1 3.5.2 WiFi kit 32 WiFi Kit 32 relevant documents. Wifi Kit 32 Hardware Update Logs • First release • 2017-6-1 public sale • Pinout diagram for V1 • Schematic diagram for V1 3.5. Contents...
- Page 278 Heltec Automation Docs, Release V0.0.1 • 2019-5 public sale; • Fixed charging status (orange LED) blinking problem; • 4MB (32M-bits) FLASH upgrade to 8MB (64M-bits) FLASH; • Better 2.4GHz antenna design and impendence matching; • Basic low power design (800uA in deep sleep);...
- Page 279 Heltec Automation Docs, Release V0.0.1 V2.1 • 2019-10 public sale; • Fix battery voltage read can’t work together with Wi-Fi bug, change battery voltage reading pin to GPI37 (use ADC1_1), please refer to this example: ADC_Read_Voltage/Battery_power. • Pinout diagram for V2.1;...
- Page 280 Heltec Automation Docs, Release V0.0.1 Orange LED Blink Problem Annoying orange LED lights are always flashing? It’s because the battery management chip MCP73831. with the following control logic: • Blink – Power on • Light – Charging • Turn OFF – Battery filled Change this capacitor to 220nF to temporarily correct this problem.
- Page 281 Heltec Automation Docs, Release V0.0.1 We had use the TP4054 to replace MCP73831, the orange LED have new control logic: • Dim – Power on • Light – Charging • Turn OFF – Battery filled 3.5. Contents...
- Page 282 Heltec Automation Docs, Release V0.0.1 Another Communication Bus Usage Example • SPI0 / SPI1 / SPI2 / SPI3 • I2C0 / I2C1 • UART0 / UART1 System Reset All the Time According to the situation we have collected so far, the most likely to cause a constant reset problem may have two reasons: •...
- Page 283 Heltec Automation Docs, Release V0.0.1 • GPIO 21 --> LOW --> Vext(3.3V/250mA) ON • GPIO 21 --> HIGH --> Vext(3.3V/250mA) OFF 3.5.4 Relevant Offical Resources • Heltec ESP32 development framework source code; • Heltec ESP32 series Arduino library. 3.6 Contents...
- Page 284 Heltec Automation Docs, Release V0.0.1 3.6.1 Heltec ESP8266+Arduino Series Quick Start We suggest you confirm whether the USB driver, Git and Arduino IDE has installed first. If not, please view this two articles establish serial connection Install Git and Arduino IDE.
- Page 285 Heltec Automation Docs, Release V0.0.1 Input the last ESP8266 package URL: https://github.com/Heltec-Aaron-Lee/WiFi_Kit_series/releases/download/0.0.4/package_heltec_ Click Tools->Board:->Boards Manager..., search Heltec in the new pop-up dialog, then click install. 3.6. Contents...
- Page 286 Heltec Automation Docs, Release V0.0.1 The source code of Heltec ESP series (ESP32 & ESP8266) framework available here: https://github.com/Heltec-Aaron- Lee/WiFi_Kit_series Chapter 3. General Docs...
- Page 287 Heltec Automation Docs, Release V0.0.1 Step2. Download the Heltec ESP8266 Library Open Arduino IDE, then Select Sketch->Include Library->Manage Libraries... Search Heltec ESP8266 and install it. The source code of Heltec ESP8266 library available here:https://github.com/HelTecAutomation/Heltec_ESP8266 3.6. Contents...
- Page 288 Heltec Automation Docs, Release V0.0.1 Via Git • For Windows: https://github.com/Heltec-Aaron-Lee/WiFi_Kit_series/blob/master/ InstallGuide/windows.md • For MacOS: https://github.com/Heltec-Aaron-Lee/WiFi_Kit_series/blob/master/ InstallGuide/mac.md • For Linux – Debian/Ubuntu: https://github.com/Heltec-Aaron-Lee/WiFi_Kit_series/blob/master/ InstallGuide/debian_ubuntu.md – Fedora: https://github.com/Heltec-Aaron-Lee/WiFi_Kit_series/blob/master/ InstallGuide/fedora.md – OpenSUSE: https://github.com/Heltec-Aaron-Lee/WiFi_Kit_series/blob/master/ InstallGuide/opensuse.md Example This section is used to verify that Arduino programming can be used and that the environment is configured successfully.
- Page 289 Heltec Automation Docs, Release V0.0.1 • Select the corresponding example and upload. 3.6. Contents...
- Page 290 Heltec Automation Docs, Release V0.0.1 If the screen or serial port has output, it means that the board runs successfully! Chapter 3. General Docs...
- Page 291 Heltec Automation Docs, Release V0.0.1 3.6.2 WiFi Kit 8 WiFi Kit 8 relevant documents. Wifi Kit 8 Hardware Update Logs • First release 3.6. Contents...
- Page 292 Heltec Automation Docs, Release V0.0.1 • 2017-6-1 public sale • Pinout diagram • Schematic diagram Relevant Offical Resources • Schematic diagram. 3.6.3 HeltecTM ESP8266+Arduino Series Frequently Asked Questions This page contains the most frequently questions from user. If this page’s detail can’t solve your problem, you can also talk in our forum: community.heltec.cn...
- Page 293 Heltec Automation Docs, Release V0.0.1 Note about the device cannot connect to WiFi We get feedback from some customers: The device can connect to WiFi normally(No peripherals are plugged in) under normal conditions. But once the device is plugged into the breadboard, it cannot connect to WiFi normally. We investigated this.
- Page 294 Heltec Automation Docs, Release V0.0.1 3.6.4 Relevant Offical Resources • Heltec ESP8266 development framework source code; • Heltec ESP8266 series Arduino library. 3.7 Contents This document is used to solve some common problems. 3.7.1 How to install Git and Arduino IDE (Windows) 1.
- Page 295 Heltec Automation Docs, Release V0.0.1 3.7.2 Establish Serial Connection MacOS Windows This section provides guidance how to establish serial connection between your board and PC. 3.7. Contents...
- Page 296 Heltec Automation Docs, Release V0.0.1 For MacOS 1. Install the USB driver Download the SiLabs CP2104 Driver After the disk image SiLabsUSBDriverDisk.dmg was downloaded, mount it. And install this USB driver following those screenshots. Chapter 3. General Docs...
- Page 297 Heltec Automation Docs, Release V0.0.1 3.7. Contents...
- Page 298 Heltec Automation Docs, Release V0.0.1 Chapter 3. General Docs...
- Page 299 Heltec Automation Docs, Release V0.0.1 3.7. Contents...
- Page 300 Heltec Automation Docs, Release V0.0.1 Chapter 3. General Docs...
- Page 301 Heltec Automation Docs, Release V0.0.1 3.7. Contents...
- Page 302 Heltec Automation Docs, Release V0.0.1 Chapter 3. General Docs...
- Page 303 Heltec Automation Docs, Release V0.0.1 3.7. Contents...
- Page 304 Heltec Automation Docs, Release V0.0.1 2. Check port on MacOS To check the device name for the serial port of your your board board (or external converter dongle), open terminal and run this command two times, first with the board / dongle unplugged, then with plugged in. The...
- Page 305 Heltec Automation Docs, Release V0.0.1 Choice the right version installer(x64/x86), and install it. 3.7. Contents...
- Page 306 Heltec Automation Docs, Release V0.0.1 Chapter 3. General Docs...
- Page 307 Heltec Automation Docs, Release V0.0.1 2. Check port on Windows Check the list of identified COM ports in the Windows Device Manager. Disconnect your board and connect it back, to verify which port disappears from the list and then shows back again.
- Page 308 Heltec Automation Docs, Release V0.0.1 Then, let’s look into our code: (In the .ino file corresponding to LoRaWAN) Refer to “LoRaWAN” for CubeCell seriesrefer to “OTTA” for ESP32 series. Chapter 3. General Docs...
- Page 309 Heltec Automation Docs, Release V0.0.1 Here are 6 arrays defined all channels of LoRaWAN protocol for AU915. In the userChannelsMask[0], 0x00FF means use the first 0-7 channels, they are 915.2MHz, 915.4MHz, 915.6MHz . . . 916.6MHz. When you set the value to 0xFF00, it means the upload channels changed to 8-15, they are 916.8MHz, 917.0MHz .
- Page 310 Heltec Automation Docs, Release V0.0.1 TTN uses 2nd Sub-Band only (channels 8 to 15 and 65) for AU915: https://www.thethingsnetwork.org/docs/lorawan/ frequency-plans.html Chapter 3. General Docs...
- Page 311 Heltec Automation Docs, Release V0.0.1 How To? Generally speaking. . . To change the channel to 8-15we just need to change the channelsMaskTemp[0]=0xFF00;, then the uplink frequency will be changed to TTN supported. BTW. the listening frequency in your LoRa gateway must be the same as the TTN server. it’s defined in your gateway’s gloable_conf.json file.
- Page 312 Heltec Automation Docs, Release V0.0.1 EU433 No frequency plan yet. US902-928 Used in USA, Canada and South America • Uplink: 1. 903.9 - SF7BW125 to SF10BW125 2. 904.1 - SF7BW125 to SF10BW125 3. 904.3 - SF7BW125 to SF10BW125 4. 904.5 - SF7BW125 to SF10BW125 5.
- Page 313 Heltec Automation Docs, Release V0.0.1 5. 487.1 - SF7BW125 to SF12BW125 6. 487.3 - SF7BW125 to SF12BW125 7. 487.5 - SF7BW125 to SF12BW125 8. 487.7 - SF7BW125 to SF12BW125 • Downlink: 1. 506.7 - SF7BW125 to SF12BW125 (RX1) 2. 506.9 - SF7BW125 to SF12BW125 (RX1) 3.
- Page 314 Heltec Automation Docs, Release V0.0.1 9. 923.3 - SF12BW500 (RX2) Tip: Note that The Things Network uses 2nd Sub-Band only (channels 8 to 15 and 65). You’ll need to program the specific channels into the devices. AS923 Use two frequency plans based on country/region. OTAA devices use two common channels: 923.2MHz and 923.4MHz.
- Page 315 Heltec Automation Docs, Release V0.0.1 7. 924.4 - SF7BW125 to SF12BW125 8. 924.6 - SF7BW125 to SF12BW125 9. 924.5 - SF7BW250 10. 924.8 - FSK • Downlink: – Uplink channels 1-10 (RX1) – 923.2 - SF10BW125 (RX2) KR920-923 • Uplink: 1.
- Page 316 Heltec Automation Docs, Release V0.0.1 Relevant Resources 3.7.5 LoRaWAN Frequency Plans and Regulations by Country/Region Summary This document is only a summary of radio regulations, and the appropriate frequency plan that should be used in the corresponding countries. This is in no way an official document; gateway owners are still obliged to find, study and adhere to their own country’s regulations.
- Page 317 Heltec Automation Docs, Release V0.0.1 Coun- Fre- Regulatory document try/Region quency Plan hamas Bahrain EU863- Kingdom Of Bahrain National Frequency Plan EU433 Bangladesh Barba- Belarus CEPT Rec. 70-03 known, limited CEPT Belgium EU863- CEPT Rec. 70-03 EU433 Belize Benin Bhutan...
- Page 318 Heltec Automation Docs, Release V0.0.1 Country/Region Frequency Plan Regulatory document Cabo Verde Cambodia AS923-925 (“AS2”) Cameroon Canada US902-928 Central African Republic (CAR) Chad Chile AU915-928 FIJA NORMA TECNICA DE EQUIPOS DE ALCANCE REDUCIDO China CN470-510 CN779-787 Colombia US902-928 Comoros Democratic Republic of the EU863-870 EU433 CRASA follows CEPT Rec.
- Page 319 Heltec Automation Docs, Release V0.0.1 Country/Region Frequency Plan Regulatory document Fiji Finland EU863-870 EU433 CEPT Rec. 70-03 France EU863-870 EU433 CEPT Rec. 70-03 Coun- Frequency Plan Regulatory document try/Region Gabon Gambia Georgia unknown, limited CEPT Rec. 70-03 CEPT Germany EU863-870 Non-specific Short Range Devices (SRD) regulations, CEPT Rec.
- Page 320 Heltec Automation Docs, Release V0.0.1 Coun- Frequency Plan Regulatory document try/Region Iceland EU863-870 CEPT Rec. 70-03 EU433 India IN865-867 Use of low power wireless equipments in the frequency band 865-867MHz for RFID Indonesia AS923-925 (“AS2”) Iran EN 302 208 Iraq...
- Page 321 Heltec Automation Docs, Release V0.0.1 Coun- Frequency Regulatory document try/Region Plan Laos AS923-925 (“AS2”) Latvia EU863-870 CEPT Rec. 70-03 EU433 Lebanon Lesotho EU863-870 CRASA follows CEPT Rec. 70-03, Radio Spectrum Management Guidelines EU433 and Procedures 2014 Liberia Libya Liechtenstein EU863-870 CEPT Rec.
- Page 322 Heltec Automation Docs, Release V0.0.1 Coun- Frequency Plan Regulatory document try/Region Namibia EU863-870 CRASA follows CEPT Rec. 70-03 EU433 Nauru Nepal Netherlands EU863-870 Regeling gebruik van frequentieruimte zonder vergunning en zonder meld- EU433 ingsplicht 2015, CEPT Rec. 70-03 AU915-928 Radio Spectrum Management...
- Page 323 Heltec Automation Docs, Release V0.0.1 Country/Region Frequency Plan Regulatory document Qatar Country/Region Frequency Plan Regulatory document Romania EU863-870 EU433 CEPT Rec. 70-03 Russia EU863-870 EU433 CEPT Rec. 70-03, Decision 07-20-03-001, Appendix 10 Rwanda 3.7. Contents...
- Page 324 Heltec Automation Docs, Release V0.0.1 Country/Region Frequency Regulatory document Plan Saint Kitts and Nevis Saint Lucia Saint Vincent and the Grenadines Samoa San Marino Sao Tome and Principe Saudi Arabia EU863-870 National frequency plan in the kingdom of Saudi Arabia...
- Page 325 Heltec Automation Docs, Release V0.0.1 Country/Region Frequency Plan Regulatory document Taiwan AS923-925 LP0002 2016 or LP0002 2011, section 4, “Radio Frequency Identifica- (“AS2”) tion, RFID” Tajikistan Tanzania EU863-870 CRASA follows CEPT Rec. 70-03 EU433 Thailand AS923-925 (“AS2”) Timor-Leste Togo Tonga...
- Page 326 Heltec Automation Docs, Release V0.0.1 Country/Region Frequency Plan Regulatory document Yemen Country/Region Frequency Plan Regulatory document Zambia EU863-870 EU433 CRASA follows CEPT Rec. 70-03 Zimbabwe EU863-870 EU433 CRASA follows CEPT Rec. 70-03 Relevant Resources • Frequency Plans by Country/Region 3.7.6 How to Subscribe MQTT Messages from LoRa Server...
- Page 327 Heltec Automation Docs, Release V0.0.1 • username_pw_set – The MQTT topic subscribe user name and pass word. – For HT-M02 PoE Edge LoRa Gateway, the default user name is loraroot, pass word is 62374838 – For Heltec LoRa Cloud Server, the login information is the user name and password of the MQTT sub- scription.
- Page 328 Heltec Automation Docs, Release V0.0.1 If the example does not run correctly, may be missing related components, install it through the following command. sudo pip3 install paho-mqtt python-etcd Via third party application (MQTT.fx) There are many useful MQTT subscription and push software on the Internet. This article takes MQTT.fx...
- Page 329 Heltec Automation Docs, Release V0.0.1 • After the node uploads the data, the information will be scanned in the Scan column. 3.7. Contents...
- Page 330 Heltec Automation Docs, Release V0.0.1 • Select one as the subscription information. When there is matching subscription information uploaded, it will be displayed in the data column. The sample subscription is application/4/device/22..09/rx. Chapter 3. General Docs...
- Page 331 Heltec Automation Docs, Release V0.0.1 3.7.7 Publish MQTT Message Before operation, make sure that the gateway and node are connected, and the gateway and node can work normally. MQTT Connect to Cloud Server • Open “MQTT.fx” and click the Settings button to configure the connection information.
- Page 332 Heltec Automation Docs, Release V0.0.1 • Configure related information as shown in the figure below. Among them, “Broker Address” is the address of the server connected by the gateway, “Broker Port” is 1883 by default, and “Client ID” can be randomly generated by clicking “Generate”.
- Page 333 Heltec Automation Docs, Release V0.0.1 Publish MQTT Message • Configure topic information. – Among them, “application/4/device/2232330000888809/tx” correspond to “application/[application ID]/device/[DevEUI]/[event type]” respectively. 3.7. Contents...
- Page 334 Heltec Automation Docs, Release V0.0.1 – The published data is as follows: "fPort": 10, //Port used(fPort > "data": "EjQ=" //Published data – The published data needs to use Base64 encoding. As shown below. • After editing the published data, click “Publish”, and you can see the published data in the serial port print of the node.
- Page 335 Heltec Automation Docs, Release V0.0.1 3.7.8 How to Decode Payload Data Why need decode messages? Suppose you have a very high accurate sensor, for example, the measured data is 27.313232421875, if send this data via string like char data[] = "27.313232421875", Has the following disadvantages: •...
- Page 336 Heltec Automation Docs, Release V0.0.1 Now, we can have a try if this decoder running: That’s it! Decode payload data in ChripStack Similar with TTN, add relevant decode script in the Applications -> Node name -> APPLICATION CONFIGURATION section: Chapter 3. General Docs...
- Page 337 Heltec Automation Docs, Release V0.0.1 3.7.9 How to Upload the TF Card Image of Raspberry Pi, Configure Wi-Fi Access, SSH Connection Users can also refer to Raspberry Pi official quick start manual. Prepare Related Tools • SD Formatter (It’s not necessaryIf you need to format the TF card with an existing Raspberry Pi image, You need this tool.)
- Page 338 Heltec Automation Docs, Release V0.0.1 The speed of image upload depends on the performance of TF card. After uploading, You can see a boot letter of about 42.5MB in “my computer”, open the config.txt file and add the following line at the end(Open serial port to...
- Page 339 Heltec Automation Docs, Release V0.0.1 Before starting Raspberry Pi, lead out the serial port of Raspberry Pi, connect to the computer through USB serial port module(If you have already purchased Raspberry Pi - - HT-M01 special adapter board, you do not need additional USB serial port module) 3.7.
- Page 340 Heltec Automation Docs, Release V0.0.1 Chapter 3. General Docs...
- Page 341 Heltec Automation Docs, Release V0.0.1 If everything is normal, you can see the log information of Raspberry Pi startup in putty serial port. Default user name and password: user namepi passwordraspberry In Linux system, the process of entering password through command line can not see any change...
- Page 342 Heltec Automation Docs, Release V0.0.1 Configure SSH to Realize LAN Login sudo raspi-config Open the Raspberry Pi configuration menu Interfacing Options --> SSH --> YES Activate the SSH login option. At this point, we can log in to Raspberry Pi through the network in the LAN environment :...
- Page 343 Heltec Automation Docs, Release V0.0.1 3.7.10 Get Limited Technical Resources We released all relevant resources in GitHub Resource Page. Some technical data ara special for Heltec produced products, it’s not shown public, these relevant resources will become downloadable with the products’ Chip ID. At the same time, the Chip ID can also be used to identify authenticity...
- Page 344 Heltec Automation Docs, Release V0.0.1 Get Limited Resources via Chip ID Limited resources will become downloadable with products’ Chip ID, that’s an unique ID. Input the Chip ID in http://resource.heltec.cn/search, and click Confirm . There with show some basic informations about this board, click Relevant Resource.
- Page 345 Heltec Automation Docs, Release V0.0.1 How to Get Chip ID The products’ Chip ID is relative to the onboard MCU, each MCU have an unique ID. • ESP32 Core • STM32 Core – LoRa Node 030 – LoRa Node 151 –...
- Page 346 Heltec Automation Docs, Release V0.0.1 Turtle Board How to Download Firmware to Turtle Board Turtle Board use STM32L432KC, download this firmware into Turtle Board: Then the Chip ID will be printed via the virtual serial port (USB CDC). CubeCell Series Almost all resources for CubeCell are open source.
- Page 347 Heltec Automation Docs, Release V0.0.1 Or via Get ChipID example code: 3.7.11 LoRa Node Connect to a Single/Dual Channel Gateway Summary This article aims to describe how to connect nodes to a non-standard gateway less than 8 channels (such as a sigle...
- Page 348 Heltec Automation Docs, Release V0.0.1 Communication Channels and Frequencies In the LoRaWAN protocol, the uplink and downlink frequencies of each band are defined in detail. These frequencies used are called channels. For reference, we have intercepted the description of the CN470-510 channel definition in the protocol document.
- Page 349 • Example 1 – Connect to Heltec HT-M00 Dual-Channel Gateway If the HT-M00 is setted to 472. 1 and 472.3 (channels 10, 11), the ChannelsMask should be: uint16_t userChannelsMask[6]={ 0x0600,0x0000,0x0000,0x0000,0x0000,0x0000 }; • Example 2 – Connect to a single channel gateway The single channel getaway is setted to 470.7 MHz (channel 3), the ChannelsMask should be;...
- Page 350 Heltec Automation Docs, Release V0.0.1 3. Change your password in the Password change area: 4. Login the Heltec LoRaWAN test server again. Chapter 3. General Docs...
Need help?
Do you have a question about the HT-M00 and is the answer not in the manual?
Questions and answers