
Summary of Contents for Kognita PC002
- Page 1 Instruction Manual Air Fryer Oven Item: PC002 120V 60Hz 1700W Oven Capacity: 23L/0.81CUFT...
-
Page 2: Important Safeguards
IMPORTANT SAFEGUARDS When using an electrical appliance, basic safety precautions should always be followed, including the following: 1. Read all instructions. 2. Unplug from outlet when not in use and before cleaning. Allow to cool before cleaning or handling, putting on or taking off parts. 3. - Page 3 cause over heating of the oven. 17. Oversize foods, metal foil packages and utensils must not be inserted in the Air Fryer Oven, as they may involve a risk of fire or electric shock. 18. A fire may occur if the Air Fryer Oven is covered or touching flammable materials such as curtains, draperies or walls, when in operation.Do not store any items on top of the appliance when in operation.
-
Page 4: Special Cord Set Instructions
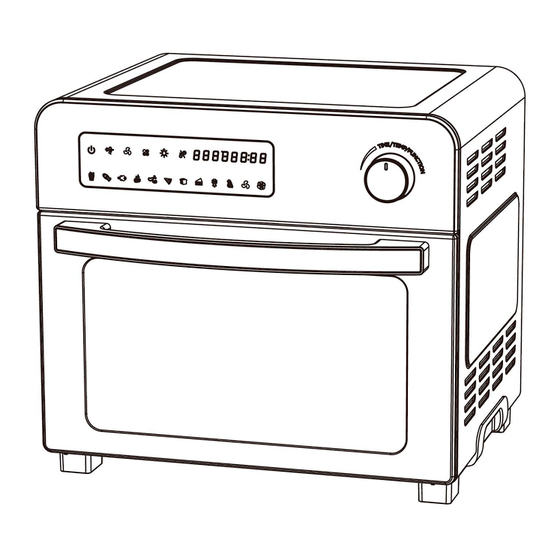
SAVE THESE INSTRUCTIONS Please read and keep these instructions handy. These instructions will help you use your Air Fryer Oven to its fullest so that you will achieve consistent, professional results. SPECIAL CORD SET INSTRUCTIONS A short power-supply cord is provided to reduce the risks resulting from becoming entangled in or tripping over a longer cord.Extension cords are available and may be used if care is exercised in their use.If an extension cord is used, the marked electrical rating of the extension cord must be at least as great... - Page 5 Parts and Accessories: A.Rotisserie spit assembly E. Fetch rack B.Wire rack F. Removable crumb tray C.Baking pan G. Air fryer oven D.Air fryer basket A:Rotisserie Shaft, Forks & Set Screws Use for roasts and whole chicken. Force Shaft lengthwise through meat and center.
-
Page 6: Features And Benefits
D:Air fryer basket The Air Fryer Basket is grated to allow air to pass through the basket for even cooking. The Air Fryer Basket can only be used in conjunction with either the Baking/Drip Pan or on the Wire Rack. The Air Fryer Basket should be placed in the middle rack position unless a recipe states otherwise. - Page 7 Two icon will light on when the machine is on high fan speed. 4. Function selection button Use to select different functions. 5. Oven light button Press this button to turn the Oven Light On or Off. 6. Time/Temperature adjust mode button Use to adjust desired time and temperature.
- Page 8 chicken pizza toast cake warm dehydrate Oven Rack Rack have 3 rack positions, top, middle and bottom position.
-
Page 9: Before Your First Use
Before Your First Use • Unpack the Air Fryer Oven and remove all packaging materials. Clean the Air Fryer Oven according to the Care & Cleaning section of this manual. • Place the Air Fryer Oven, on a flat, stable, level surface. Ensure that the oven is 2 to 4 inches away from the wall or any other objects. - Page 10 6.Press start/stop button, turn on the oven. Icon of french fry flash, the rest icons go out. When the set time has expired, display screen shows OFF. Note: the time/ temperature as well as fan speed can be adjusted as desired. 7.Unplug from the wall outlet when not using the oven.
- Page 11 4.Plug on the oven with power, LED shows OFF. Under this mode, any knob turn or start/ stop button press can activate machine entering into be stand by mode. 5.Turn function knob, select the function of bake, under this mode, time and temperature , fan speed display as bellow.
- Page 12 Toast . Place the Air Fryer Oven, on a flat, stable, level surface. Ensure that the oven is 2 to 4 inches away from the wall or any other objects. 2. Ensure that the Removable Crumb Tray is placed beneath the bottom heating elements when using your Air Fryer Oven.
- Page 13 6.Press ON/OFF icon, turn on the oven. Icon of pizza flash, the rest icons go out. When the set time has expired, display screen shows OFF. Noted: the time/ temperature as well as fan speed can be adjusted as desired. 7.Unplug from the wall outlet when not using the oven.
- Page 14 temperature , fan speed display as bellow. Function Name Icon Temperature ( ℉ ) Time (Mins) Fan speed warm 6.Press ON/OFF icon, turn on the oven. Icon of warm flash, the rest icons go out. When the set time has expired, display screen shows OFF. Note: the time/ temperature as well as fan speed can be adjusted as desired.
- Page 15 Rotisseries 1. Place the Air Fryer Oven, on a flat, stable, level surface. Ensure that the oven is 2 to 4 inches away from the wall or any other objects. 2. Ensure that the Removable Crumb Tray is placed beneath the bottom heating elements when using your Air Fryer Oven.
- Page 16 and temperature , fan speed display as bellow. Function Name Icon Temperature (℉) Time (Mins) Fan speed rotisseries 13.Press ON/OFF icon, turn on the oven. Icon of rotisseries flash, the rest icons go out. When the set time has expired, display screen shows OFF. Noted: the time/ temperature as well as fan speed can be adjusted as desired.
- Page 17 Trussing Poultry...
-
Page 18: Care And Cleaning
Care & Cleaning • Unplug your Air Fryer Oven and allow it to completely cool before cleaning. Do not use abrasive cleaners, as they will damage the finish. Simply wipe the exterior with a clean, damp cloth and dry thoroughly. Apply the cleaning agent to a cloth, not directly onto the Air Fryer Oven. - Page 19 LIMITED WARRANTY We appreciate your feedback and will do our best to guarantee your satisfaction. lf you have any questions, please contact us at cs@heynemo.com. Our professional after-sales service team is always here for you. This is the only express warranty for this product and is in lieu of any other warranty or condition. This product is warranted to be free from defects in material and workmanship for a period of one (1) year from the date of original purchase.
- Page 20 amount of the purchase price. Every implied warranty, including any statutory warranty or condition of merchantability or fitness for a particular purpose, is disclaimed except to the extent prohibited by law, in which case such warranty or condition is limited to the duration of this written warranty. This warranty gives you specific legal rights.
Need help?
Do you have a question about the PC002 and is the answer not in the manual?
Questions and answers
My Kognita oven just died? I woke up this morning and the screen is black like if it was not plugged in. I check the plug is in the wall, I changed to a different plug in the wall where I also have a lamp the lamp turned on but my little Kognita still does not power-up?? Is there a fuse or something I can check? I do not use it much just to warm up a slice of pizza or such thing. Thank, a.
If the Kognita oven model PC002 does not power on, take the following troubleshooting steps:
1. Ensure the oven is plugged into a working wall outlet.
2. Verify the power cord and plug are not damaged.
3. Confirm the oven is on a flat, stable surface and properly set up.
4. Turn or press any knob to activate standby mode.
5. If it still does not power on, unplug it and allow it to cool down.
6. If the problem persists, return the oven to the retailer for examination or repair.
This answer is automatically generated