
Summary of Contents for IN DEVICE POWER AD 2
- Page 1 POWER AD Tool for embedding PK60 flush-mounted boxes POWER AD 2 User Manual PL | EN POWER AD 3 POWER AD 4 POWER AD 5...
- Page 2 Please read the Operator’s Manual! Dear customers, Thank you for choosing the IN DEVICE brand. We hope that our product, which uses the latest technologies, will prove to be the most satisfactory. POWER AD is an innovative tool for embedding PK 60 type flush- mounted boxes.
-
Page 3: Table Of Contents
TABLE OF CONTENT Product Overview 1.1 General description 1.2 Use 1.3 Characteristics 1.4 Adjustment of the distance from the wall 1.5 Execution of POWER AD Installation of PK60 boxes with POWER AD 2.1 Installation steps 2.2 Setting the position of the clamps Technical Data Safety and environmental protection 4.1 General safety rules... -
Page 4: Product Overview
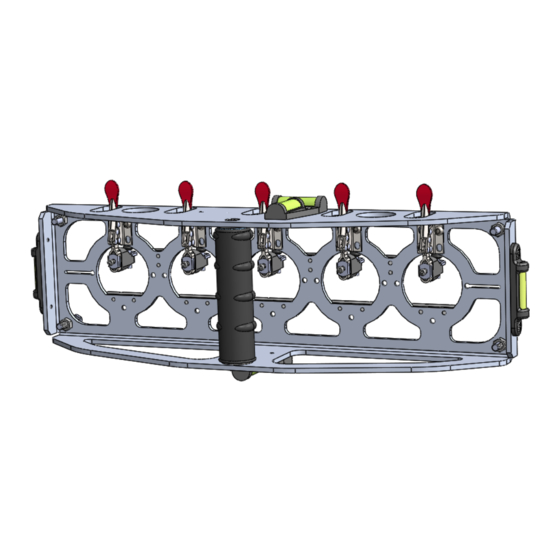
Product Description 1.1 General description 4 12 List of Power AD items Base frame 2 Grip 3 Manual clamp 4 PK 60 Box clamp 5 Two-planes surface level 6 Level line 7 Mounting box 1 8 Mounting box 2 9 Hole for the bolt of PK60 box 10 Hole for foam application 11 Through - hole 12 Viewing hole for level setting... -
Page 5: Use
Product Description 1.2 Use For this purpose, appropriate openings were created to support the Power AD is a tool mounting of the cans. used for embedding electrical boxes. It eliminates problems related to the assembly of PK60 electrical boxes. It is a tool that facilitates assembly work and ensures the highest standard of mounting the boxes in the wall. -
Page 6: Adjustment Of The Distance From The Wall
Product Description Indicators for horizontal or vertical 1.4 Adjustment of the position in all planes are placed on distance from the wall the tool. It is possible to set the tool in such a way that it automatically embeds the boxes at the appropriate distance from the wall to the thickness of the plaster or glaze. -
Page 7: Installation Of Pk60 Boxes With Power Ad
Installation of PK60 boxes with POWER AD The boxes are blocked by moving the 2.1 Assembly steps clamps (3) towards the boxes. 1. Preparation and making of the hole in the wall for electrical boxes. 2. Fixing a row of boxes on POWER AD tool. -
Page 8: Setting The Position Of The Clamps
Installation of PK60 boxes with POWER AD 4. Embedding the boxes in the wall. Setting the tool in the appropriate 7. Finishing the wall surface. position (vertical or horizontal). NOTE - in order to correct assembly, removal of the 5. Application of mounting foam POWER AD should take place after through the holes. -
Page 9: Technical Data
POWER AD 4 - installation of up to 4 boxes at the same time POWER AD 3 - installation of up to 3 boxes at the same time POWER AD 2 - installation of up to 2 boxes at the same time POWER AD - user manual... -
Page 10: Safety And Environmental Protection
Safety and environmental protection • Follow the correct order of work, as This chapter includes described in the manual, to avoid safety instructions that will undesirable events. help you to protect against • Dropping the tool can result in personal injury or property injury, if safety shoes and work damage. -
Page 11: Storage
Safety and environmental protection • Be careful when inserting the PK60 • The tool has been produced in industrial conditions in compliance boxes on the POWER AD sockets. with all safety conditions. • Be careful when pushing the clamps of the hand clamp. •... -
Page 12: Transport, Cleaning And Maintenance
Transport, cleaning and maintenance 5.1 Maintenance 5.3 Handling and The tool should be washed with transportation water and dried each time after use. • POWER AD should be handled and Scrape off the deposits with a copper transported in its original or a soft brass brush. -
Page 13: Disposal And Scrapping
Disposal and scrapping 6.1 Disposal and scrapping 6.2 Product Packaging. Adopted constructional solutions and high-quality Packaging of this tool components allow for proper is made of materials that are operation of the device for about 10 allowed to be recycled. Packaging years.