Table of Contents
Advertisement
Quick Links
Advertisement
Table of Contents

Related Manuals for ALE Coral 144

Summary of Contents for ALE Coral 144
- Page 2 RiX® and TraceX® are registered trademarks of sarl. All trademarks in this document belong to their respective owners. Version history: Date: Revision: Modifications: Author: 03/12/10 First version Only solvant version Coral 144 Operator Manual...
-
Page 3: Table Of Contents
Installing the system along the conveyor 2.1.3 Photocell installation 2.1.4 Encoder installation Inking up for the first time "from dry" Print-heads alignment Printer operation Ink bottle replacement Printer service Controller usage Change parameters Make a message Coral 144 Operator Manual... -
Page 4: Notes
Design • Print • Trace 03/12/2010 Notes Coral 144 Operator Manual... -
Page 5: Description
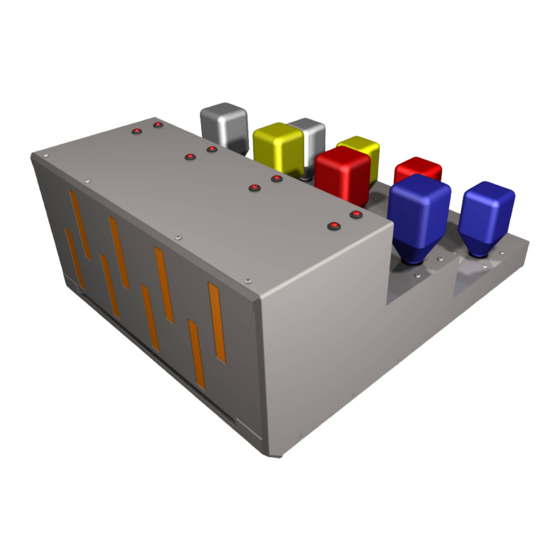
– IEEE1394 data cables (to connect with a MasterSeries controller) – Fig. 2: 24x M5 mounting holes underneath On top of the Coral 144 print-head are 8 alarm LEDs. See 1.4 Alarm LEDs information. Numbering Each of the 8 printing channels is numbered (print-engine, Alarm LED, cable, ink... - Page 6 Design • Print • Trace 03/12/2010 Fig. 3: print-engines numbering (front view) Fig. 4: ink circuits numbering Coral144 Operator Manual...
-
Page 7: Dimensions
Design • Print • Trace 03/12/2010 Dimensions The main dimensions are given in the following drawings (Fig. 5). Fig. 5: Coral 144 side dimensions Fig. 6: Coral 144 front dimensions Coral144 Operator Manual... -
Page 8: Alarm Leds
Design • Print • Trace 03/12/2010 Fig. 7: Coral 144 bottom dimensions with M5 mounting points Alarm LEDs There are eight red alarm LEDs on top of the print-head. Each one corresponds to an ink bottle (See 1.2 for numbering). It starts blinking when the level of ink is too low in the corresponding reservoir, which means that the bottle of ink is empty. -
Page 9: Defining The Position Of The System
Design • Print • Trace 03/12/2010 2.1.1 Defining the position of the system After unpacking the printer and checking that the contents correspond to your order and to the delivery note, the first operation will be to set the position of the print-head on the conveyor. -
Page 10: Installing The System Along The Conveyor
Design • Print • Trace 03/12/2010 Don't hesitate to contact your distributor in case you have any questions regarding the position of the printer. 2.1.2 Installing the system along the conveyor Due to the risk of vibration, it is not recommended to fix the printer directly onto the conveyor. -
Page 11: Encoder Installation
Design • Print • Trace 03/12/2010 Fig. 11: Photocell position When installing the photocell ensure that the detection is not confused by reflections, or by poor light or colour contrast. The two LED lights on the photocell should only light once as it detects the passage of the product. -
Page 12: Inking Up For The First Time "From Dry
Sheets carefully before handling the fluids. Always wear protective gloves and eye protection when in contact with any inks or solvents. The Coral 144-S has been specially built to be used with Solvant colour inks. Using any other fluid is likely to severely damage the hydraulic system. - Page 13 Design • Print • Trace 03/12/2010 Fitting a bottle of ink into the reservoir: ● Using a craft knife (or a sharp blade), cut the round raised plastic dome on the top of the ink bottle cap (Fig. 14). Turn the bottle up-side down and push into the reservoir (Fig.
- Page 14 Design • Print • Trace 03/12/2010 To prime the system, proceed as follows : From the print menu, Press the “Purge” key. It leads to the Purge Menu (Fig. 17). ● Fig. 17: Master Series prime menu access This menu offers 3 options: Jet : primes the circuit at high pressure –...
- Page 15 Design • Print • Trace 03/12/2010 Fig. 19: !! Carefully and gently !! wipe the excess ink Check that all dots are operating : prepare a sheet of paper. Then in the Purge Menu, ● press "blackpad" whilst moving the sheet of paper in front of the print- head.
-
Page 16: Print-Heads Alignment
Design • Print • Trace 03/12/2010 Print-heads alignment Once the printer is inked, it is important to adjust the print engines with respect to each other, to get a perfect print. The x parameter is horizontal. Its value can be changed freely. the y is vertical. -
Page 17: Printer Operation
– Printer service The printer requires a service every year for routine maintenance and inspection (filters, o- rings replacement, visual inspection...). Please contact your ALE distributor to have your printer serviced by fully trained staff. 4 Controller usage Change parameters All parameters can be modified from the "Settings"... -
Page 18: Make A Message
Design • Print • Trace 03/12/2010 Fig. 23: access to the "Settings" screen controllers have large memory stores and will accept a large range of character fonts, barcode formats, images and logos. The procedure for loading files into the controllers is detailed in the Codex reference manual. A full explanation of the parameters is detailed in the complete controller manual found in the included CD.
Need help?
Do you have a question about the Coral 144 and is the answer not in the manual?
Questions and answers