
Related Manuals for Puleida PU-300

Summary of Contents for Puleida PU-300
- Page 1 Puleida PU-300 POWER STATION User Guide http://www.iPuleida.com Email: Hello@iPuleida.com(US) support@iPuleida.com(JP) http://www.iPuleida.com Email: Hello@iPuleida.com(US) support@iPuleida.com(JP)
-
Page 2: Table Of Contents
TABLE OF CONTENTS IMPORTANT SAFETY INSTRUCTIONS Please read the User Guide carefully before recharging or operating your Puleida PU-300. IMPORTANT SAFETY INSTRUCTIONS・・・・・・・・・・・・ 1 IMPORTANT SYMBOLS FEATURES・・・・・・・・・・・・・・・・・・・・・・・2 WARNING · Indicates potentially dangerous conditions that could result in personal injury PACKAGE CONTENTS・・・・・・・・・・・・・・・・・・ 3 ·... -
Page 3: Features・・・・・・・・・・・・・・・・・・・・・・・2
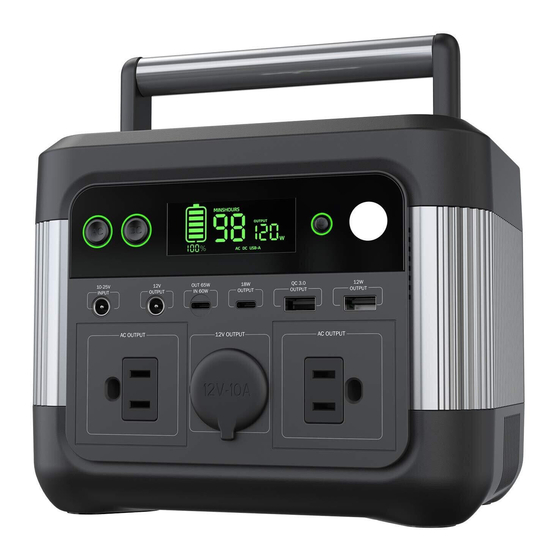
AC Controller LCD light button VERSATILE POWERING OPTIONS DC Input LCD light The Puleida PU-300 is equipped with multiple commonly used output ports to power DC Output essential gadgets and small appliances. USB-C1 (60W INPUT/ 65W OUTPUT) PURE SINE WAVE... -
Page 4: Specifications
・Use the Solar Panle Connectors to DC Adapter Cable to connect the solar USB-C PD Port 60W Max panel to the DC Input Port of your Puleida PU-300 and place your Puleida PU-300 in Total 120W Max the shade to prevent it from overheating. -
Page 5: Operating Your Puleida Pu-300・・・・・・・・・・・・・7
Recharging via AC/DC Adapter OPERATING YOUR Puleida PU-300 · Plug your Puleida PU-300 into a wall outlet through the DC Input Port using the included AC/DC Adapter. Operating your Puleida PU-300 at high temperatures above 104℉ (40℃) or at low temperatures below 32℉ (0℃) can result in battery perfor- WARNING mance degradation and service life shortening. - Page 6 BUTTON AI: AC INDICATOR Buttons for AC output, LCD on/off, DC output · LCD Display ''AC, Hz for AC output power status Press the AC button at least for 2 seconds to turn on/ turn off the AC output Press the DC button at least for 2 seconds to turn on/ turn off the DC( 5521 DC port DI: DC INDICATOR and car charger port) output ·...
-
Page 7: Maintenance・・・・・・・・・・・・・・・・・・・・・11
•Press for at least 2 seconds the LCD button, to switch to the LCD On from 100% bright— · To prolong the service life of your Puleida PU-300, keep it away from harsh sunlight, water, 50% bright —SOS— off. dust, and dirt. DO NOT leave your Puleida PU-300 outside under harsh environments. -
Page 8: Specifications
Possible Causes Solutions Q: No, the battery pack in Puleida PU-300 is not replaceable. Do not try to dismantle your Puleida PU-300 and replace the battery by yourself. Doing so may cause irreversible damages to the unit DC input interface 1. -
Page 9: 安全に関する重要注意事項
目次 安全に関する重要注意事項 Puleida PU-300を充電または使用する前に、 本説明書をよく お読みの上、 正しく ご使用く ださい。 安全に関する重要注意事項··············· 1 重要な図記号 危険 · 誤った取り扱いをすると 「死亡または重傷などを負う可能性 特徴·································2 が切迫して想定される」 内容です。 警告 · 誤った取り扱いをすると 「死亡または重傷などを負う可能性 パッケージ内容························ 3 が想定される」 内容です。 注意 · 誤った取り扱いをすると 「傷害を負う可能性または物的損害 製品一覧····························· 3 の発生の可能性が想定される」 内容です。 仕様································· 4 本製品を水に浸したり、 雨の中で使用しないでください。 そうすると、 ショー... -
Page 10: パッケージ内容
パッケージ内容 本製品を直射日光の当たる場所や高温の場所に置かないでください。 そう 警告 すると、 誤作動や構造物の劣化を起こす可能性があります。 1 x Puleida PU-300 ポータブル電源 本製品を強い静電界、 強い磁界及び放射線にさらされないでください。 警告 1 x AC/DCアダプター 使用する前に本体を確認してください。 異臭や高熱、 歪み、 または他の異常 警告 1 x USB Type-Cケーブル がある場合、 使用を停止してください。 1 x 取扱説明書 本製品をより長く使用するには、 CPAP呼吸器または他の機器を充電しな 1 x 保証カード 警告 い場合は、 ACボタンまたはDCボタンを長押して電源をオフにします (ACボ... -
Page 11: Puleida Pu-300を充電する
仕様 PULEIDA PU-300を充電する · バッテリー寿命を最大化するためには、 使用または保管する前に 警告 概要 Puleida PU-300を満充電してください。 注意 · Puleida PU-300の充電時間を短縮するためには、 充電中にすべての 重量 3.2kg 負荷を切断することをお勧めします。 材質 PC + ABS 充電時間 動作/保管湿度 45-95% · ソーラーを介して充電: 4時間 動作温度 0-40℃ / 32-104℉ · AC/DCアダプターを介して充電: 5.5時間 · USB-C PD 60W壁充電器を介して充電: 5.5時間... -
Page 12: Puleida Pu-300の操作方法
80000mAh x 0.90 デバイスのバッテリー容量 (mAh) でください。 ·DC 入力のデバイス: USB-C PD壁充電器を介して充電 稼働時間 = 296Wh x 0.90 デバイスの定格電力 (W) · Puleida PU-300は、 USB-C壁充電器を介して充電できるように設計されています。 ただし、 最適な充電パフ ォーマンスを得るには、 高電力定格のUSB-C PD壁充電器 (別売り) を使用 ·AC入力のデバイス: して本製品を充電することをお勧めします。 稼働時間= 296Wh x 0.85 デバイスの定格電力 (W) · 上記の推定算式は、 Puleida PU-300が満充電され、 デバイスがあまり... - Page 13 ボタン AI: ACインジケーター AC出力ボタン、 LEDオン/オフボタン、 DC出力ボタン · 「AC」 はAC出力パワー状態の表示 AC出力ボタンを2秒以上押して、 AC出力をオン/オフにします。 DCボタンを2秒以上押して、 DC出力をオン/オフにします (DCポート&シガーソケッ ト) 。 DI: DCインジケーター LEDボタン (操作モード3つ) : · 「DC」 はDC出力パワー状態の表示 2秒以上押してLEDランプをオンにします/ 50%輝度 (LEDボタンをクリ ック) / UAI: USB-Aインジケーター SOS (LEDボタンをクリ ック) 、 ボタンを2秒以上長押してLEDランプをオフにします。 · 「USB-A」 はUSB-A出力状態の表示 AC出力の状態で、 DCボタンとACボタンを同時に2秒以上押して周波数を変えます ( 60Hz / 50Hz)...
-
Page 14: メンテナンス
· バッテリー残量が1%未満の場合は、 AC出力がオフにします。 · DCボタンを (2秒間以上) 押して、 DC出力をオンにします。 メンテナンス · DCボタンを (2秒間以上) 押して、 DC出力をオフにします。 · デバイスを接続すると、 液晶画面がオンにします。 · Puleida PU-300の使用年数を延ばすためには、 過酷な日光、 水、 ほこり、 汚れから離 •30秒間経過しても出力がない場合は、 スリープモードになり、 液晶画面がオフになります。 れた場所に置いてください。 過酷な環境下で本製品を屋外に放置しないでください。 •バッテリー残量が0%に達すると、 バッテリー図記号が点滅してからオフになります。 •LEDボタンを (2秒間以上) 押し、 LEDランプを100%輝度-50%輝度-SOS-オフに切り替えます。 · 可能であれば、 Puleida PU-300を使わないときも電源に接続してください。 バッテ... -
Page 15: 問題点及び解決方法
• 問題点及び解決方法を見ても解決出来ない場合、 お問い合わせください。 連絡先は説明 体を充電してください。 最後に、 接続されたデバイスが出力ポートの仕様に合っているかどうかを 書の最後のページに記載されております。 確認してください。 それでもデバイスに電力を供給しない場合は、 問題点及び解決方法を参考し、 弊社にお問い合わせください。 連絡先については、 説明書の最後のページに記載されております。 Q : Puleida PU-300のバッテリーは交換できますか? 液晶画面表示 考えられる原因 解決方法 A : いいえ、 Puleida PU-300のバッテリーは交換できません。 本製品を分解したり、 バッテリーを自分 で交換したりしないでください。 本体に永久的な損傷を与え、 バッテリーが爆発する可能性があり ます。 DC入力インターフェースが過 1.Puleida専用ACアダプターを使 電圧保護/不足電圧保護 (不 用してポータブ電源を充電 Q : Puleida PU-300は他のポータブル電源と接続できますか? 適切な電源アダプターまたは...
Need help?
Do you have a question about the PU-300 and is the answer not in the manual?
Questions and answers
充電コードを差し込むと液晶画面に反応はあるのですが、インプットワット数が0で充電ならない。充電方法を変えても同じ反応なので本体側に問題あるのかと思いますが
If the Puleida PU-300 shows a response on the LCD screen when the charging cable is plugged in but the input wattage is 0 and it does not charge, possible causes and solutions include:
1. Incorrect Power Adapter: Ensure you are using the Puleida-specific AC adapter or a PD charger with the correct voltage (10-25V) and power output.
2. Overvoltage or Undervoltage Protection Triggered: If the input voltage is outside the acceptable range, the device may not charge. Use a compatible power source.
3. Faulty Charging Cable or Port: Check if the cable or adapter is damaged. Try using a different cable or adapter.
4. Battery is Full: If the battery level is 100%, charging will stop automatically.
5. Device Malfunction: If none of the above solutions work, the unit may have a fault. Contact customer support as mentioned in the manual.
If the issue persists, refer to the troubleshooting section or contact customer service.
This answer is automatically generated