Advertisement
Quick Links
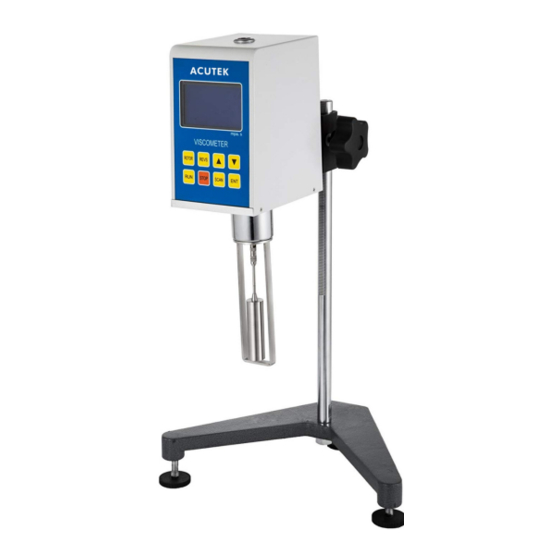
ACUTEK
New User Interface
- Keypad control
- Sharp viewing screen
for close up or
distance viewing
No calculations required
- Direct reading of
viscosity
Displayed Info:
- Viscosity (mPa•s)
- % Torque
- Speed/Spindle
8 Speeds
for wide range
capability
Bubble Level
conveniently located
for easy adjustment
Accuracy: ±1.0% of range
Repeatability: ±0.5%
What's Included?
Instrument
4 Spindles
Spindle Guard Leg
Lab Stand
Carrying Case
A220B Viscometer
www.digitalviscometer.com
Advertisement

Summary of Contents for ACUTEK A220B
- Page 1 ACUTEK A220B Viscometer New User Interface - Keypad control - Sharp viewing screen for close up or distance viewing No calculations required - Direct reading of viscosity Displayed Info: - Viscosity (mPa•s) - % Torque - Speed/Spindle 8 Speeds for wide range...
- Page 2 BLANK...
-
Page 3: Table Of Contents
Contents ----------Topic---------------- Page # 1. General...................1 2. Main Technical Data..............1 3. Environmental Conditions............1 4. Structure..................2 5. Installation..................3 6. Working Principle...............4 7. Operating Procedure..............4 8. Precautions...................7... -
Page 5: General
& repeatable results within set limits. The Acutek™ A-220B is widely used to determine & measure viscosity in many applications such as grease, paints, lacquer, varnish, pharmacy, detergent, soap, adhesives, polymers, inks and many more. -
Page 6: Structure
4. Structure... -
Page 7: Installation
List of Parts 1 LCD Display Base Nut 2 Keypad Panel 10 Printer Interface Socket 3 Spindle Connection 11 Temp. Probe Socket 4 Spindle 12 Clamping Bolt 5 Spindle Guard Leg 13 Mounting Clamp 6 Stanchion with Teeth 14 Power Socket 7 Base 15 Level Bubble 8 Base Adjusting Knob... -
Page 8: Working Principle
6. Working Principle This instrument is a rotary viscometer. Therefore a rotor/spindle can be rotated constantly by the variable speed stepping motor installed in the machine. Rotating the standard spindle, the spindles will be subject to a torque percentage proportional to liquid viscosity because of the liquid viscose hysteresis. - Page 9 Step 7: Press the ‘RUN’ button to start the measurement cycle. Wait for at least 5 complete rotations to get a stable reading. The value displayed against mPa.S is your viscosity. Scenario B: Spindle Number & Rotor is not know, but approximate idea of viscosity is know Step 1: Use the below table to guess the the spindle number &...
- Page 10 Step 7: Press the ‘REVS’ button to input the speed you wish to measure at. Use the arrow keys to toggle between 8 speeds from 0.3 RPM to 60 RPM. Then press ‘ENT’ to save your speed selection. Step 8: Press the ‘RUN’ button to start the measurement cycle. Wait for at least 5 complete rotations to get a stable reading.
-
Page 11: Precautions
In case the spindle and speed is wrong, the machine will give a message such as ‘Finished. Try Spindle S3’. If so, repeat the Step 6 until the desired spindle & speed is known. Step 7: Once done, the machine shall give a decision if this spindle is correct or you need to experiment with another spindle. - Page 12 4. The instrument mounted with rotor should not be revolved without liquid to avoid damaged to the axis tip. 5. Extreme care should be taken for mounting or removing rotors. Slightly lift the connecting screw bolt to avoid a transverse force acting on the rotor sensors.
Need help?
Do you have a question about the A220B and is the answer not in the manual?
Questions and answers