
Summary of Contents for BURGER MOTORSPORTS 135
- Page 2 Juice Box Stage 3 Professional (Pin out) Installation Guide – 5/13/09 JB3 professional/pin-out is intended for experienced enthusiasts only. If this is your first install please have someone on hand who has performed an install before. You can also review the install video on our website ahead of time to prepare. The directions in this guide supersede the install video.
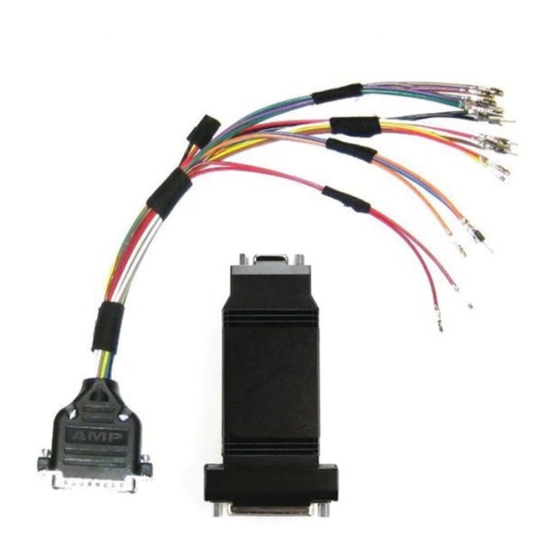
- Page 3 Juice Box Stage 3 Professional (Pin out) Installation Guide – 5/13/09 Removing the slider from the smaller driver side subconnector: 4) The harness is split in to four bundles, one for each subconnector. Take care to do one wire at a time as several ECU wires are the same color. Be careful to avoid mixing up the light red and dark red JB3 wires, the dark red wires will be in their own small bundle.
- Page 4 Juice Box Stage 3 Professional (Pin out) Installation Guide – 5/13/09 Large black subconnector: JB3 yellow: slot 10 (boost, yellow wire) JB3 light red: slot 11 (power, 5v reference, blue/yellow wire) JB3 brown: slot 17 (air intake temperature, red/yellow wire) JB3 white: slot 29 (crank position, yellow wire) JB3 black: slot 32 (ground, red/black wire) White subconnector:...
- Page 5 Juice Box Stage 3 Professional (Pin out) Installation Guide – 5/13/09 Photo of small black subconnector with JB3 loom installed: JB3 Pin Out Installation Guide © 2009 Copyright Burger Motor Sports, LLC 4 / 9...
- Page 6 (e.g. road race course) mixing in higher octane fuel is suggested. *** DISCLAIMER *** Because of its intended usage, Burger Motorsports, LLC & Terry Burger make no warranties whatsoever, expressed or implied, written or oral, to purchasers of Burger Motorsports products regarding performance, safety, fit, merchantability, length of service, or for any other criteria.
- Page 7 Juice Box Stage 3 Professional (Pin out) Installation Guide – 5/13/09 Map switching directions: Insert keyfob and press start button to turn ignition on (lights on dash, but engine not running). Press and hold the gas pedal down to the floor for 4 or more seconds, and then release pedal.
- Page 8 Juice Box Stage 3 Professional (Pin out) Installation Guide – 5/13/09 Map 8: --Race map --97 octane RM2 or greater required. The higher the octane, the more power. --Modifications like intake, downpipes, and intercooler strongly suggested --Lagfix enabled --May trigger tuner detection codes Map 9: --More aggressive race map --100 octane RM2 or greater required.
- Page 9 Juice Box Stage 3 Professional (Pin out) Installation Guide – 5/13/09 Troubleshooting Guide Troubleshooting is broken in to two distinct groups. The first are issues that come up during installation, like failure to start, yellow engine light (CEL) upon first start, etc. The second are issues that arise after the tuner has been installed and working properly for some time.
- Page 10 Juice Box Stage 3 Professional (Pin out) Installation Guide – 5/13/09 Engine starts with no lights, but upon first drive a big yellow engine light (CEL) appears: Cause 1) Normal ECU adaptation. It takes the ECU a few cycles to fully adapt to the JB3, and in rare cases this can result in a CEL.
Need help?
Do you have a question about the 135 and is the answer not in the manual?
Questions and answers