
Summary of Contents for Atlasen LEO
- Page 1 Atlasen LEO Wall-Mounted Type Installation Guide © 2021 atlasen | All rights reserved | www.atlasen.com...
-
Page 2: Table Of Contents
5. How to setup LEO---------------------------------------------------------------------5 6. How to setup LoRa-------------------------------------------------------------------- 8 7. How to setup Wi-Fi------------------------------------------------------------------10 8. How to select sensors---------------------------------------------------------------12 9. Product specification-----------------------------------------------------------------13 10. Cautions---------------------------------------------------------------------------------------14 11. Safety Precautions----------------------------------------------------------------------------16 12. Warranty---------------------------------------------------------------------------------------18 © 2021 atlasen | All rights reserved | www.atlasen.com... -
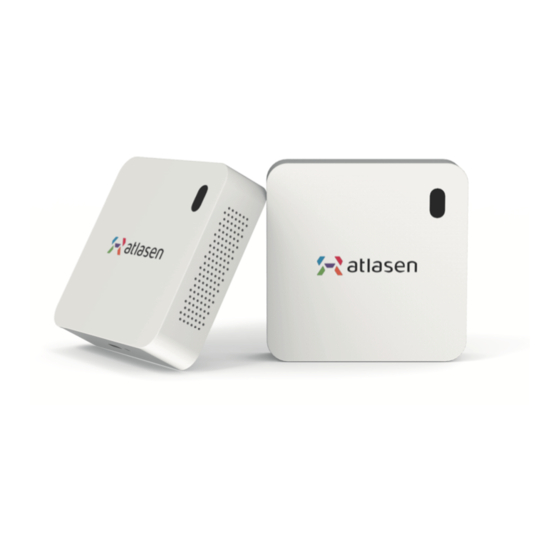
Page 3: Product Components
1. Product Components Part 1. Sensor Device FRONT BACK Part 2. AC/DC Converter BACK FRONT © 2021 atlasen | All rights reserved | www.atlasen.com... -
Page 4: Dimension
2. Dimension Part 1. Sensor Device : 94*94*25(mm) Part 2. . AC/DC Converter : 94*94*25(mm) © 2021 atlasen | All rights reserved | www.atlasen.com... -
Page 5: Management Target
3. Management target © 2021 atlasen | All rights reserved | www.atlasen.com... -
Page 6: How To Install
Put the Part 2 into the junction box and Connect the wire of the Part 1(Sensor combine Device) to Part 2. WALL WALL Wall Wire Wall Wire Fix the Part 1 by fitting it to the clasp Wall Wire © 2021 atlasen | All rights reserved | www.atlasen.com... -
Page 7: How To Setup Leo
Dimension 5. How to setup LEO © 2021 atlasen | All rights reserved | www.atlasen.com... - Page 8 © 2021 atlasen | All rights reserved | www.atlasen.com...
- Page 9 © 2021 atlasen | All rights reserved | www.atlasen.com...
-
Page 10: How To Setup Lora
Dimension 6.How to setup LoRa © 2021 atlasen | All rights reserved | www.atlasen.com... - Page 11 © 2021 atlasen | All rights reserved | www.atlasen.com...
-
Page 12: How To Setup Wi
7. How to setup Wi-Fi Dimension © 2021 atlasen | All rights reserved | www.atlasen.com... - Page 13 © 2021 atlasen | All rights reserved | www.atlasen.com...
-
Page 14: How To Select Sensors
Dimension 8. How to Select Sensors © 2021 atlasen | All rights reserved | www.atlasen.com... -
Page 15: Product Specification
Pollution degree IoT Connectivity Wi-Fi_802.11b/g/n(2.4GHz) , LoRa , MYTHINGS Analyzing Tool RESTful, SOAP, SQL, Server Support System Requirement Android 4.1 or later, iOS 8 or later Certification KC, FCC, UL, RESET © 2021 atlasen | All rights reserved | www.atlasen.com... -
Page 16: Cautions
If the orange light is shown, unplug the power and operate it again. If the problem is not resolved, please contact customer service. (Help Center: hello@atlasen.com) 9. In the case of malfunction or error, please contact customer service. © 2021 atlasen | All rights reserved | www.atlasen.com... - Page 17 Si le problème n'est pas résolu, veuillez contacter le service client. (Centre d'aide : hello@atlasen.com) 9. En cas de dysfonctionnement ou d'erreur, veuillez contacter le service client © 2021 atlasen | All rights reserved | www.atlasen.com...
-
Page 18: Safety Precautions
10.If the accessories (cables or power cables) are damaged or require replacement, please contact us. 11.We are not responsible for any accidents or problems caused by failure to comply with the safety precautions stated above. © 2021 atlasen | All rights reserved | www.atlasen.com... - Page 19 10.Si les accessoires (câbles ou câbles d'alimentation) sont endommagés ou doivent être remplacés, veuillez nous contacter. 11.Nous ne sommes pas responsables des accidents ou des problèmes causés par le non-respect des précautions de sécurité énoncées ci-dessus. © 2021 atlasen | All rights reserved | www.atlasen.com...
-
Page 20: Warranty
Product Name atlasen IEQ IoT Sensor Model Name atlasen LEO Serial No. Marked on surface of the case Date of Purchase MM-DD-YYYY Manufacturer atlasen, Korea /Country of Manufacture Seller Help Center hello@tlasen.com © 2021 atlasen | All rights reserved | www.atlasen.com... - Page 21 Indoor Environmental Quality CONTACT Address 221 Yeocksam-ro, Samyoung Bldg., Suite 605 Gangnam-gu, Seoul 06224, Korea Homepage www.atlasen.com E-Mail hello@atlasen.com © 2021 atlasen | All rights reserved | www.atlasen.com...
Need help?
Do you have a question about the LEO and is the answer not in the manual?
Questions and answers