Advertisement
Quick Links
Ducker Pro 2 Manual
Thank you for purchasing Bob Perry Ducker Pro 2. To be able to get the best out of this
product, we recommend you carefully read these instructions.
Firstly we will describe the user interface and will give a brief introduction to the control
elements. After that we will provide a quick guide to show some typical use cases for the
plug-in.
To use Bob Perry Ducker Pro 2, a Digital Audio Workstation (DAW) with support for AU (Mac),
VST2 (PC, Mac), VST3 (PC, Mac) or AAX 64 bit (PC, MAC) is required. We thoroughly tested
the plug-in with various versions of the following DAWs:
Steinberg Cubase (Mac, PC)
Steinberg Nuendo (Mac, PC)
PreSonus Studio One (Mac, PC)
Image-Line FL Studio (PC)
Adobe Audition (Mac, PC)
Extract the downloaded .zip file, if it hasn't been extracted automatically. Then simply open
the .pkg file and follow the installer's instructions.
Extract the downloaded .zip file, then open the installer file and follow the instructions.
The first installation path you will be prompted for will be the location of the manuals and the
uninstaller.
Then you will be asked for your VST2 paths. If you want to install the VST2 plug-ins, select the
VST2 path of your preferred DAW. If you don't want to install the VST2 plug-ins, you will be
able to deselect the VST2 components after clicking 'Next'.
Bob Perry Ducker Pro 2 Copyright © 2015-2021 Jonas Peters
VST is a software and trademark of Steinberg Media Technologies GmbH.
Preface
System Requirements
Reaper (Mac, PC)
Logic Pro X (Mac)
Avid Pro Tools (Mac, PC)
Harrison Mixbus (Mac, PC)
Cakewalk Sonar (PC)
Installation – macOS
Installation – Windows
Bob Perry Ducker Pro 2 – Manual – Page 1/18
20210113160816
Advertisement

Summary of Contents for BOBPERRY AUDIO Ducker Pro 2
- Page 1 Ducker Pro 2 Manual Preface Thank you for purchasing Bob Perry Ducker Pro 2. To be able to get the best out of this product, we recommend you carefully read these instructions. Firstly we will describe the user interface and will give a brief introduction to the control elements.
- Page 2 Bob Perry Ducker Pro 2 – Manual – Page 2/18 What does a Ducker do? Since you already have purchased the Bob Perry Ducker Pro 2, you probably already know what it's good for. Nevertheless, here is a quick summary: A Ducker reduces one signal's volume when a second signal's volume surpasses a set threshold.
-
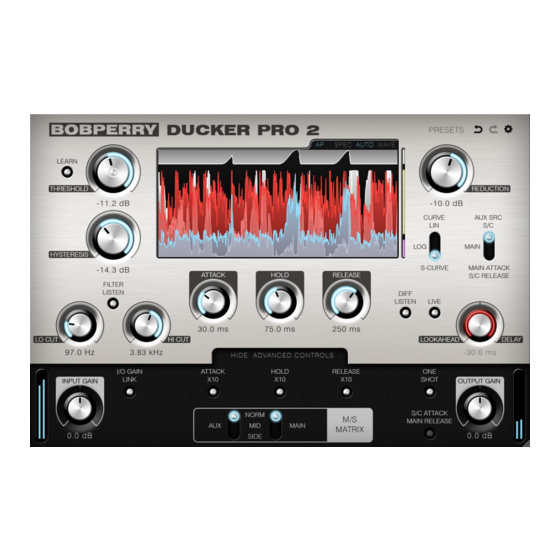
Page 3: User Interface
Click and hold the LEARN button to automatically set the Threshold value. While this button is pressed, Ducker Pro 2 will analyse the Aux Signal and set the Threshold to the sum of the Aux Signal and the THRESHOLD LEARN OFFSET. (see below) For best results, click and hold the LEARN button in pauses between segments you want the Ducker be triggered by. - Page 4 Bob Perry Ducker Pro 2 – Manual – Page 4/18 HYSTERESIS Sets the Hysteresis Threshold. While “Threshold” is the threshold for the “beginning” of the Ducking process, “Hysteresis” is the threshold for the “end” of the Ducking process. This means that, when your Aux signal has surpassed the Threshold and the Ducker is ducking, it will remain ducked, even if the signal does not surpass the Threshold any more, until the Hysteresis threshold is reached.
- Page 5 Bob Perry Ducker Pro 2 – Manual – Page 5/18 SPECTROGRAM AND WAVEFORM DISPLAY The Ducker Pro 2 Display has three modes: SPEC, AUTO and WAVE. Display WAVE Mode Click WAVE to enable WAVE mode. In this mode, the Display always shows the Waveform Display, displaying the following signals: ●...
- Page 6 Bob Perry Ducker Pro 2 – Manual – Page 6/18 Display SPEC Mode Click SPEC to enable SPEC mode. In this mode, the Display shows the Spectrogram Display, which always displays the Aux signal. When either LO CUT or HI CUT filter is set, the corresponding filter curves are shown.
- Page 7 LOOKAHEAD / DELAY Turn this dial to the left to increase Lookahead. Ducker Pro 2 will then react to your Aux signal Bob Perry Ducker Pro 2 Copyright © 2015-2021 Jonas Peters VST is a software and trademark of Steinberg Media Technologies GmbH.
- Page 8 Please refer to your DAW's manual for details. When enabling the side chain for the first time, Ducker Pro 2 will automatically set AUX SRC to S/C. (Due to the way Audio Units work, this behaviour is disabled for the AU version of Ducker Pro 2) Bob Perry Ducker Pro 2 Copyright ©...
- Page 9 Bob Perry Ducker Pro 2 – Manual – Page 9/18 SHOW ADVANCED CONTROLS Extends the Advanced Controls Drawer to reveal the following additional controls: INPUT GAIN + Input Meter Adjusts the main input signal's level if a plug-in in the signal chain has a high or low output.
- Page 10 Bob Perry Ducker Pro 2 – Manual – Page 10/18 ONE SHOT Enables the special “One shot mode”. In this mode, Ducker Pro 2 will duck only once with each Attack, Hold/Hysteresis and Release period. It will only restart to listen to the Aux signal once the previous Release period is over.
-
Page 11: Filter Resonance
If the Display Mode switch is set to AUTO, the display will switch to the spectrogram view accordingly when doing so. MIDI TRIGGER Enables MIDI TRIGGER mode: Ducker Pro 2 now responds to MIDI inputs, instead of audio signals. Bob Perry Ducker Pro 2 Copyright © 2015-2021 Jonas Peters VST is a software and trademark of Steinberg Media Technologies GmbH. - Page 12 In Logic Pro X, to use MIDI TRIGGER, create a Software Instrument track and insert a Bob Perry Ducker Pro 2 instance as an instrument (not as an insert FX!). Then use Logic’s Side Chain menu to “grab” your audio signal from your audio track. You will then want to mute your audio track’s output and only have the Software Instrument track output your signal.
- Page 13 Bob Perry Ducker Pro 2 – Manual – Page 13/18 ALLOW HYS+HOLD New plug-in instances will always open with “Allow Hysteresis+Hold” setting enabled. I/O GAIN LINK New plug-in instances will always open with I/O GAIN LINK enabled. TOOLTIP MODE Every control can show you a tooltip when hovering your mouse cursor over it for a couple of seconds.
-
Page 14: Typical Use Cases
First of all, you need to think about what signal you want to duck in dependence of which trigger signal (side chain). Then proceed as follows: 1) Load Ducker Pro 2 into the channel of the signal that you want to be ducked. (Main Signal) 2) Enable the side chain. (refer to DAW's manual for details) 2a) In the channel that provides the trigger signal (side chain), use an Aux Send to route the channel's signal onto the Ducker's side chain. - Page 15 4) De-esser If you have vocal recordings with too strong sibilance you can use Ducker Pro 2 as a perfect de-esser. Unlike the usual compressor based de-essers the reduction of the sibilance is proportional to the main signal and not inverse proportional.
- Page 16 For a very quick solution of a pumping remix you can use the M/S Matrix and filters to detect only the Bass Drum hits of a stereo track to trigger the Ducker. Set up the Ducker Pro 2 like we described for de-essing. But instead of filtering the low frequencies, filter the high frequencies.
-
Page 17: Technical Notes
Bob Perry Ducker Pro 2 – Manual – Page 17/18 Appendix Common plug-in installation paths Windows 32-bit VST3 plug-ins in 32-bit environments C:\Program Files\Common Files\VST3 32-bit VST3 plug-ins in 64-bit environments C:\Program Files (x86)\Common Files\VST3 64-bit VST3 plug-ins in 64-bit environments C:\Program Files\Common Files\VST3 VST2 plug-ins are usually installed into a subfolder of your DAW, called “VSTplugins”... - Page 18 Bob Perry Ducker Pro 2 – Manual – Page 18/18 We hope this manual leaves no questions unanswered. If you still have questions, feel free to contact us: support@bobperry-audio.com Bob Perry Ducker Pro 2 Copyright © 2015-2021 Jonas Peters VST is a software and trademark of Steinberg Media Technologies GmbH.
Need help?
Do you have a question about the Ducker Pro 2 and is the answer not in the manual?
Questions and answers