
Summary of Contents for SyntherJack 4sum
- Page 1 4sum portable audio mixer assembly instructions* v0.95 by SyntherJack.net *I've tried to keep it short and informative. Nobody reads manuals.
- Page 2 Main features: 4x mono inputs, • 1x stereo (double mono) output, • long battery life (average 100 hours), • output in phase with input, • high quality components, • designed for portability, • LED on/off indicator. • Mechanical data: size: •...
-
Page 3: Bill Of Materials
BILL OF MATERIALS Part/value Count Part on PCB Description Resistors 47 kΩ R1, R2, R3, R4, R5, R6, R7, R8, R9 0,6 W, metal film, 1% 4,7 kΩ 0,6 W, metal film, 1% Potentiometers 100 kA LVLI1, LVLI2, LVLI3, LVLI4, LVLO Alpha Taiwan RV09AF-40-20K-A100K Capacitors 10 μF... - Page 4 Step I : solder nine 47 kΩ resistors (R1..R9). Step II : solder one 4,7 kΩ resistor (R10). Step III : solder one Schottky diode (D1). Step IV : solder one 100 nF ceramic capacitor (C5). Mind the polarity! Black strip should be pointing top!
- Page 5 Step V : solder DIL8 socket (IC1). Step VI : bend legs of four 10 μF capacitors (C1..C4) and solder The small notch in socket should be pointing to the left! them (see photo). Mind the polarity! On tantalum capacitor positive (longer) lead is marked and it should be pointing to the left! Step VIII : solder power switch (PWR) and slide it to the right.
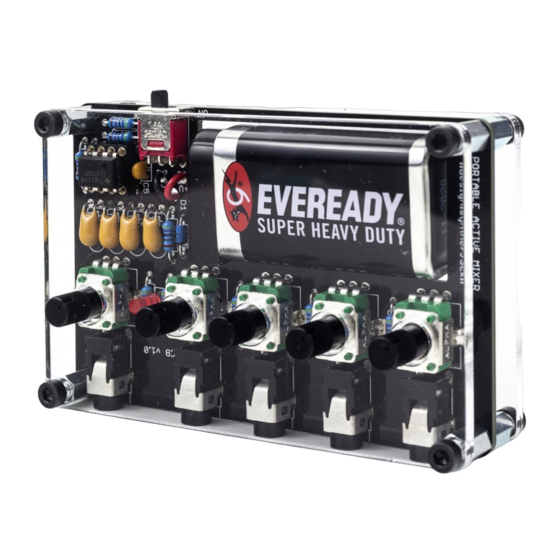
- Page 6 Step IX : solder LED (LED) slightly (~1 mm) above resistors. Step X : solder five potentiometers (LVL1..LVL4, LVLO). Mind the polarity! Cut edge (shorter lead) of the LED should be pointing to the top! Step XI : cut the battery connector to around 85 mm, strip both Step XII : inspection –...
- Page 7 Step XIII : insert the battery, remove protection form acrylic Step XIV : turn the device on – the LED should lit. The chance cover and connect it with screws and spacers using fingers. you've soldered everything correctly just increased! Turn it off. Step XV : Slightly bend the IC leads and put it into the socket.
- Page 8 Step XVII : Congratulations! Your brand new and shiny portable mixer is ready, I hope it looks as good as mine :)
- Page 9 Operation manual Controls: each knob sets the level for the corresponding • input/output (see diagram), fully left (anticlockwise) is equal to silence, fully right • (clockwise) to maximum volume level possible. First run: turn mixer OFF, • turn all IN knobs to around 50% (12 o'clock), •...
Need help?
Do you have a question about the 4sum and is the answer not in the manual?
Questions and answers