Advertisement
LETTER & NUMBER GUIDES
A B C D E F G H I J K L M
N O P Q R S T U V W X Y Z
1 2 3 4 5 6 7 8 9 0 ! ? # @ &
A B C D E F G H I J K L M
N O P Q R S T U V W X Y Z
1 2 3 4 5 6 7 8 9 0 ! ? # @ &
T RO U BLES HOOT ING TIPS
Etching looks rough: Press lightly on the plastic as you etch.
Pressing down hard creates a rougher finish.
Blue dust on the etching tool: As you etch, the foam stencil may create dust.
Stop the tool and remove the dust with your hand or paper towel.
Etching tool tip fell out: Just push it back in place, and continue to use.
On/Off button came off: Just push it back in place.
We have also included an extra button just in case.
Tool isn't working when I press down on the plastic: Be sure you are using fresh batteries.
Pushing too hard may slow the power of your etching tool.
Use light pressure to maximize battery life.
Etch-It Workshop #6264000
© Faber-Castell USA, Inc.
Designed in USA • Made in China
e-mail: consumer@fabercastell.com
Cleveland, Ohio 44125
Chat or view FAQS & INFO online:
www.fabercastell.com
supportcfk.fabercastell.com
ETCH-IT Workshop
ETCH-IT Workshop
BATTERY CAUTIONS
• Use only Alkaline batteries.
• Non-rechargeable batteries are not to be recharged.
• Do not mix different types of batteries or new and used batteries.
• Only batteries of the same or equivalent type as recommended
should be used.
• Batteries are to be inserted with the correct polarity.
• Exhausted batteries are to be removed from the toy.
• The supply terminals are not to be short-circuited.
• Instructions must be kept since they contain important information.
WARNING: The etching tool should only be used as directed with the components included in your kit.
Do not place the etching tool on any part of your body, furniture or other items. Younger children may
need help and adult supervision.
You will also need a pair of scissors and a pencil or pen.
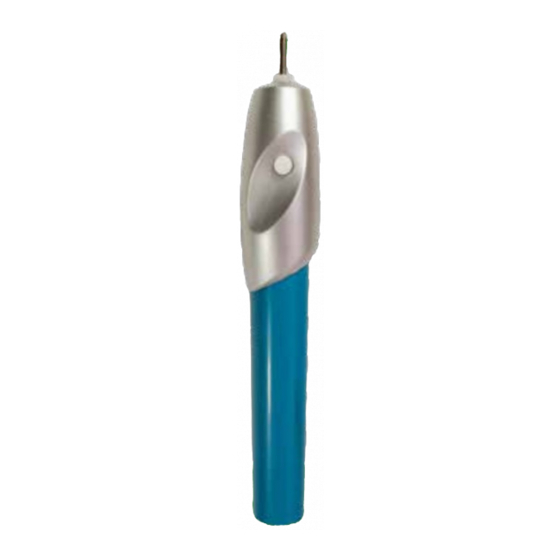
USING THE ETCHING TOOL
Use the foam sheet included to protect your workspace.
Hold the tool as shown in the photo. To turn it on, press the button and
hold it down. When you let go of the button, it will automatically turn off.
For your first time using the etching tool, we have included
a small square of plastic for you to test the tool. Try different
amounts of pressure. When you like how it looks,
you are ready to move on to the accessories.
You do not need to press too hard.
A light touch will create a cleaner etch.
Choose your accessory and decide what you would
like to etch into it. For design ideas refer to the
instructions and pictures on the packaging.
Need Help?
Call: 800-311-8684
The tool requires 2AA (2 x 1.5v) batteries.
(not included) Twist the top off. Place the
batteries in the bottom half of the tool as
shown and also marked on the barrel.
Screw top half back on.
Use the stencils and letter guide,
or create your own designs.
The possibilities are endless!
Whatever you etch
will be permanent.
#6264000 • Ages 7 to 97
Advertisement
Table of Contents

Summary of Contents for Faber-Castell Creativity for Kids Etch-It Workshop
- Page 1 For design ideas refer to the instructions and pictures on the packaging. Need Help? Etch-It Workshop #6264000 Call: 800-311-8684 © Faber-Castell USA, Inc. Whatever you etch e-mail: consumer@fabercastell.com Cleveland, Ohio 44125 Chat or view FAQS & INFO online: www.fabercastell.com...
- Page 2 PLAN YOUR DESIGNS HERE USING THE STENCILS Use the next page of your instructions to plan out your design. However, do not put the stencils on the paper. Reminder: Do not stick the stencils to the paper. When you are ready to etch, peel stencils off the backer and then position them on top of your accessory.
Need help?
Do you have a question about the Creativity for Kids Etch-It Workshop and is the answer not in the manual?
Questions and answers