Table of Contents
Advertisement
Quick Links
EyeOP1 & associated EYEOP-PACK
USER MANUAL
Version H of 2020/11/17
English
Date of CE-marking affixing: 05/2011
Printed by:
Manufacturer:
EYE TECH CARE
2871, Avenue de l'Europe
69140 RILLIEUX-LA-PAPE, FRANCE
Tel. +33 (0)4.78.88.09.00
Fax. +33 (0)4.78.97.45.11
support@eyetechcare.com
User Manual MUT_RD_009H_GB
Page 1 of 43
Advertisement
Table of Contents

Summary of Contents for EYE TECH CARE EyeOP1
- Page 1 EyeOP1 & associated EYEOP-PACK USER MANUAL Version H of 2020/11/17 English Date of CE-marking affixing: 05/2011 Printed by: Manufacturer: EYE TECH CARE 2871, Avenue de l’Europe 69140 RILLIEUX-LA-PAPE, FRANCE Tel. +33 (0)4.78.88.09.00 Fax. +33 (0)4.78.97.45.11 support@eyetechcare.com User Manual MUT_RD_009H_GB Page 1 of 43...
-
Page 2: Table Of Contents
3.5.2 Dysfunction ____________________________________________________________________ 19 3.5.3 Emergency stop device ___________________________________________________________ 19 SECTION 4: DESCRIPTION OF THE EyeOP1 DEVICE AND EYEOP-PACK CONSUMABLE _ 19 General presentation and focused ultrasound principle _________________________ 19 Description of the device elements __________________________________________ 20 4.2.1 The EyeOP1 Control Unit: _________________________________________________________ 20 4.2.2... -
Page 3: Section 1: Introduction
1. SECTION 1: INTRODUCTION 1.1 Use of the manual The present manual contains the instructions for use of the EyeOP1 electro-medical device (Control Unit) and the associated EYEOP-PACK consumable (sterile single-use device) composed of a therapy probe and a coupling cone equipped with a liquid trap. The system is indicated for clinical ophthalmologic use enabling cyclocoagulation of the ciliary body with focused ultrasound for the non-invasive treatment of glaucoma. -
Page 4: Icons And Symbols
Read the manual thoroughly before using the device and keep it for further use. The term ‘Medical device’ used in this manual refers to the combination of the EyeOP1 control unit and associated EYEOP-PACK consumables. 1.2 Icons and symbols... -
Page 5: Contra-Indications
This medical device (EyeOP1 control unit and associated EYEOP-PACK consumables) is intended to treat glaucoma. This device allows for non-invasive treatment of glaucoma via coagulation of part of the ciliary body by using focused ultrasound in order to reduce the production of aqueous humor and thereby to decrease the intraocular pressure (IOP). -
Page 6: Adverse Effects
- Infection of the eyeball. - Chronic ocular pain. - Headaches. 2.5 User profile This medical device (EyeOP1 Control Unit and associated EYEOP-PACK consumables) is not intended to be used by a layperson to perform a treatment. User Manual MUT_RD_009H_GB Page 6 of 43... -
Page 7: Treatment Session
(for combined cataract/glaucoma treatment). The ophthalmologist is trained for the use of the appropriate protocols. In addition, the present User Manual supplied the EyeOP1 Control Unit is available to the user, detailing the treatment procedure. The trained ophthalmologist may be assisted by a nurse or intern in performing the treatment preparation and monitoring during the treatment procedure. -
Page 8: Section 3: Safety And Precautions For Use
3. SECTION 3: SAFETY AND PRECAUTIONS FOR USE This section concerns the safety and precautions for use of the medical device (EyeOP1 control module, its accessories and associated EYEOP-PACK consumables). These precautions must be taken in order to ensure optimal product performance, treatment efficacy, as well as patient and operator safety. -
Page 9: General Warnings
The users shall comply with the maintenance guidelines provided by EYE TECH CARE in order to preserve the safety and performance of the medical device. That is why a periodic maintenance (annual) must be done by EYE TECH CARE or person qualified by EYE TECH CARE in order to do the necessary maintenance and calibration operations. -
Page 10: Main Warnings On Treatment
European Directives on medical devices The EyeOP1 medical device is not intended for domestic use. If it is not installed in compliance with the instructions for use, it can cause interference that could damage other more sensitive equipment or be disrupted by their possible excessive radio-electric emissions. -
Page 11: Protection Against Electric Shocks
If the EyeOP1 control unit is moved, check that the electric plug is suitable for the equipment. In case of fire and risk for a device, disconnect the EyeOP1 control unit from the mains network and contact the relevant staff. -
Page 12: Signage Plate Of The Eyeop1 Control Unit
3.4.1 Signage plate of the EyeOP1 Control Unit The signage plate of the EyeOP1 device is located on the rear side. It bears the following information: Address telephone number Supply voltage (V), frequency (Hz), and manufacturer (EYE TECH CARE). maximum absorbed power (VA). - Page 13 The information shown on these labels is described and explained in the table below and must be fully understood by the user: Adhesive label affixed to the EYEOP-PACK lid: Item code of consumable Size of the therapy probe and coupling cone Lot number CE marking...
-
Page 14: Electromagnetic Compatibility Tables (Emc)
IEC 60601-1-2 standard. Any incident related with electromagnetic compatibility must be reported to the manufacturer. Exposure of patients equipped with active implantable medical devices (pacemaker…) to the EyeOP1 control unit and associated EYEOP-PACK consumables must be supervised by a cardiologist. - Page 15 This symbol means that any equipment emitting radio waves must be OFF when close to the device. This symbol means that the equipment features a RF transmitter. Directives and manufacturer’s claim – electromagnetic emissions The medical device is intended for use in the electromagnetic environment described below. The customer or medical device user must ensure that it is used in such an environment.
- Page 16 40 % U EyeOP1 control unit from a failure-free (60 % dips of U Complies energy supply or from a battery. during 5 cycles...
- Page 17 It is important that fixed RF transmitter field intensity, determined by an electromagnetic investigation on site be less than the compliance levels, for each frequency range Interferences may occur close to the device marked with the following symbol: Note 1: at 80 MHz and at 800 MHz, the highest frequency range applies. Note 2: These directives may not apply in all cases.
-
Page 18: Safety System And Precautions
Note 2: These directives may not apply in all cases. Electromagnetic propagation is affected by absorption and reflection of structures, objects and persons. 3.5 Safety system and precautions 3.5.1 Characteristics and roles of the general system safeties Safety checks are constantly being performed by the medical device software throughout the various phases of its use. -
Page 19: Dysfunction
PACK CONSUMABLE 4.1 General presentation and focused ultrasound principle The EyeOP1 control unit, combined with the sterile single-use EYEOP-PACK consumable, is intended for clinical use in ophthalmology, enabling to treat glaucoma by cyclo-coagulation of the ciliary body with focused ultrasound delivered by the therapy probe, thereby allowing for a reduction of the intraocular pressure (IOP). -
Page 20: Description Of The Device Elements
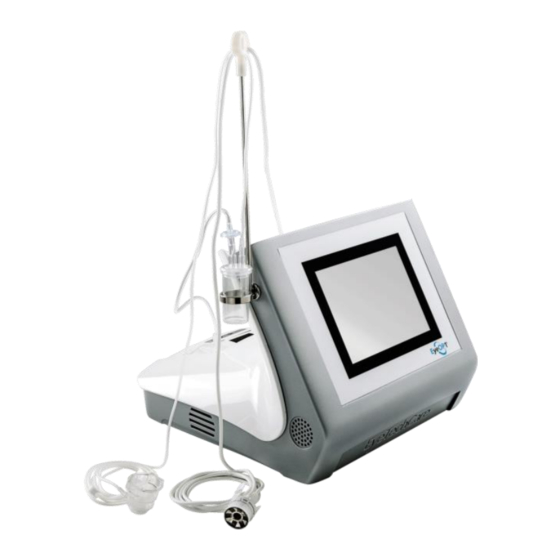
The EyeOP1 Control Unit which enables to set up the parameters and control the procedure throughout the treatment. The therapy probe, the active element which is connected to the EyeOP1 Control Unit and delivers the focused ultrasound via the six transducers. - Page 21 Front view of the Control Unit: The touch screen is in the middle The ON/OFF button is on the side. Rear views of the Control Unit: The printer (3) is in the middle, Connection for the therapy probe (1) cable is on the left side, Connection for the suction circuit (2) is on the right side.
-
Page 22: The Single-Use Eyeop-Pack Consumable
The EYEOP-PACK is a sterile single-use consumable, necessary for operating the medical device via connection to the EyeOP1 Control Unit. It is prescribed by an ophthalmologist for a given patient, and contains the therapy probe, as well as the coupling cone linked to a liquid trap (see figure 1). The EYEOP- PACK comes in three diameters, i.e. - Page 23 Three EYEOP-PACK models are available (11 mm, 12 mm and 13 mm model). The appropriate probe size is chosen by the user using a nomogram provided by EYE TECH CARE. Read the instructions associated with the nomogram carefully before use.
-
Page 24: Description Of The System Installation And Treatment Configuration
To fully stop mains supply, press on the ON/OFF button or disconnect the mains supply plug. As both elements are used as sectioning devices, they must remain easily accessible. The EyeOP1 Control Unit must be installed in a stable horizontal position in a cleared area, next to the patient’s head. -
Page 25: Section 5: Switching On The Eyeop1 Control Unit
(this may occur if the control unit is left unused for several months), please leave the latter powered on for 24 hours after the treatment session, in order to recharge the battery, thus preventing complete discharge that would require servicing by EYE TECH CARE before the device could be reused. -
Page 26: General Rules And Conventions
Start Home User information Settings User information Patient Patient identification information Selection of the Eye, of the Treatment treatment protocol and of the IOP Probe connection Equipment Vacuum test preparation Cone and probe positioning Execution Treatment Treatment Report report Shut down Same User New User 6.2 General rules and conventions... -
Page 27: Data Entry
In some cases, when the conditions required to go to previous or next screen are not met (incomplete process, data not entered or incorrect, etc.), the corresponding arrows are blackened (figure 3), and pressing on them will have no effect. Figure 3: switch to the next screen is not possible In some cases, this navigation bar is implicit and therefore is not displayed. -
Page 28: Step 1. Information For The Physician-Ophthalmologist-User
Before starting the procedure, make sure you have read and understood the ‘safety and precautions for use’ part of Section 3. The anesthesia (general, local or topical) must be performed on the patient only after the medical device has been switched ON and after checking its proper operation. Leave enough time for the anesthesia to be effective. -
Page 29: Step 3. Selection Of The Eye And Of The Number Of Sectors To Treat
Select NEW PATIENT in order to enter information on the patient to be treated. This option must be ticked regardless of the patient to be treated and no matter if he/she has already undergone a previous treatment in the past. Enter the patient’s last name (the 3 first letters at a maximum) and validate. -
Page 30: Step 4. Equipment Preparation
Handle the therapy probe with care. A shock applied to the transducers could damage them and affect the treatment safety. In case of doubt, use a new EYEOP-PACK. Connecting the therapy probe to the EyeOP1 Control Unit: Connect the therapy probe to the rear of the Control Unit (as shown on the screen): 1. - Page 31 2. Orientate the engraved visual cue of the probe connector (a vertical line) with the one of the Control Unit (a red dot), 3. Then, push the probe connector to the maximum. Attach the cable to the cable holder of the Control Unit.
- Page 32 Start the vacuum test by pressing on Test >Start< wait a few seconds for the test results. During the test, a “Testing” message is displayed until a sufficient and stable vacuum level is achieved Results of vacuum test: ➔ If the test complies: 1.
- Page 33 Center the coupling cone in order to visualize a uniform peripheral white ring (visible inside the cone) and keeping vertical the patient’s optical axis. Make sure not to rub the conjunctiva too much. A minimal uniform scleral ring ≥ 2mm is needed Good centering centering: reposition the coupling cone before the treatment.
- Page 34 Then, squeeze the tabs gently to let the probe drop into place at the bottom of the coupling cone. A distinct “click” noise will be heard and “felt”, which indicates the probe is correctly locked in place. Release the tabs of the probe. Do not try to rotate the probe in the coupling cone.
-
Page 35: Step 5. Treatment
Go to the next step by pressing on the blue arrow in the bottom right corner of the screen. Moving to the next step is possible only if the coupling cone is securely positioned on the eye, indirectly indicated by the ‘green’ vacuum level bar. In case of suction problems (vacuum level in red), an error message is displayed. - Page 36 Once the first session of treatment done, release the firing pedal For 6-sectors protocol, refers to Step 6 “Treatment completion”. For 8-sectors protocol: after a loading period, a message is displayed, asking the user to rotate the therapy probe in the coupling. Rotation of the therapy probe in the coupling cone (only for 8-sectors protocol):...
-
Page 37: Step 6. Treatment Completion
Step 6 5.3.6 . Treatment completion When treatment is completed, suction automatically stops. Release the firing pedal. The Control Unit automatically displays the Treatment Report screen describing operations carried out for each sector, and a first automatic print (default print) is delivered by the printer located at the rear of the Control Unit. -
Page 38: Other Settings
6.4 Other settings In the Main Menu screen, it is possible to access the Settings Menu to adjust different parameters by selecting icon at the top of the screen. 6.4.1 Adjusting the screen brightness and sound volume When in the Settings Menu, press on SYSTEM. To return to the main menu, press on the blue arrow on the bottom left corner of the screen. -
Page 39: Adjusting Automatic Treatment Report Printing
6.4.2 Adjusting automatic treatment report printing Press the SYSTEM icon on the Settings Menu screen. To return to the Main Menu, press the blue arrow in the bottom left-hand corner of the screen. Press the Icon. When it turns green , this means that automatic printing is enabled and that a paper printout will automatically be produced upon... -
Page 40: Language Selection
: scrolling the paper (keep button depressed). : pausing the printer. Press a second time to cancel the pause. In case of need of additional printer paper, contact the EYE TECH CARE technical department at support@eyetechcare.com, or the local representative. -
Page 41: Section 7: Errors And Warranty
7. SECTION 7: ERRORS AND WARRANTY 7.1 Warranty The EyeOP1 Control Unit must be checked and revised once a year by qualified personnel appointed by the manufacturer. EYE TECH CARE cannot be held responsible for safety, reliability and incorrect operations under the following conditions: 1. -
Page 42: Breakdowns And Errors
❶ The therapy probe is no longer detected on reaching the treatment initialization step: A message informs the user that he may: 7 Either permanently cancel the treatment. He will be redirected to the Treatment Report screen, 8 Or restart manual detection of the probe after rechecking its correct connection to the control unit. -
Page 43: Section 8: Maintenance And Cleaning
Furthermore, if the medical device is damaged due to use other than described in the present manual, immediately inform the technician. The user and/or patient should report to EYE TECH CARE and the competent authority of the country in which the user and/or patient is established any serious incident that has occurred in relation to the EyeOP1/EYEOP-PACK medical device. -
Page 44: Transportation
When transporting the EyeOP1 Control Unit over short distances, carry using the handle located at the rear. Avoid shocks and carry using both hands. To transport the device over long distances, place the EyeOP1 Control Unit in its storage case and avoid shocks. - Page 45 Addition of a note orientating the user in case of need of printer paper. Addition of a note asking the user and/or the patient to contact EYE TECH CARE and the competent authority in case of occurrence of a serious incident involving the SECTION 9 §2...
Need help?
Do you have a question about the EyeOP1 and is the answer not in the manual?
Questions and answers