
Related Manuals for mammotome REVOLVE


Summary of Contents for mammotome REVOLVE
- Page 1 NSTRUCTIONS AND PERATIONS UIDE www.mammotome.com/ifu eIFU number: 001413...
-
Page 2: Table Of Contents
NSTALLATION AND ETTING TARTED Preventative Maintenance ..........................3-1 Unpacking/Assembling the Mammotome revolve Control Module..............3-1 Unpacking the Cart.............................. 3-2 Unpacking the EX Holder (Cart Detachable Component) ................... 3-2 Placing the Control Module on the Cart ......................3-2 Unpacking the Holster............................3-3 Unpacking the Remote Footswitch ........................ - Page 3 (OPTIONAL) Connecting the Remote Keypad to the Control Module ............ 3-6 Connecting the Vacuum Canister to the Control Module ..............3-6 (OPTIONAL – EX ONLY) Connecting the Sleeve to the Mammotome revolve EX Holster ...... 3-7 Loading the Mammotome revolve Probe onto the Mammotome revolve Holster ....... 3-8 Connecting the Probe Vacuum Tube Set to the Mammotome revolve Dual Vacuum-Assisted Biopsy System ..............................
- Page 4 Instructions for Use ............................. 6-2 Steps for Tissue Sampling ..........................6-2 Other Instructions ............................6-5 Disassembling the Mammotome revolve Biopsy System ................6-7 Shutting Down the Mammotome revolve Dual Vacuum-Assisted Biopsy System ........6-10 ......................7-1 HAPTER LEANING AND ISINFECTION Introduction ................................
- Page 5 RFID Frequency Information ..........................10-6 WEEE (The Waste Electrical and Electronic Equipment Directive ..............10-7 All Other Symbol and Labeling Information ...................... 10-7 How Supplied ..............................10-7 Responsibility of the Manufacturer ........................10-7 Calling for Service .............................. 10-8 Requesting a Paper Copy of the Information for Use (IFU) ................10-8 Additional Product Information ........................
-
Page 6: Chapter 1 Introduction
NOTE: The information in this guide is subject to change without notice. Indications The Mammotome revolve Dual Vacuum Assisted Biopsy (VAB) System is indicated to provide tissue samples for diagnostic sampling of breast abnormalities. • The Mammotome revolve Dual Vacuum Assisted Biopsy (VAB) System is intended to provide breast tissue for histologic examination with partial or complete removal of the imaged abnormality. -
Page 7: General
Do not immerse electrosurgical instruments in liquid unless the instruments are designed and labeled to be immersed. The Mammotome revolve Dual Vacuum Assisted Biopsy System is not suit able for use in environments that contain a mixture of flammable anesthetic and air or oxygen and nitrous oxide. -
Page 8: Control Module
Ensure that all cords are clear of the cart wheels prior to transporting the system. Do not attempt to open or access internal components of the Mammotome revolve Dual Vacuum- Assisted Biopsy System, as safety hazards may exist. -
Page 9: Training
Chapter 9, Service and Troubleshooting, Contact Information.) System Components Only the devices identified below are designed for compatible functionality with the system. The Mammotome revolve Biopsy System comprises the following components: Mammotome revolve EX System (for Ultrasound Guided Procedures) •... - Page 10 Mammotome revolve ST Holster and ST Probes are only compatible with Mammotome revolve System Software. • Bemis 800cc Vacuum Canister (Manufactured for use with the Mammotome revolve dual Vacuum- Assisted Biopsy System) • Mammotome revolve Specimen Management System(s) • Mammotome revolve Probe Guide(s) Mammotome revolve U/S System (for Ultrasound Guided Procedures) •...
-
Page 11: Chapter 2 System Description
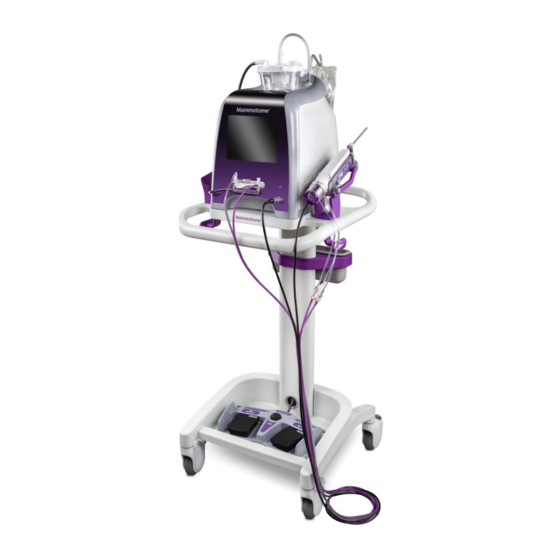
Biopsy site identifiers are not intended to be placed through the EX probe. Alternative methods should be used if placement of a biopsy site identifier is required. NOTE: Refer to the Biopsy Site Identifier Instructions for Use for compatibility, confirmed fit, function, and length with the Mammotome revolve Dual Vacuum-Assisted Biopsy System. - Page 12 Mammotome revolve Dual Vacuum-Assisted Biopsy System comprises the following components and input devices: Figure 1. Mammotome revolve Dual Vacuum-Assisted Biopsy System Components...
-
Page 13: Control Module
The working load of the Mammotome revolve cart is equivalent to the mass of the Mammotome revolve components (control module, footswitch, remote control, ST holster and holder, EX holster and holder), which is 34 lbs. The total mass of the Mammotome revolve cart loaded with the Mammotome revolve system is 75 lbs. -
Page 14: Ex Holders (Cart Detachable Component)
Figure 3. Cart Illustration and Nomenclature EX Holders (Cart Detachable Component) The EX holders are designed exclusively for use with the Mammotome revolve Cart to contain the Mammotome revolve EX Holster and/or EX Probe in the clinical environment. Figure 4.: EX Holders Illustration... - Page 15 A biopsy site identifier may be used in conjunction with the Mammotome revolve probes to radiographically mark the location of the biopsy procedure. In the event of removal of evidence of abnormality, it is strongly recommended that a marking device be placed to mark the biopsy site in case follow-up is required.
- Page 16 Figure 6. Vacuum Tube Set Illustration and Nomenclature Table 1. Mammotome revolve ST Probe Specifications Dimension (mm) 8G 9cm 8G 12cm 8G 15cm 10G 9cm 10G 12cm 10G 15cm MST0809 MST0812 MST0815 MST1009 MST1012 MST1015 A: Needle Height B: Needle Width 3.45...
-
Page 17: U/S Probe And Vacuum Tube Set
A biopsy site identifier may be used in conjunction with the Mammotome revolve U/S probes to mark the location of the biopsy procedure. In the event of removal of evidence of abnormality, it is strongly... - Page 18 Figure 8. U/S Probe and Vacuum Tube Set Illustration and Nomenclature Table 2. Mammotome revolve U/S Probe Specifications Dimension (mm) MHUS08 MHUS10 A: Needle Height B: Needle Width 3.45 C: Tip to Center 21.0 17.5 D: Needle Length 123.55 124.04...
-
Page 19: Ex Probe, Vacuum Tube Set, And Sleeve
Figure 9. Mammotome revolve U/S Probe Illustrations EX Probe, Vacuum Tube Set, and Sleeve The EX Probe (along with its integrated components: Specimen Management System, Vacuum Tube Set, and Optional Sleeve) is a sterile, single-patient use device that may be used with imaging guidance to excise a tissue sample for diagnosis. - Page 20 Figure 10. EX Probe, Vacuum Tube Set, and Sleeve Illustrations and Nomenclature Table 3. Mammotome revolve EX Probe Specifications Dimension (mm) MHEX08 AND MHEX08S A: Needle Height 5.99 mm (6.0) B: Needle Width 4.26 mm (4.3) C: Tip to Center 23.3 mm...
-
Page 21: Input Devices
Figure 11. Mammotome revolve EX Probe Illustrations Input Devices The buttons used to activate the clinical functions of the Mammotome revolve Dual Vacuum-Assisted Biopsy System are located on an input device. Three input devices are available for use with the system:... - Page 22 The sample aperture can be manually rotated by using the wrist to rotate the probe/holster assembly to the desired orientation. Three fingertip-operable buttons on the U/S Holster control the functions of the Mammotome revolve Dual Vacuum-Assisted Biopsy System.
- Page 23 The sample aperture can be manually rotated by using the wrist to rotate the probe/holster assembly to the desired orientation. Three fingertip-operable buttons on the EX Holster control the functions of the Mammotome revolve Dual Vacuum-Assisted Biopsy System. Figure 14. EX Holster Illustration EX Specific Holster Functions •...
- Page 24 NOTE: The sample collection area can be manually rotated by holding the outside of the sample collection area to move to next desired chamber. • VACUUM (VAC) button. Activates vacuum aspiration and probe clearing. Press and hold to activate vacuum aspiration for the duration of the press. The cutter retracts and vacuum is applied for up to 15 seconds.
- Page 25 Figure 16. Remote Keypad Illustration and Nomenclature 2-15...
- Page 26 Table 4. Input Device Button Operations for ST and U/S Only U/S Holster Remote Remote Button Description ST Holster Footswitch Keypad Activates tissue sampling. When the BIOPSY button is depressed, the specimen management system first indexes to the next available chamber, to receive the attempted specimen.
- Page 27 U/S Holster Remote Remote Button Description ST Holster Footswitch Keypad Activates vacuum aspiration and probe clearing. • Press and hold to activate vacuum aspiration for the duration of press. The cutter retracts and vacuum is applied for up to 15 seconds. •...
- Page 28 Table 5. Input Device Operations for EX Only EX Holster Remote Remote Button Description Footswitch Keypad Activates tissue sampling. When the BIOPSY button is pressed, the previous specimen advances to sample collection area. BIOPSY • Press and release for single specimen acquisition.
-
Page 29: Detachable Components
Figure 17. Vacuum Canister Detachable Component The Mammotome revolve probe guide (ST only) is a sterile, single-patient use device used with a Mammotome revolve ST probe during a stereotactic procedure. It is designed to guide and stabilize the probe trocar shaft. Refer to... -
Page 30: System Software
System Software Mammotome revolve Dual Vacuum-Assisted Biopsy System arrives loaded with applicable system software. System software functions are described in Chapter 8: Software Description. 2-20... -
Page 31: Chapter 3 Initial Installation And Getting Started
Unpacking/Assembling the Mammotome revolve Control Module • To unpack, lift the control module from the box and remove the protective wrapping. • Items included in shipping box: Mammotome revolve Dual Vacuum-Assisted Biopsy Control Module Safety Information Booklet Power Cord Saline Pole Flexible Vacuum Source Tube... -
Page 32: Unpacking The Cart
Removal and Attachment Instructions Placing the Control Module on the Cart Place the Mammotome revolve Control Module on the cart, ensuring the feet of the control module are positioned in the recesses of the cart top base. Secure the control module to the cart by tightening the two thumbscrews attached to the cart. The thumbscrews are positioned under the recess of the cart top base. -
Page 33: Unpacking The Holster
Unpacking the Holster Lift the holster from the box and remove the protective wrapping. • Items included in the shipping box: ST Holster with attached electrical cable U/S Holster with attached electrical cable EX Holster with attached electrical cable WARNING: Before using the holster, inspect its electric cable for fraying or damage. -
Page 34: Connecting The Holster To The Control Module
If a holster has already been attached, the control module recognizes the device and displays a screen prompt to attach a probe. (See Step 6: Loading the Mammotome revolve Probe onto the Mammotome revolve Holster.) If no holster has been attached, the touchscreen interface on the control module displays prompt: A holster must be attached via the holster connection port to proceed with setup. - Page 35 Place the holster in its designated docking station: ST Side EX Side U/S Side U/S Side NOTE: To ensure the holster is secure in its docking station on the cart, ensure the probe tubing (if a probe is attached to the holster) and holster electric cable are out of the way and do not obstruct placement.
-
Page 36: Optional) Attaching The Ex Holder (Cart Detachable Component) To The Cart
WARNING: Use care when placing the holster in its docking station, to ensure it does not slip out of its cradle. NOTE: The cart arrives with the U/S docking station on the left side and the ST docking station on the right side. -
Page 37: Optional - Ex Only) Connecting The Sleeve To The Mammotome Revolve Ex Holster
Place the assembled vacuum canister in the well at the top of the Mammotome revolve Control Module. NOTE: Ensure that the canister and lid are correctly assembled to prevent a vacuum error. Incorrect assembly can prevent the system from completing initialization. -
Page 38: Loading The Mammotome Revolve Probe Onto The Mammotome Revolve Holster
When the sleeve is fully engaged with Mammotome revolve EX Holster, vertically lift them off the docking station. With the second hand, pull the assembly collar down the length of the Mammotome revolve EX Holster cable until the folded material on the collar has reached its full length, partially down the EX Holster cable. - Page 39 Ensure all connections are secure before loading the probe. NOTE: • Only the Mammotome revolve probes with the letters “ST” in the product code should be used with the Mammotome revolve ST Holster. • Only the Mammotome revolve probes with the letters “US” in the product code should be used with the Mammotome revolve U/S Holster.
- Page 40 NOTE: Steps d. through g. below are specific to each probe: ST Probe U/S Probe EX Probe ST Probe Only Ensure the holster’s firing fork is securely tightened before attempting to load the probe. If it is NOTE: loose, use a coin to tighten it. DO NOT OVER-TIGHTEN. Before the probe is attached to the holster, ensure that the Specimen Management System’s marker port is aligned with the alignment indicator on the probe body, as shown below.
- Page 41 The locking mechanism engages to confirm attachment. Carefully place holster/probe assembly on the cart’s ST docking station until you are ready to initiate the tissue sampling procedure. U/S Probe Only Before the probe is attached to the holster, ensure that the Specimen Management System’s marker port is aligned with the alignment indicator on the probe body, as shown below.
- Page 42 Grasp the holster (with or without sleeve attached) and move toward the middle of the probe body. Align the front tab of Mammotome revolve EX Holster/Sleeve assembly with the front tab slot of Mammotome revolve EX Probe and push forward.
-
Page 43: Connecting The Probe Vacuum Tube Set To The Mammotome Revolve Dual Vacuum-Assisted Biopsy System
(e.g., Needle tip to cart surfaces or Control Module). Connecting the Probe Vacuum Tube Set to the Mammotome revolve Dual Vacuum-Assisted Biopsy System Connecting the Vacuum Tube Set to the Saline Bag Remove the saline spike cover from the saline spike. - Page 44 slippage or device damage can occur. NOTE: Do not disconnect the tubing while the system is on. iii. Hang the saline bag on the saline pole at the back of the control module by moving the bag around the right side of the control module to the back. PRECAUTION: The saline spike should be below the saline bag when the bag is hung on the saline pole, ensuring the spike tubing is not kinked.
-
Page 45: Holster/Probe Assembly Initialization
Connecting the Vacuum Tube Set to the Control Module Using sterile technique, remove the vacuum tube set from the probe package. To avoid damage, do not flip the device into the sterile field. Note: Prior to use, remove and discard the retainers that secure the vacuum lines in the packaging. -
Page 46: Select Side Of Holster And Ready For Procedure (St Only)
To initialize the system: Touch the forward arrow on the touchscreen interface to proceed with initialization. When initialization is complete, the Touchscreen interface instructs the user to select an operating side at the holster (ST Only). For Ultrasound guided procedures (U/S and EX), the software goes directly from Initialization to the Ready Screen. - Page 47 on the left-hand side. To change the selected operating side of the ST holster: Press and hold ( 2 seconds) any button on the opposite side of the holster to prompt the system to change sides. The blue LEDs on both sides of the holster flash slowly, prompting the user to touch any button on either side of the holster to identify the desired operating side.
- Page 48 ST and U/S EX Only • On these screens, the user can adjust the default settings or continue with tissue sampling as described in Chapter 4 (ST), Chapter 5 (U/S), or Chapter 6 (EX). 3-18...
-
Page 49: Chapter 4 Stereotactic (St) Instructions For Use
This chapter provides a step-by-step description for collecting tissue samples using the Mammotome revolve Dual Vacuum-Assisted Biopsy System for a Stereotactic Guided Procedure. Mammotome revolve ST Probe and ST Holster Summary Description The Mammotome revolve ST Probe and ST Holster are used together to perform a stereotactic breast biopsy procedure. • holster is a non-sterile, reusable instrument with one electrical cable for transmitting information to the control module. - Page 50 NOTE: The sample aperture is oriented by manually rotating the ST holster aperture rotation knob or the ST probe aperture rotation thumbwheel to the desired position around the sample aperture. • VACUUM (VAC) button. Activates vacuum aspiration and probe clearing. Press and hold to activate vacuum aspiration for the duration of press.
-
Page 51: Preparation For Use
Instructions for Use Steps for Tissue Sampling Using sterile technique, insert a Mammotome revolve probe guide into the probe guide holder. Manually rotate the probe guide, in the holder, as necessary to ensure that the peak on the probe guide is aligned with the 12 o’clock position on the probe’s aperture rotation thumbwheel. - Page 52 NOTE: The sample aperture is in the CLOSED position after arming. NOTE: The holster cannot operate the ARM/FIRE clinical functions in the variable aperture setting. The aperture must be set to the full (open) setting for the ARM/FIRE clinical function to be activated. WARNING: Ensure that no hard material is forced into the aperture.
- Page 53 NOTE: Immediately after the trocar shaft has disengaged, the sample aperture is in the fully open position. If you wish to have the sample aperture closed, press the open/close button on the input device to move the cutter to the closed position. After the probe has been introduced into the percutaneous site using either of the methods listed above, the device is ready for tissue biopsy: Orient the sample aperture to the desired position by manually rotating the ST holster aperture...
- Page 54 NOTE: Refer to Chapter 8: Software Description for more information about the clinical function buttons and the touchscreen interface. When the biopsy cycle is complete, as defined above, rotate the aperture rotation thumbwheel on the probe or aperture rotation knobs on the holster to the desired position for the next sample acquisition. Repeat steps 9-10 as necessary to obtain additional tissue specimens.
-
Page 55: Other Instructions
Perform post biopsy imaging of the patient and specimens as necessary. Place a biopsy site identifier, if desired, by pressing the OPEN/CLOSE button on the input device to Open the aperture. NOTE: Do not activate the probe cutter or other clinical functions while a marker is inserted in the probe. - Page 56 During sampling, when the cutter reaches the distal end of the sample aperture, it stops moving momentarily and a tone sounds, indicating the biopsy cycle is complete. The green LEDs on the holster interface illuminate to indicate the position of the cutter. iii.
-
Page 57: Disassembling The Mammotome Revolve Dual Vacuum-Assisted Biopsy System
Continue the biopsy procedure, if desired. Disassembling the Mammotome revolve Dual Vacuum-Assisted Biopsy System When the tissue sampling procedure is complete, the user must discard the disposable system components. Disconnecting the ST Probe and Vacuum Tube Set Using standard medical technique, remove the probe guide from the probe guide holder. - Page 58 Disconnect the vacuum tube set line from the vacuum canister. NOTE: Ensure the system is in standby before removing the vacuum tube set lines from the vacuum canister. Do not disconnect tubing while system is at the Ready screen. Disconnect the valve cartridge from the front of the control module. Optional: Connect the probe’s two lateral vacuum tube set lines to each other and pinch the pinch valve, if desired, for disposal.
-
Page 59: Shutting Down The Mammotome Revolve Dual Vacuum-Assisted Biopsy System
Disconnect the holster electrical cable from the control module. Clean disinfect the holster for later use as described in Chapter 7: Cleaning and Disinfection. NOTE: The Mammotome revolve Dual Vacuum-Assisted Biopsy System should be shut down once per day. 4-11... -
Page 60: Chapter 5 Ultrasound (U/S) Instructions For Use
• YMBOLS Mammotome revolve U/S Probe and U/S Holster Summary Description The Mammotome revolve U/S Probe and U/S Holster are used together to perform an ultrasound-guided breast biopsy procedure. • holster is a non-sterile, reusable instrument with one electrical cable for transmitting information to the control module. -
Page 61: Preparation For Use
If a remote input device is attached (e.g. remote footswitch, remote keypad), the blue LED on the U/S holster illuminates in the Active (flashing) state only. Preparation for Use To prepare the Mammotome revolve Dual Vacuum-Assisted Biopsy System for tissue sampling, refer to Chapter 3: Initial Installation and Getting Started. -
Page 62: Instructions For Use
Instructions for Use Steps for Tissue Sampling Prepare the percutaneous site in accordance with standard surgical technique prior to insertion of the probe. Incise the selected area adequately to accommodate the trocar shaft. NOTE: Ensure that you incise the selected area before penetrating the breast with the probe. NOTE: Ensure that the patient and the probe are in the correct location for tissue biopsy. - Page 63 • The biopsy cycle can be interrupted to avoid unnecessary injury or visualize the location of the sample aperture via imaging, if desired. (Refer to Other Instructions: Sample Interrupt.) • Do not remove the specimen collection chambers during tissue acquisition. NOTE: Do not move the probe during the biopsy cycle, as defined above.
-
Page 64: Other Instructions
Perform post-biopsy imaging of the patient and specimens as necessary. Place a biopsy site identifier if desired, by pressing the OPEN/CLOSE button on the input device to Open the aperture. NOTE: Do not activate the probe cutter or other clinical functions while a marker is inserted in the probe. - Page 65 iii. Rotate the probe/holster assembly to orient the sample aperture for the next sample acquisition. Continue the biopsy procedure at Step 7, removal of the specimen collection chambers from the device. Sample Interrupt The biopsy cycle may be interrupted to avoid unnecessary injury. To interrupt the biopsy cycle, push any button other than BIOPSY when the cutter is retracting from position 1 to 3 or when the cutter is advancing from 3 to 2.
-
Page 66: Disassembling The Mammotome Revolve Biopsy System
Continue the biopsy procedure, if desired. Disassembling the Mammotome revolve Biopsy System When the tissue sampling procedure is complete, the user must discard the disposable system components. Disconnecting the U/S Probe and Vacuum Tube Set Disconnect the saline spike from the saline bag. -
Page 67: Disconnecting Input Devices
Close all the ports at the top of the vacuum canister. Discard the vacuum canister in the appropriate container after use. Shutting Down the Mammotome revolve Dual Vacuum-Assisted Biopsy System To shut down the system, press the green power button on the front of the control module. A prompt appears on the screen, asking you to confirm the intended shutdown. - Page 68 Disconnect the holster electrical cable from the control module. Clean and disinfect the holster for later use as described in Chapter 7: Cleaning and Disinfection. NOTE: The Mammotome revolve Dual Vacuum-Assisted Biopsy System should be shut down once per day.
-
Page 69: Chapter 6 Ex Instructions For Use
This chapter provides a step-by-step description for collecting tissue samples using the Mammotome revolve Dual Vacuum-Assisted Biopsy System for an EX Ultrasound Guided Procedure. Mammotome revolve EX Probe and EX Holster Summary Description The Mammotome revolve EX Probe and EX Holster are used together to perform an ultrasound-guided breast biopsy procedure. • The EX... -
Page 70: Preparation For Use
LED on the EX holster illuminates in the Active (flashing) state only. Preparation for Use To prepare the Mammotome revolve Dual Vacuum-Assisted Biopsy System for tissue sampling, refer to Chapter 3: Initial Installation and Getting Started. Instructions for Use... - Page 71 WARNING: Take care to avoid scrapping of the needle tip against the protective sleeve and injury while removing the protective sleeve. Introduce the probe into the percutaneous site through the skin incision. NOTE: To introduce the probe from the percutaneous site, ensure the sample aperture is closed off, either by a biopsy site identifier applicator or a fully closed cutter.
- Page 72 PRECAUTION: The system must be primed with saline before use. Ensure that saline is used for the procedure. The absence of saline may cause a decrease in tissue transport to the chamber. NOTE: Tissue samples can be visually inspected through the viewing window. •...
-
Page 73: Other Instructions
PRECAUTION: Remove the tray in a slow, controlled manner to prevent the possibility of spilling tissue and fluid. PRECAUTION: Ensure the open area of the tray is facing up when removing it from the fluid management manifold. Perform post-biopsy imaging of the patient and specimens as necessary. Before removing the probe from the percutaneous site, ensure the sample aperture is closed. - Page 74 Rotate the probe/holster assembly to orient the sample aperture for the next sample acquisition. NOTE: Manual rotation of the specimen collection chambers is necessary for more than 25 tissue samples in a single large chamber. Continue the biopsy procedure at Step 8 removal of the specimen collection chambers from the device.
-
Page 75: Disassembling The Mammotome Revolve Biopsy System
NOTE: If the system is on, a chime sounds when the input device is connected or removed. Disassembling the Mammotome revolve Biopsy System When the tissue sampling procedure is complete, the user must discard the disposable system components. Disconnecting the EX Probe and Vacuum Tube Set... - Page 76 Disconnect the valve cartridge from the front of the control module. Optional: Connect the probe’s two lateral vacuum tube set lines to each other and pinch the pinch valve, if desired, for disposal. NOTE: Do not remove vacuum tubing from the vacuum canister if vacuum is being used (ON). To remove the probe from the holster, press down on the locking tab on the back of the probe body.
- Page 77 Discard the removed sleeve. DO NOT attempt to reinstall the probe’s protective sleeve by hand. Doing so may cause NOTE: injury to the user. PRECAUTION: Discard the probe, sleeve (if used), and vacuum tubing in the appropriate container(s) after use. If additional sampling is planned, follow Steps 6-9 in Chapter 3: Initial Installation and Getting Started, Setup...
-
Page 78: Shutting Down The Mammotome Revolve Dual Vacuum-Assisted Biopsy System
Shutting Down the Mammotome revolve Dual Vacuum-Assisted Biopsy System To shut down the system, press the green power button on the front of the control module. A prompt appears on the screen, asking you to confirm the intended shutdown. Touch YES to proceed to shut down. -
Page 79: Chapter 7 Cleaning And Disinfection
The cleaning agents and disinfectants specified for use in these instructions have been validated for use with the Mammotome revolve Biopsy System. The use of cleaning agents or disinfectants other than those specified in these instructions should be assessed for equivalency before using. Technical data sheets are typically available through the cleaning/disinfection agent manufacturer’s web pages to assist in this assessment. -
Page 80: Cleaning And Disinfection Instructions For The Holsters And Remote Keypad
Cleaning the Control Module, Cart, and Remote Footswitch: Option 2 Using Process Chemical Super Sani-Cloth (Manufacturer: PDI): Use the specified wipe to wipe all external surfaces, including crevices to remove any debris. Use the specified wipe to thoroughly wipe all external surfaces including cracks and crevices, ensuring that a wet surface is maintained for 2.5 minutes. -
Page 81: Disinfecting The St Or U/S Holster: Option 1
Note: The gears and electronics on the underside of the Holster should not be wiped with the cleaner. Note: Additional wipes may be used to maintain the 2.5 minute contact time. Allow the holster to air dry. Perform a visual check to ensure all visible contamination is removed from the surface. If contamination is present, repeat steps 1-4 until no visible contamination is present. -
Page 82: Cleaning The Ex Holster
Do not transport the device in a container prior to disinfection. The Mammotome revolve ST and U/S holsters have an expected life of 500 reprocessing cycles. Cleaning the EX Holster After each use, manually clean the EX holster thoroughly using one of the following wipes:... -
Page 83: Cleaning The Remote Keypad: Option 1
Using a new wipe, thoroughly wipe the holster holder to maintain the specified contact time, per the wipe manufacturer’s instructions. (See the table above.) Additional wipes may be necessary to maintain the specified wet contact time. Allow the holster holder to air dry. Do not expose the device to heat greater than 54°C. Cleaning the Remote Keypad: Option 1 After each use, manually clean the remote keypad thoroughly using a pH-neutral enzymatic detergent. -
Page 84: Disinfecting The Remote Keypad: Option 2
solutions, may influence the wear of a device or equipment. Soak a clean cloth in the disinfectant solution. Squeeze the cloth thoroughly to remove all excess solution. Thoroughly wipe down all surfaces (including crevices) of the remote keypad ensuring that a slightly wet surface is maintained for five minutes. -
Page 85: Chapter 8 Software Description
Chapter 8 S OFTWARE ESCRIPTION Touchscreens and Screen Button Functions The Mammotome revolve Dual Vacuum-Assisted Biopsy System software guides users through the following functions using touchscreens via Graphic User Interface (GUI) on the control module. Device Confirmation and Initialization Screens Searching for Holster Screen •... - Page 86 Proceed to Initialization Screen • This screen is displayed when the control module has been turned on, and the system detects a probe attached to the holster. • The user must touch the forward arrow button on the touchscreen to proceed to system initialization.
-
Page 87: St And U/S Procedure Screens
ST and U/S Procedure Screens Procedure Ready Screen • This screen is displayed once the system is fully initialized and ready to perform clinical functions. • In this screen, the user can adjust the following procedure settings: Set Aperture Adjust Biopsy Mode Set Specimen View Position Advance to Chamber 7/Reset Chambers... - Page 88 18mm Full aperture • At Full aperture settings, the 8G Mammotome revolve probe has a 23mm aperture, and the 10G Mammotome revolve probe has a 19mm aperture. • To adjust the setting: First, touch the “Set Aperture” button. Then touch the desired aperture length shown on the screen.
- Page 89 Set View Position • On this Confirm Selection Screen, the user can select from four distinct viewing locations for the most recent tissue sample obtained to be presented for visual inspection. • When a tissue sample is retrieved, it is always deposited into the “top”...
- Page 90 Advance to Chamber 7/Reset Chambers Advance to Chamber 7 / Reset Chambers Advance to Chamber 7 Advance to Chamber 7 (Example below: Three samples have been attempted. • The Advance to Chamber 7 function is used to “Advance to Chamber 7” is available for activation.) skip the remaining chambers in the first set, to start acquiring tissue samples in the second set of chambers (7-12) in the specimen management...
- Page 91 Biopsy Counter • This number is seen in the center of the SMS graphic and represents the number of attempted samples taken during the biopsy procedure for a single probe. The number increases as each sample is attempted for a single probe. •...
- Page 92 SteadyVac (Example below: SteadyVac is ON.) • This setting directs the system to apply a continuous and low-level vacuum to keep the biopsy cavity, probe, and tubing clear, to minimize clogging and incidence of hematoma at the biopsy cavity. • Press the touchscreen icon once to turn the function on.
-
Page 93: Ex Procedure Screens
EX Procedure Screens 1. Set Aperture Buttons and Status 2. Aperture and Cutter Position Indicator 3. Saline Level Buttons and Status 4. Biopsy Count Location and Count Reset Button 5. Vacuum Level Buttons and Status 6. Volume Level Button 7. Brightness Level Button 8. - Page 94 Set Aperture • On this Confirm Selection Screen, the user can select one of three options for the length of the sample aperture: 12 mm 18 mm 25 mm (Full Aperture) • To adjust the setting: First, touch the aperture size desired.
- Page 95 Biopsy Counter • This number is seen in the center of the SMS graphic and represents the number of attempted samples taken during the biopsy procedure for a single probe. The number increases as each sample is attempted for a single probe. •...
- Page 96 Volume and Screen Brightness Volume • Volume and Brightness settings can be accessed from any screen and allow the user to adjust the system volume level and touchscreen brightness for better audible and visible feedback. • Changes to the volume and screen brightness High Medium levels are saved on system shutdown and will...
-
Page 97: Standby Screens
Standby Screens Standby Main Screen • This screen is displayed when the user places the system into an inactive state. The system displays the detected input devices and holster/probe attachment status. From this screen, a user can perform the following actions: Remove the probe to end a procedure Add a new probe for a new procedure Change input devices (remote... -
Page 98: Utilities Screens
Shutdown Screen • To shut down the system, the user must select the green power button on the front of the control module. • A prompt then appears on the screen to confirm the intended shutdown. • Touch YES to proceed with shutdown. If YES is selected, the green power button on the front of the control module turns to amber... - Page 99 Utilities Main Screen • The main utilities screen allows the user to access system utility settings: • Change Language • Access Data Logs • Access System Information • Utilities can be accessed from the Standby Screen and any time prior to initialization. Language Screen •...
-
Page 100: Chapter 9 Service And Troubleshooting
Refer servicing to qualified personnel or contact customer service through one of the phone numbers listed at the end of this chapter. Table 7. Mammotome revolve Dual Vacuum-Assisted Biopsy System Components Troubleshooting Tips Symptom... - Page 101 Symptom Possible Cause Corrective Action • Remove the probe and manually rotate the specimen collection chambers to align with the alignment indicator on the probe, taking care not to pinch or dislodge the chambers. Take care not to pull chambers out of the SMS. NOTE: The probe will make a clicking sound as Probe/holster did not the SMS chambers are rotated.
- Page 102 Symptom Possible Cause Corrective Action rotation knobs are broken. • Misalignment of the Remove the probe from the probe guide. ST Only: • probe guide peak or Align the peak of the probe guide to align it Trocar shaft rotation with the 12.o’clock indicator on the probe’s probe aperture appears extremely uneven.
- Page 103 Symptom Possible Cause Corrective Action into a different chamber than the expected one. • Disconnect the holster cable from the Control Module, reattach it, and proceed through Sample aperture is not fully Probe/Holster did not initialization again. closed after initialization. initialize correctly.
- Page 104 Incorrect needle Double-check measurements to ensure the length chosen/used. correct needle was used for the procedure. For additional causes and corrections related to Mammotome revolve markers, refer to Deployment Guide of the marker IFU. The user may have • tapped the Vacuum...
- Page 105 Table 8. Mammotome revolve Dual Vacuum-Assisted Biopsy System Software Troubleshooting Tips Symptom Possible Cause Corrective Action System reports “Control • Call Custom Service and report the error Module Malfunction” Control module malfunction. code displayed. when powered on. • Ensure the vacuum tubing is connected to...
- Page 106 Possible Cause Symptom (continued) Corrective Action (continued) (continued) • Ensure the vacuum tubing is connected as defined in Chapter 3. System returns to • Standby and reports Check that all vacuum canister lid ports are Vacuum canister leak, or error message: “Vacuum sealed.
-
Page 107: Contact Information
Customer Service at 1-877-926-2666, or email us.customerservice@mammotome.com. If emailing, please include 1) your account name and number, 2) your contact information, and 3) your question. Once received, a member of the Customer Support Team will reply... -
Page 108: Ystem Specifications
MFOOT1 Mammotome revolve Remote Footswitch (optional) MHKEYP1 Mammotome revolve Remote Keypad (optional) MG08A 8G Mammotome revolve Disposable Probe Guide 8G Mammotome revolve Disposable Probe Guide (for MG08B GE Upright Systems) MG10A 10G Mammotome revolve Disposable Probe Guide MG10B 10G Mammotome revolve Disposable Probe Guide... -
Page 109: Storage/Operating Conditions
Mode of Operation Continuous Electromagnetic Compatibility (EMC), Guidance and Manufacturer Declarations The Mammotome revolve Dual Vacuum-Assisted Biopsy System requires special precautions regarding electromagnetic compatibility (EMC) and must be installed and used in accordance with the EMC information provided in this installation guide. - Page 110 Guidance and Manufacturer’s Declaration – Electromagnetic Emissions The Mammotome revolve Dual Vacuum-Assisted Biopsy System is intended for use in the electromagnetic environments specified below. The customer or user of the Mammotome revolve Dual Vacuum-Assisted Biopsy System should assure that it is used in such an environment.
- Page 111 Guidance and Manufacturer’s Declaration – Electromagnetic Immunity The Mammotome revolve Dual Vacuum-Assisted Biopsy System is intended for use in the electromagnetic environments specified below. The customer or user of the Mammotome revolve Biopsy System should assure that it is used in such an environment.
-
Page 112: System Specifications
System Specifications Guidance and Manufacturer’s Declaration – Electromagnetic Immunity The Mammotome revolve Dual Vacuum-Assisted Biopsy System is intended for use in the electromagnetic environments specified below. The customer or user of the Mammotome revolve Biopsy System should assure that it is used in such an environment. -
Page 113: Rfid Frequency Information
If the measured field strength in the location in which the Mammotome revolve Biopsy System is used exceeds the applicable RF compliance level above, the Mammotome revolve Biopsy System should be observed to verify normal operation. If abnormal performance is observed, additional measures may be necessary, such as re-orienting or relocating the Mammotome revolve Biopsy System. -
Page 114: Weee
How Supplied The Mammotome revolve Probes, Specimen Management Systems, Vacuum Tubing Sets, Probe Guides, and Vacuum Canisters are for single-patient use. Discard into an appropriate container after use. All other system components are supplied non-sterile and should be disposed of in accordance with applicable local regulations. -
Page 115: Calling For Service
After a request for a paper copy of the IFU is submitted, the paper copy will be sent to the requester within 24 hours. Additional Product Information For a complete listing and description of available products for use with the Mammotome revolve Dual Vacuum- Assisted Biopsy System, visit our website: www.mammotome.com. 10-8... -
Page 116: Chapter 11 Warranty
Chapter 11 W ARRANTY Devicor Medical Products, Inc. warrants this product to be free from defects in material and workmanship under normal use and preventative maintenance for the respective warranty period shown below. Devicor Medical Products, Inc.’s obligation under this warranty is limited to the repair or replacement, at its option, of any product, or part thereof, which has been returned to Devicor Medical Products, Inc. -
Page 117: Chapter 12 Stereotactic (St) Holster States
Chapter 12 S (ST) H TEREOTACTIC OLSTER TATES Remote (Keypad or Footswitch) State and without Variable Aperture Aperture Holster only without Variable Aperture • Ready • Closed • Armed • Closed • Armed, Standby • Closed • Just Fired • Open •... - Page 118 CEP: 09560-050 – Tel.: +55-11-4226-0666 ©2020 Devicor Medical Products, Inc. All rights reserved. Mammotome and Mammotome revolve are registered trademarks of Devicor Medical Products, Inc., part of Leica Biosystems, in USA and optionally in other countries. Bemis is a registered trademark of Bemis Manufacturing Company.
- Page 119 Mammotome revolve Dual Vacuum-Assisted Biopsy System User Instructions and Operations Guide Mammotome revolve User Instructions and Operations Guide (English) ARTWORK NUMBER SCALE REVISION ECN NUMBER DATE AW-001413 ECN-002017 04/30/2020 PRODUCT CODE DRAWN BY MSCM1, MSTH1, MHUSH1, MCART1, MHKEYP1, MFOOT1, MST0809, MST0812, MST0815, MST1009, MST1012, MST1015, MHUS08, MHUS10, MG08A, MG08B, MG10A, MG10B, A.
Need help?
Do you have a question about the REVOLVE and is the answer not in the manual?
Questions and answers