Advertisement
Available languages
Available languages
Quick Links
Getting Started
Remove the device from the bag. It will arrive with all sensors attached to the
device. Do not disconnect the sensors from the device. You will also find tape
strips included in the bag and possibly an extra set of batteries (for multiple
night use).
Fitting the Belt
1. Pull the belt around your body. Thread the end of the belt through the
slot on the effort sensor and fasten the tab to the belt.
2. Check that the belt is secure and comfortable and that the device is
positioned over center of your chest (females position above breasts).
3. Slide the finger sensor cable clip onto the belt. The clip should be on the
same side of your body as the finger sensor.
Fitting the Cannula
1. Insert the prongs into your nostrils. Make sure the curved side is
pointing towards the back of your nose.
2. Loop the plastic tubing around your ears.
3. Pull the slider up towards your chin unit the plastic tubing is secure
and comfortable. Use provided tape to secure cannula to each cheek
Fitting the Finger Sensor
Slide the gray, rubber finger sensor over your finger. It
can be positioned on any finger but should not be used
on a finger with dark nail polish or acrylic fingernails.
Use the provided tape to secure the finger sensor cable to
the back of your hand.
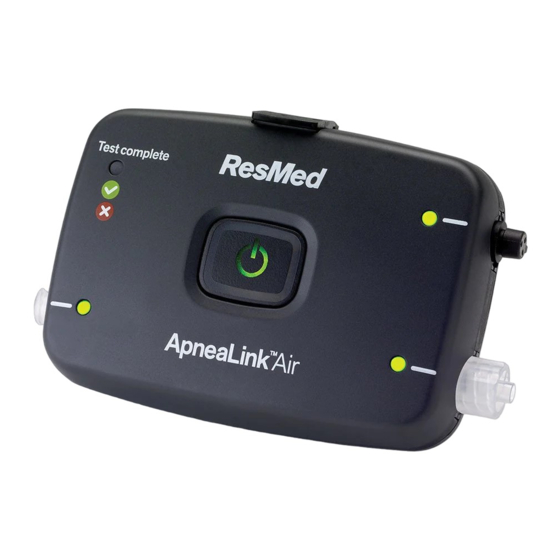
ApneaLink Air
Patient instructions
Starting the Test
1. Press and hold the power button in the center of the device for
about 2 seconds or until the light turns on.
2. Check that the lights next to the sensor connections are green. The
lights may blink back and forth from red to green, this is normal and
should resolve to steady green once you fall asleep and are still. If the
lights are solid red readjust the sensors and make sure they are
positioned correctly on your body.
3. Go to sleep as normal.
Ending the Test
1. Press the power button for about 2 seconds.
2. Check that the test complete indicator light is lit and green. This
means the test is complete. If the test complete indicator light is red
contact the testing facility.
3. Press and hold the power button for about 2 seconds to power off
the device.
Returning the Device
1. Remove the cannula from your nose and the sensor from your
finger.
2. Remove the belt from your body and place the device and the
attached sensors back into the bag it came in.
3. Place the bag and completed paperwork into the mailing box the
device was shipped in.
4. Place the included shipping label on the box (covering the
original shipping label) and ship.
Instrucciones españolas en revés
Advertisement

Summary of Contents for ApneaLink Air
- Page 1 Instrucciones españolas en revés ApneaLink Air Patient instructions Getting Started Starting the Test Remove the device from the bag. It will arrive with all sensors attached to the device. Do not disconnect the sensors from the device. You will also find tape strips included in the bag and possibly an extra set of batteries (for multiple night use). Fitting the Belt 1. Press and hold the power button in the center of the device for about 2 seconds or until the light turns on. 2. Check that the lights next to the sensor connections are green. The lights may blink back and forth from red to green, this is normal and should resolve to steady green once you fall asleep and are still. If the lights are solid red readjust the sensors and make sure they are 1. Pull the belt around your body. Thread the end of the belt through the positioned correctly on your body. slot on the effort sensor and fasten the tab to the belt. 3. Go to sleep as normal. 2. Check that the belt is secure and comfortable and that the device is positioned over center of your chest (females position above breasts). Ending the Test 3. Slide the finger sensor cable clip onto the belt. The clip should be on the same side of your body as the finger sensor. Fitting the Cannula 1. Press the power button for about 2 seconds. 2. Check that the test complete indicator light is lit and green. This means the test is complete. If the test complete indicator light is red 1. Insert the prongs into your nostrils. Make sure the curved side is contact the testing facility.
- Page 2 Instructions in English on reverse ApneaLink Air Instrucciones para el Paciente Para Empezar Inicio de la prueba Saque el dispositivo del empaque. Viene con los sensores conectados al dispositivo. No desconecte los sensores del dispositivo. También encontrará tiras de papel adhesivo (tape) en la bolsa y posiblemente un juego extra de baterías (para múltiple uso nocturno). Colocación del cinturón Mantenga oprimido el botón de encendido situado en el centro del dispositivo durante unos dos segundos o hasta que se encienda la luz. Compruebe que las luces situadas junto a los accesorios que está utilizando estén de color verde. Las luces pueden parpadear intermitentemente de rojo Pásese el cinturón alrededor del cuerpo. Pase el extremo del cinturón por la a verde, esto es normal y debe cambiar a verde una vez que usted se duerma ranura del sensor de esfuerzo (si lo va a utilizar) y pegue la lengüeta en el y no se mueva. Si alguna de esas luces está de color rojo y parpadea, el cinturón. Si no va a utilazar el sensor de esfuerzo, pegue la lengüeta en el accesorio en cuestion no está bien conectado. cinturón. Duérmase lo normal. Compruebe que el cinturón le quede firme y cómodo y que el dispositivo esté colocado en el centro del pecho (las mujeres pónganlo arriba del pecho). Detención de la prueba Si va a utilizar un oxímetro, deslice la pinza por el cinturón. La pinza debe quedar colocada en el mismo lado del cuerpo que el sensor digital del oxímetro. Colocación de la cánula nasal Mantenga oprimido el botón de encendido durante unos dos segundos. Compruebe que la luz indicadora del studio esté encendida ye de color verde. Esto significa que la prueba se ha realizado. Si la luz que indica que Inserte las puntas en las fosas nasales. Asegúrese de que el lado curvo quede la prueba está terminada está roja, llame a la persona encargada de la apuntando hacia la parte posterior de la nariz. prueba. Pase el tubo de plástico por detrás de las orejas. Mantenga oprimido el botón de encendido durante unos dos segundos Empuje la pieza deslizante hacia arriba, hacia el mentón, hasta que el tubo para apagar el dispositivo. de plástico esté firme y cómodo. Use el tape para asegurar la cánula a cada Para regresar el dispositivo mejilla.
Need help?
Do you have a question about the Air and is the answer not in the manual?
Questions and answers