
Related Manuals for PreppComm DMX-40

Summary of Contents for PreppComm DMX-40
- Page 1 Making Communications Fun Again! DMX-40 REFERENCE MANUAL By Eric C Anderson PreppComm Version 3.1, December 2020 Copyright © 2020 PreppComm. All rights reserved . ...
-
Page 2: Table Of Contents
Frequency Memories & Frequency Memory Editor Function Keys Transmit Keyboard Controls Decoder Operation HCW Mode CTX Mode Switching Modes Tuning a Station Two Frequencies? The Tuning Rule Switching Bands (Modes) Tone Output Control and KEY IN Page 2 Copyright © 2020 PreppComm... - Page 3 Inserting into a Running CALL or ANS Microprogram The Microprogram Editor Microprogram Help Some Examples Appendix VI: Keyboard and RPL Layouts Receive Mode Keyboard Layout Transmit Mode Keyboard Layout RPL Command Table Page 1 RPL Command Table Page 2 Page 3 Copyright © 2020 PreppComm...
- Page 4 Return to Table of Contents Appendix VII: Common CW Abbreviations Appendix VIII: The Tuning Rule, Graphically Explained Appendix IX: Alternate USB Keyboards Appendix X: Wiring for the 3.5 mm Jacks Page 4 Copyright © 2020 PreppComm...
-
Page 5: Overview
1. Overview Congratulations for purchasing the new DMX-40 Morse Code Decoder & Converter Transceiver! The DMX-40 was created to make it possible and easy for non-technical people to utilize the HF (High Frequency) Amateur Radio bands for battery-powered emergency communications. This is done by providing a texting interface to the user,... - Page 6 Under the Hood For those of you with technical interest, the DMX-40 is based on a triple-processor real-time multi-tasking system architecture. A complex dance of real-time interaction between three interrupt-driven real-time processors makes the magic of the DMX-40 possible.
-
Page 7: Warranty And Cautions
RF in the shack problems. Keep the keyboard cable away from the rear of the DMX-40, and coil it up at the rear of the keyboard to shorten it (use a tight coil) to reduce RF issues. There is an RF filter inside, but you can overpower it and cause your DMX to lose it’s mind when you transmit. ... -
Page 8: The Elephant In The Room
"rubber duck" or vertical whip antenna on virtually any of the HF bands except maybe 10 meters and expect good results. For example, for the DMX-40, a 40 meter band unit, this means you need a 40 meter capable antenna. Since you will be running QRP (low power on transmit), having an efficient antenna is pretty important. -
Page 9: Getting Started
As always, we love to hear from our customers, so if you have questions, comments, or suggestions, please use the Contact Us page on our website: https://PreppComm.com Page 9 Copyright © 2020 PreppComm... -
Page 10: Getting Acquainted
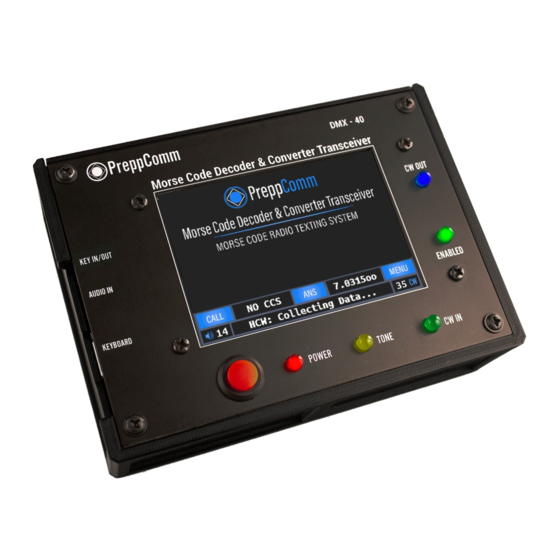
Return to Table of Contents 3. Getting Acquainted Figure 1 is a labeled diagram of the DMX-40 transceiver: FIGURE 1. DMX-40 TRANSCEIVER 3.5" Color LCD Display At the center is the 3.5" color LCD display, which is also a touch screen input device. - Page 11 For best results, do not use a car antenna as they are extremely inefficient (less than 1% efficiency, typically). Rather, use a dipole, end-fed, or NVIS antenna designed for 40 meters. 12V Power Connector (Not Shown), Power Consumption and Output Power Page 11 Copyright © 2020 PreppComm...
- Page 12 A good antenna with a low SWR (Standing Wave Ratio) will generally eliminate any RF in the shack issues. See more on grounding below. WARNING: Operating the transmitter without a properly installed antenna or dummy load may damage your transmitter, and will void your warranty. Page 12 Copyright © 2020 PreppComm...
-
Page 13: Initial Setup
Return to Table of Contents 4. Initial Setup The standard setup for the DMX-40 is shown below. A dummy load is an optional alternative to a 40 meter antenna, or using External Mode, but allows you to fully operate the transceiver without causing any band interference, and without an antenna. -
Page 14: Setup With External Transceiver
Return to Table of Contents 5. Setup with an External Transceiver If you plan to use the DMX-40 as a decoder and encoder for a different transceiver, typically a multi-band 100 watt transceiver, for example, use Figure 3 below. FIGURE 3: EXTERNAL MODE SETUP FOR DMX-40 Again, here you can replace the earphones with a powered speaker. -
Page 15: Power On Walk-Thru
FIGURE 5: MAIN SCREEN Text Area Most of the screen is dedicated for text - both for received text from other stations, and transmitted text from you. The initial screen shows the PreppComm logo, but this will Page 15 Copyright © 2020 PreppComm... - Page 16 The first is what we call the answer-validate function, to see if the other station can hear you and thus establish a 2-way conversation. In addition, it allows you to answer back to the other station you are in a conversation Page 16 Copyright © 2020 PreppComm...
- Page 17 (RIT) mode, pressing this button will revert to the standard frequency mode. The frequency range of the DMX-40 receiver is 4.9 MHz to 10.1 MHz. The 40 meter band is 7.0 MHz to 7.3 MHz. Depending on your license, the range of frequencies you can transmit on may be more limited Than the 40 meter band.
-
Page 18: Menus
Return to Table of Contents 7. Menus The menu system is fairly simple on the DMX-40. Figure 6 is the screen displayed when the MENU Button is pressed. FIGURE 6: MAIN MENU SCREEN There are only 6 options on the menu screen, besides EXIT MENU, which returns you to the Main Screen. -
Page 19: Local Station Setup
Return to Table of Contents TYPING SPEED The default typing speed is set to the maximum DMX-40 transmit speed, or 60 WPM. This is not likely to be your comfortable typing speed, so you should select this option, take the speed test, and get the maximum speed reduced to your comfortable typing speed, This feature prevents starving the transmitter from your text input, which would generate poorly timed Morse Code output. - Page 20 W2OL/RM. for W2OL Remote. Also, there are some uses of the DMX-40 where military units will use them, and they can have 3 character call signs. Pressing the NEXT Button will bring you a very similar screen, but in this case, it is asking for your handle, or name.
-
Page 21: Vfo Adjust
ANS buttons will only operate when the Enabled LED is lit. 7.2 VFO Adjust The VFO Setting screens is shown below in Figure 9. However, if the DMX-40 is in External Mode (See Figure 5, Frequency Button) when you press the VFO ADJUST Button, you will not see this screen. -
Page 22: Typing Speed
The reality is, this IS a test, and you will try to beat the clock. It’s simply human. Show the computer how fast you can type the line! Well, that is counter-productive, so the Page 22 Copyright © 2020 PreppComm... - Page 23 (check the rate - it could be slower due to slow sender) 2. Adjust DOWN if you often find yourself in a situation where the buffer goes empty while you are typing, again, when transmitting at the maximum rate. Page 23 Copyright © 2020 PreppComm...
-
Page 24: Microprogramming
With microprograms, you can take full control of how the DMX-40 operates, and control that from your keyboard F1 to F10 keys. F11 and F12 are not functional on the included keyboards, but they can be used as text or commands to be called from the main 10 functions. -
Page 25: Mhz Memories
18.7. 7.5 MHz Memories The DMX-40 provides 10 Frequency Memories for your use. Pressing the MHz MEMORIES Button on the Main Menu brings you to the Frequency Memory List in Figure 12a, or to the External Mode Notification Screen in Figure 12b: FIGURE 12A: FREQUENCY MEMORY LIST In this example list, you see 5 frequency memory slots define, and five empty. - Page 26 External Mode, you will see the screen in Figure 12b instead of the frequency list: FIGURE 12B: EXTERNAL MODE NOTIFICATION This screen is self explanatory. Press FINISH to return to the Main Screen. Page 26 Copyright © 2020 PreppComm...
-
Page 27: Keyboard Controls
FIGURE 13: RECEIVE MODE KEYBOARD COMMAND LAYOUT Also, note the keyboard layouts available in Section 19 Appendix VI for printing out and laying alongside your keyboard while you are learning how to operate the DMX-40. Page 27 Copyright © 2020 PreppComm... -
Page 28: Decoder Mode Control Key
SPACE: Decoder Restart: This key is used to restart data collection for any new signal being received. This allows clean restart with the new signal, rather than combining datasets from multiple signals and thus getting incorrect results Always restart the decoder for a new signal! Page 28 Copyright © 2020 PreppComm... -
Page 29: Gain Control Key
< > keys: Decoder Gain Control The decoder gain control allows you to adjust the signal level getting to the decoder. The decoder works extremely well when the Tone LED is blinking rapidly. Leave the setting at 30 unless: Page 29 Copyright © 2020 PreppComm... -
Page 30: Editing Keys
0’s (zeros): Displayed Frequency Step Size 7.1ooooo 7,100000 MHz 100,000 Hz 7.10oooo 7.100000 MHz 10,000 Hz 7.100ooo 7.100000 MHz 1,000 Hz 7.1000oo 7.100000 MHz 100 Hz 7.10000o 7.100000 MHz 10 Hz Page 30 Copyright © 2020 PreppComm... -
Page 31: Rit Tuning
2. If you are closer than 2600 Hz to the top or bottom of the band, the key that would take you beyond the band edge will not work. This prevents accidental excursions outside of the tuning range of the current band definition. Page 31 Copyright © 2020 PreppComm... -
Page 32: Frequency Memories & Frequency Memory Editor
If there is both a frequency and a label defined, the label will be defined, as shown in Figure 12a. The Frequency Memory Editor is shown on the next page in Figure 14a. Page 32 Copyright © 2020 PreppComm... - Page 33 Memory Frequency value area. Storing a new value will instantly change the value shown in Memory Frequency. Likewise, if you press CLEAR and then STORE, you will clear the memory. Page 33 Copyright © 2020 PreppComm...
-
Page 34: Function Keys
F1 - F12 key These keys are used to insert a microprogram into your outgoing message, in a similar way to the INFO microprogram. More information on microprogramming is provided in Section 18 Appendix Page 34 Copyright © 2020 PreppComm... - Page 35 This prompt will appear in the Status Line display when a call sign is required when processing an ANS Button press. Refer to Section 12 for more information. When you see this prompt, you must enter the station call sign you are answering. Page 35 Copyright © 2020 PreppComm...
-
Page 36: Decoder Operation
Return to Table of Contents 9. Decoder Operation The decoder built into the DMX-40 is quite complex. It includes a very sophisticated and sensitive analog and digital filtering system that is capable of extracting CW from aa extremely noisy environment with excellent results. We have seen it do this when you can barely tell there is a CW signal under the noise. -
Page 37: Ctx Mode
12. The CTX decoder is set to 30 WPM, and while it can adjust slightly to that speed from band fluctuations, it is quite stable. The advantage of this is a substantially lower error Page 37 Copyright © 2020 PreppComm... -
Page 38: Switching Modes
2. Hyper-Active Tone Digitizer converts the incoming reshaped signal into a very noisy digital signal 3. Digital Filter separates the noise from the signal, like your ear does. They have very different characteristics Page 38 Copyright © 2020 PreppComm... - Page 39 This is about twice as high a frequency as most decoders use. Note that the DMX-40 decoder system is extremely selective: it will only respond to signals that are within 50 to 60 Hz from its center frequency, around 1300 Hz. The frequency selectivity is higher at lower signal volumes.
-
Page 40: Two Frequencies
2600 Hz off, and he/she will not hear you. For the DMX-40, the frequency you see in the Frequency Button is the transmitter frequency, NOT the receiver frequency. The receiver is tuned 1300 Hz lower, so any station transmitting on the displayed frequency will be heard by you and the decoder as a 1300 Hz tone. -
Page 41: The Tuning Rule
For single-band units, such as the DMX-40, you have the option of using it on the selected band or turning off the Tx/Rx board. Pressing the Frequency/Band button on the display will switch you between the current band, and External mode. - Page 42 10 frequency memories - you don’t have to "share" a measly 10 memories with all of the supported bands. A quick way to return to 7.03 MHz, therefore, is a quick double-tap on the Frequency Button. Page 42 Copyright © 2020 PreppComm...
-
Page 43: Tone Output Control And Key In
Before we get into transmitter functions, getting familiar with the Tone Output and Key Input function is important. Your DMX-40 can generate a 1300 Hz tone for both computer generated output as well as if you utilized a Morse Code mechanical key plugged into the KEY IN/OUT Jack. -
Page 44: Calling
This term is widely used in amateur radio by morse code as well as SSB and FM voice users. Your transceiver has a built-in general calling microprogram. Here is the format, where [YOU] is your call sign: CQ CQ CQ CQ DE [YOU] [YOU] K Page 44 Copyright © 2020 PreppComm... -
Page 45: Setting Transmit Speed
Never fear, the transceiver computer knows when it needs a speed and does not have one. If you start a CALL and no speed is known, you will be asked for a speed on the Status Line. Page 45 Copyright © 2020 PreppComm... -
Page 46: Setting A New Default Transmit Speed
You do this by pressing the S key rather than the SPACE bar after entering a speed on request. This will store your speed, which will then replace the factory default. Now, every time a transmit speed is requested, press the SPACE bar Page 46 Copyright © 2020 PreppComm... -
Page 47: The Call Sequence
11:00 AM at 7.115 MHz. Typically, you have an agreement for one of you to initiate the call. If it is you, press the NO CCS Page 47 Copyright © 2020 PreppComm... - Page 48 In our example, At 11:00 AM, you would tune to 7.115 MHz and start calling using the CALL Button. Since you have entered a call sign for another station, the DMX-40 will execute a directed call, such as shown below, where W1AW represents their call...
-
Page 49: Three Ways For Establishing A Ccs
If you decide you don’t want the CCS set, you can clear the CCS by pressing the CCS Button when it displays a defined call sign. This will force it back to the NO CCS state. Page 49 Copyright © 2020 PreppComm... -
Page 50: What Happens After You Call
When you answer using W1?? the W1 station will come back, the other will not, and you will get the correct call sign, typically automatically loaded by the decoder, for your next transmission. Page 50 Copyright © 2020 PreppComm... -
Page 51: Answering
2. the decoder recovering a call sign from the decoded stream then no additional action will be required. However, if there is no defined CCS, you will be asked to enter one on the Status Line: Page 51 Copyright © 2020 PreppComm... -
Page 52: The Answer Validate And Answer Microprogram
3. The ANSwer End Component, which handles the station identification step for handing the conversation back to the other station. We refer to these three as components, because they are actually all part of a single, fairly complex microprogram. We will address these differences below. Page 52 Copyright © 2020 PreppComm... -
Page 53: The Answer Validate Component
This is the normal station identification sequence the is normally sent at the beginning of a transmission, and is automated by the DMX computer for your convenience. This component transmission is as follows; Page 53 Copyright © 2020 PreppComm... -
Page 54: The Pop-Up Type-Ahead Buffer
ANS Button, so you are way ahead of the transmitter. In Figure 19b, we have you typing at a blinding speed, probably faster than you can actually type... but this is for the purpose of showing you a different state in the answering process. Page 54 Copyright © 2020 PreppComm... - Page 55 Finally, the End component transmits the handoff station ID to the other station. Of course you can change the standard operation of the DMX-40 by writing your own microprograms to replace the built-in ones.
-
Page 56: Sending Your Message
The ANSwer microprogram ends with KN, indicating that you only want the station you are talking to to "come back" to you. Once you are returned to receive mode, you will automatically enter RIT (Receiver Incremental Tuning) Mode. This is described in Section 13. Page 56 Copyright © 2020 PreppComm... -
Page 57: The Info Microprogram
The actual text sent might look like this: NAME IS JOE, QTH IS CHICAGO, IL, USING DMX-40 WITH 40M DIPOLE\ 12.8 What Happens After an ANSwer? The other station will (hopefully) begin transmitting when you are done. Of course that is assuming you did not fade out completely on their end. - Page 58 Finally, there are "pro-signs" that advanced operators use. The decoder knows most or all of these, and will display a useful indicator for you when they are decoded. A list of such pro-signs is provided in Section Section 14 Appendix Page 58 Copyright © 2020 PreppComm...
-
Page 59: Receiving Using Rit Tuning
CQ from you, W2OL, is shown, along with what the Frequency Button displays. Note that rather than showing the frequency you are transmitting on, the Frequency Button now shows you the offset from the transmitter Page 59 Copyright © 2020 PreppComm... - Page 60 -30 Hz for best decoding. This means you are tuning to 30 Hz below for best decoder operation. Figure 21 is a great example as well of how the color coding of receiver vs. transmitter makes it very easy to see what is happening. Page 60 Copyright © 2020 PreppComm...
-
Page 61: Deactivating Rit
Also, when clearing RIT mode, the step size is again reset to 1. This is done to preserve the frequency as it is currently set, rather than lopping off several digits because of the step size being set to a higher value. Page 61 Copyright © 2020 PreppComm... -
Page 62: Appendix 1: Pro-Signs And No-Signs
Return to Table of Contents 14. Appendix I: Pro-Signs and No-Signs The table below shows the pro-signs that the DMX-40 recognizes, their meaning, and what is displayed on the screen if they are decoded. Note that there is no provision for sending Pro-Signs via the keyboard. -
Page 63: Appendix Ii: Special Characters
Now for the fun and crazy part: non-standard special characters! I already mentioned above that the equal sign on the DMX-40 has a unique assigned code. We went hog wild and assigned codes to other special characters. Table 3 below shows the character and the code sequence we have assigned. - Page 64 You will know it was supposed to be I live in Sandpoint (Idaho) with my dog. Of course when communicating with another DMX-40, you can actually use both ( and ) and they will see it correctly. :) If you disapprove of these added characters, simply don’t use them.
-
Page 65: Appendix Iii: Calibrating Your Vfo
10 or 100 or so Hz and, without looking, see if you can get back to zero beat. Do this until you are very comfortable getting it right before you actually try it in the VFO Adjust screen. Page 65 Copyright © 2020 PreppComm... -
Page 66: Appendix Iv: Terminology
They "talk" and you "answer." Details in Section 12. CALL is the second transmit mode for the DMX-40. Here you are CALL: transmitting a General Call, or you are calling a specific station (Directed Call). Details in Section 11. - Page 67 Rig Programming Language: For advanced users, RPL allows the creation of up to 12 user-defined microprograms. This allows the user to configure the DMX-40 for different modes of interaction, such as DX, contests, field day, and for setting up automation for special cases, such as contacting buddies.
-
Page 68: Appendix V: Rpl And User Microprograms
Probably best not to do that on the air, however. 18.1 Introduction One of the more exciting advanced features of the DMX-40 is the technology underlying the CALL, ANS, and INFO functions. This technology is called RPL, for Rig Programming Language. -
Page 69: Built-In Microprograms
CALL or ANS microprogram a second time. For example, if you created a CALL microprogram for F1, to start it, press F1. To cause it so complete its current repeat and finish, press F1 a second time For more complex Page 69 Copyright © 2020 PreppComm... -
Page 70: Microprogram Types
Using the RPL control characters, some imagination, and some trial and error, you will be able to customize your DMX-40 transceiver operation to your hearts desire, and enable you to operate exactly the way you want. You will be able to optimize it for contests, for calling friends at their favorite CW speeds, and much more. - Page 71 (depending on the previous commands). Function key presses are remembered and saved via a counter, so a microprogram may be designed to require more than one additional press of the function key. Enables keyboard to type-ahead buffer. Page 71 Copyright © 2020 PreppComm...
- Page 72 Thus, you can have multiple in a row, such as &02&03&04, etc., for long text. Inserts the built-in INFO microprogram. Define the CCS. Use BEFORE ? or ! command. {CCS} Page 72 Copyright © 2020 PreppComm...
-
Page 73: Built-In Microprogram Review
Table 5 below: Character Execution Character Press CALL Button, enters transmit CALL mode Test if CCS is defined. Assume Not for the example < Delete <[@ @ @ @ DE * * ]KN% and > Page 73 Copyright © 2020 PreppComm... - Page 74 ANS Button press. Disables keyboard input to buffer, waits until buffer and encoder is empty (short wait because preceded by a | character) Send BACK 2U and spaces to encoder BACK 2U Insert CCS Page 74 Copyright © 2020 PreppComm...
-
Page 75: Inserting Into A Running Call Or Ans Microprogram
Since it includes a starting and ending space, it is as if you typed: HELLO, THANKS FOR COMING BACK TO ME! NAME IS JOHN, LOCATION IS CHICAGO, IL, USING DMX-40 WITH 40M DIPOLE. IT’S SUNNY HERE, HOW ABOUT THERE? Your info (text) microprograms can include whatever info you like to offer your contacts, and can likewise be inserted into your message stream at the touch of a function button. -
Page 76: The Microprogram Editor
MICROPROGRAM". Note that the cursor is positioned at the end of the line, ready to accept another character, to be inserted BEHIND the cursor as it moves forward one step. Likewise, deleting a character deletes the character BEHIND the cursor. Page 76 Copyright © 2020 PreppComm... - Page 77 FIGURE 22C: READY FOR AN INSERT Since the display does not have a "cursor" function, the DMX-40 simulates it using the | character. Unfortunately, this takes up a character space, so it does feel a little weird moving the cursor and seeing it move the text around to insert itself between characters.
-
Page 78: Microprogram Help
This is the first microprogram help screen. You should recognize the commands - they are the same ones we have already shown in the table and examples above. In Figure 23b and 23c below, the rest of the commands are displayed: Page 78 Copyright © 2020 PreppComm... -
Page 79: Some Examples
2. F2 = "?ID: * WITH @" This microprogram does a quick station ID with your call letters and the other station’s call letters. Nice for a long QSO. Page 79 Copyright © 2020 PreppComm... - Page 80 DMX transceiver to do! Have fun, and if you create a killer microprogram, send it to us! Or, if you think of a killer microprogram you can’t program with the existing RPL language, send us a request for additional features! Page 80 Copyright © 2020 PreppComm...
-
Page 81: Appendix Vi: Keyboard And Rpl Layouts
The first two keyboard layouts summarize the control and function keys available to you in transmit and receive mode. The RPL Command charts are provided to give you a quick access to the commands when you are constructing your microprograms. Page 81 Copyright © 2020 PreppComm... -
Page 82: Receive Mode Keyboard Layout
Return to Table of Contents 19.1 Page 82 Copyright © 2020 PreppComm... -
Page 83: Transmit Mode Keyboard Layout
Return to Table of Contents 19.2 Page 83 Copyright © 2020 PreppComm... - Page 84 Return to Table of Contents 19.3 Page 84 Copyright © 2020 PreppComm...
- Page 85 Return to Table of Contents 19.4 Page 85 Copyright © 2020 PreppComm...
- Page 86 Return to Table of Contents Page 86 Copyright © 2020 PreppComm...
- Page 87 FB--Fine Business (good, excellent, OK) FER--For FT--Feet GA--Good Afternoon, Go Ahead GB--Good Bye, God Bless GE--Good Evening GL--Good Luck GM--Good Morning GUD--Good HI--Telegraphic Laughing HPE--Hope HR--Here, Hear HV--Have HW--How (or "How copy?") LIL--Little MNI--Many NR--Near, Number NW--Now Page 87 Copyright © 2020 PreppComm...
- Page 88 TU--Thank You (usually used at end of contact, meaning "Thanks for the contact".) TX--Transmit U--You UR--Your, You Are URS--Yours VY--Very WID--With WL--Well, will, we'll WTS--Watts WUD--Would WX--Weather XCVR--Transceiver XMTR--Transmitter XYL--Wife YL--Girlfriend ("Young Lady") YRS--(Years) Page 88 Copyright © 2020 PreppComm...
- Page 89 As you can see, the frequency displayed matches the sender’s frequency, and we are listening at the lower of the two frequencies where a 1300 Hz tone can be heard. Note that as you move the frequency of the transceiver upward, the tone will decrease until Page 89 Copyright © 2020 PreppComm...
- Page 90 So, the Tuning Rule for finding a signal while tuning around is simple: Step up the receiver frequency 10 Hz. If the tone goes lower, you are set. If not, drop down 2600 Hz by pressing the D key. Page 90 Copyright © 2020 PreppComm...
- Page 91 Or, one could say, a modern OS. The DMX-40 has no OS. It talks directly to the "metal" and is a true real-time multi- tasking software program. Memory space is limited, and to keep power consumption down, size down, and required memory space and processor speed down for lowering cost, we choose to continue to use the old-style PS2 USB keyboards.
- Page 92 DO NOT ATTEMPT TO USE THE SAME CABLE FOR BOTH FUNCTIONS! PLEASE NOTE that SHIELDED WIRE MUST BE USED to prevent RF from getting into the internal circuitry. This may cause your DMX-40 to lose it’s mind, so to speak. Avoid problems by using shielded wire! Page 92 Copyright ©...
Need help?
Do you have a question about the DMX-40 and is the answer not in the manual?
Questions and answers