Table of Contents
Advertisement
Quick Links
Advertisement
Table of Contents

Summary of Contents for Euroscan MX1
- Page 1 Euroscan MX1 Temperature recorder & Communication device Installation manual...
-
Page 2: Table Of Contents
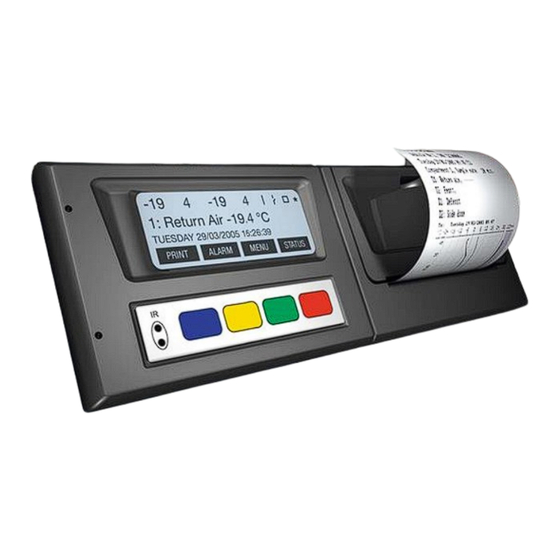
APPENDIX B FUNCTIONAL SPECIFICATION..................19 APPENDIX C EXPLANATION OF MENUSETTINGS IN EuroTOOL ............ 20 APPENDIX D FREQUENTLY ASKED QUESTIONS ................21 APPENDIX E RECORDER CONFIGURATION SETTINGS..............221 Euroscan MX1 Document number: EN-301-1:UD - based on Firmware version 1.033 and forward... - Page 3 Fig. 1 Overview Euroscan MX1 Document number: EN-301-1:UD - based on Firmware version 1.033 and forward...
-
Page 4: Introduction
1. Introduction This manual is a guideline for the installation and use of the Euroscan MX1. To avoid guarantee exclusion due to incorrect installation, it is most essential to follow the instructions and recommendations of this manual. The Euroscan MX1 is a modular device with different communication options. It is developed and produced to meet the applicable European and National guidelines for the delivery of chilled and frozen transport goods in transport vehicles. -
Page 5: Installation
Optionally, 2 extra sensors and up to 4 digital (status) inputs can be connected. The main steps of the installation are described in the following chronological order. It’s preferable to configure the settings of the MX1 recorder before mounting the recorder on a truck. How to configure the settings of the MX1 recorder is described in paragraph 2.7. -
Page 6: Cabling
2.4 Cabling The installation set of the Euroscan – recorder contains almost all components required for a standard installation with two temperature sensors. In addition to that, some small materials like a silicon kit, PVC trunking, and fixing materials for cable mounting are required. -
Page 7: Serial Connection
2.6 Serial connection To set parameters, the MX1 recorder should be connected to a pc by using a serial connection. Euroscan offers a connection cable (P/N: CC-0851-01) for this purpose. When your pc doesn’t have a serial port, you have to use a USB to serial (RS-232) convertor and you can use a USB-port instead of a serial port. -
Page 8: Eurotool Setup
Press “Edit -> Settings” again to go back to the main screen of EuroTOOL. Click now on “Autodetect recorder” to find the connected MX1 device. If everything is correct, the recorder type, name and serial will appear. Now fill the recorder’s PIN in the yellow field of the main screen. The default PIN is ‘1111’. See figure 6 on the next page. - Page 9 The values of the parameters can be changed by checking a parameter, fill in a value and press ‘Write’ to send the new value to the MX1. When data transfer is ready, the field will be green. Reading or writing all parameters will take some time.
-
Page 10: Igprs & Bluetooth Setup By Using Eurotool
2.8 iGPRS & Bluetooth setup by using EuroTOOL iGPRS and Bluetooth technology in combination with your Euroscan MX1 recorder will reduce time needed to extract data from your vehicles and provide a quick analysis of transport data. This chapter describes the settings of the Bluetooth and iGPRS parameters by using EuroTOOL. -
Page 11: Igprs Manual Settings By Using 'Eurotool
• Make sure all parameters what have to be edit are checked. Press on the right of the screen on ‘Write’ and wait till the fields of the edited parameters are green. • Exit EuroTOOL. • Fig. 8 Example of iGPRS settings in EuroTOOL Euroscan MX1 Document number: EN-301-1:UD - based on Firmware version 1.033 and forward... -
Page 12: Bluetooth Manual Settings By Using 'Eurotool
2.8.2 Bluetooth manual settings by using ‘EuroTOOL’ The build-in intelligent Bluetooth module has the possibility to take over the Bluetooth parameters from a Euroscan recorder. In this paragraph is described what the Bluetooth-settings mean and how they can be changed. -
Page 13: Pda Connection
2.9 GPS-Antenna placement in MX1 recorder In a Euroscan MX1 recorder could be up to three antennas. One for Bluetooth-, one for GPS- and one for iGPRS- signals. All these signals are high-frequency. For good working, some setup conditions are needed. -
Page 14: Final Testing Installation
Environmental In the case of the MX1 recorder being discarded, potential environmental hazardous components should be removed and discarded safely. A 3,2 V backup battery has been integrated in the recorder circuit, to preserve clock settings etc. -
Page 15: Functionality Check - Onboard Status Leds
3.1 Functionality check – onboard status LEDs After the physical installation of the MX1 recorder has been established, the functionalities of the MX1 should be inspected. Two on-board led’s (a green one and a red one) inform you about the status of the recorder. The table below shows the meaning of both LEDs. -
Page 16: Functionality Check - Pc Menu
When HyperTerminal has been configured, the MX1 is ready to be switched on. Make sure that the MX1 is powered by the vehicle or fridge battery, and that the 10 amp fuse is integrated into the circuit. (See wiring diagram on page 6.) When powered, the MX1 first initializes the communication device(s). - Page 17 Fig. 14 Initialization Fig. 15 Help menu Euroscan MX1 Document number: EN-301-1:UD - based on Firmware version 1.033 and forward...
-
Page 18: Appendix Atechnical Data
(supplied in installation kit) Battery The MX1 contains a lithium battery. This battery should be removed before discarding and should be disposed separately. For technical support, please contact your local supplier or Euroscan: visit www.euroscangroup.com. -
Page 19: Appendix Bfunctional Specification
Logging interval from 5..75 minutes External Equipment (protocols) Euroscan protocol: programming/downloading data, firmware update MX1 debug protocol: terminal protocol for installation diagnostics ThermoKing fridge protocol (through ThermoKing I-box): set- points, sensors (return air), alarm doses, engine/maintenance hours ... -
Page 20: Appendix Cexplanation Of Menusettings In Eurotool
Choose between the European and the American date/time notation COM protocol The MX1 has 4 COM-ports. COM1 and COM2 are available for external connections (e.g. with a pc). COM3 is the internal Bluetooth-port and COM4 is the internal GPS/iGPRS port. -
Page 21: Appendix Dfrequently Asked Questions
APPENDIX D FREQUENTLY ASKED QUESTIONS Q: Should the MX1 recorder always be connected to a pc? A: No, there only has to be a serial connection when the recorder will directly configure by a pc. It’s also possible to configure a recorder online via EuroWEB II. -
Page 22: Appendix Erecorder Configuration Settings
TCP server name/address:___________________________________________________________________ TCP port number:__________________________________________________________________________ BLUETOOTH SETTINGS LAP1:_______________________________________ LAP9:________________________________________ LAP2:_______________________________________ LAP10:_______________________________________ LAP3:_______________________________________ LAP11:_______________________________________ LAP4:_______________________________________ LAP12:_______________________________________ LAP5:_______________________________________ LAP13:_______________________________________ LAP6:_______________________________________ LAP14:_______________________________________ LAP7:_______________________________________ LAP15:_______________________________________ LAP8:_______________________________________ LAP16:_______________________________________ LAP PIN:____________________________________ NOTES ___________________________________________________________________________ ___________________________________________________________________________ Euroscan MX1 Document number: EN-301-1:UD - based on Firmware version 1.033 and forward... - Page 23 Euroscan Group Frederikstraat 5 6433 GK Hoensbroek (Netherlands) Tel.: +31(0) 45-528 5763 Fax: +31(0) 45-528 5764 www.euroscangroup.com info@euroscangroup.com Euroscan MX1 Document number: EN-301-1:UD - based on Firmware version 1.033 and forward...
Need help?
Do you have a question about the MX1 and is the answer not in the manual?
Questions and answers