Advertisement
Quick Links
Advertisement

Summary of Contents for AIGURD F22
- Page 1 AIGURD AIGURD Fingerprint Smart Door Lock User Manual...
- Page 2 Contents Product Introduction..............01 Installation Guide..............04 Operation Introduction.............11 Software..................17 Routine maintenance..............19 Warranty..................20 Contact..................21...
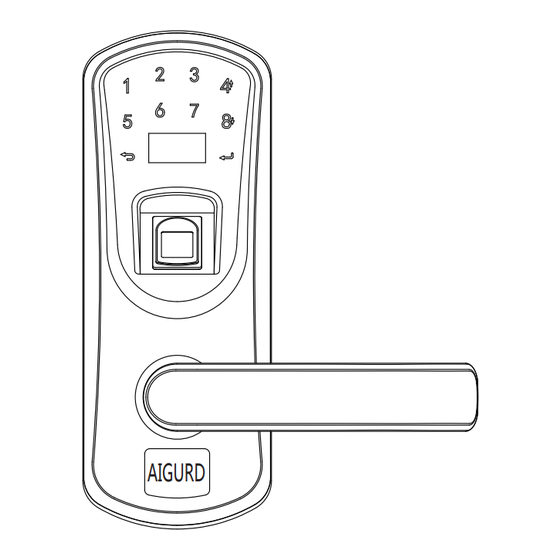
- Page 3 Up/Increase Left Right Reset Key board Reset Down/Reduce Cancel Enter Oled screen Fingerprint Sensor Dot faces the Arrow Mechanical Micro USB keyhole charging port Thank you for choosing this fingerprint touchscreen door lock No more worries about losing keys,you just need one touch to unlock.This lock adopts a live semiconductor sensor and has 360 degree fingerprint recognition,which allows easy and fast .The lock is equipped with OLED displa...
-
Page 4: Specification
1.Features UP to 200 user IDs could be registered to the lock and both finger -print and code unlocking ways are available for each ID. Administrator:who has the highest privilege in the locking system, can not only unlock but also set up the lock.10 IDs maximum(ID range:0001-0010). - Page 5 Note:Please make sure that all accessories are in the package before installation. Inside Chassis Outside Chassis Base Mounting Plate Square Spindle Mechanical Keys Door Latch USB Cable Strike Plate Connection Rod Screw M4x12 Screw M4x30 Screw M4x20 AIGURD Strike Box Drill Holes Template AIGURD Manual...
- Page 6 Inside Chassis Screw M3x8 Screw M4x30 Base Mounting Plate Connection Rod Battery Outside Chassisl compartment cover Screw M4x12 Spindle Screw M4x20 latch...
- Page 7 a.Drill holes according to the paper guide inside lock package. b.Insert the lock latch into the door. c.Install the square iron stick & outside lock housing d.install the inside lock housing a.Insert the lock latch into the door and tighten up with 2pcs screws M4x20. b.Install the strike plate and fix it with 2pcs self-tapping screws.
- Page 8 a.Insert the square iron stick across the latch, if the door thickness is less than 2 , the spring side should face the inside housing.(Note: If the door thickness is over 2 , the spring side should face the opposite direction.). b.Tighten up the 3pcs connection rods to the outside housing unit and make the two arrowheads face each other.
- Page 9 c.Insert the square iron stick smoothly across the latch.Make sure the stick edge slides into the hole on the outside handle.Get the wire on the handle across the space. a.Pass the wire through the rectangular hole on the base mounting plate and then fix the plate on the door with 3pcs M4x30.
- Page 10 b.Connect the wire to battery. c.Insert the square iron stick into the inside handle. Please arrange the wire in empty space and make sure the wire is fixed. d. Install the inside housing onto the mounting plate and fasten it with 4pcs M4*12 screws...
- Page 11 a.Install 4 new AA Alkaline batteries b.Slide the battery cover down and then tighten up with the screw c. Never mix new batteries with used batteries. a.You should be able to push down and lift up the handle. b.You should be able to unlock the lock with mechanical keys. c.You should be able to add users and program the lock by following the operation instruction.
-
Page 12: System Menu
a.Administrator: who has the highest privilege in the locking system,can not only unlock but also set up the lock. 10 IDs maximum ( ID range: 0001-0010). b.Normal user: who can only unlock the lock but has no authorization to set up the lock. 140 IDs maximum ( ID range: 0011-0150). - Page 13 Factory default With Master code Active the lock by Active the lock by touching the screen touching the screen enter enter Active the lock by Active the lock by Verify Master Verify Master touching the screen touching the screen Verify OK Verify OK enter User Empty Enroll...
- Page 14 Active the lock by Active the lock by Active the lock by touching the screen touching the screen touching the screen enter enter enter Verify Master Verify Master Verify Master Verify OK Verify OK Verify OK Menu Enroll Menu Enroll System Menu User Modify User Modify...
- Page 15 Active the lock by Active the lock by Active the lock by touching the screen touching the screen touching the screen enter enter enter Verify Master Verify Master Verify Master Verify OK Verify OK Verify OK System Menu System Menu System Menu Enroll User Enroll User...
- Page 16 Active the lock by Active the lock by touching the screen touching the screen enter enter Verify Master Verify Master Verify OK Verify OK System Menu System Menu Enroll User Enroll User Modify User Modify User Delete User Delete User Record Check Record Check System Setup...
- Page 17 Active the lock by Active the lock by touching the screen touching the screen enter enter Verify Master Verify Master Verify OK Verify OK System Menu System Menu Enroll User Enroll User Modify User Modify User Delete User Delete User Record Check Record Check System Setup...
- Page 18 Login to the system, go to the menu page, press to turn on or turn off the key sound or prompt sound. Login to the system, go to the menu page, press to confirm. You can reset the system to manufacture default by using this function and all user IDs will be removed after resetting.
- Page 19 Backup and Recover User Data Under Normal Mode a.Connect the lock to the computer through the USB cable(included). b.Login to the lock system and go to the data transfer function and then open the lock software on the computer. c.To back up the user data, click "User Backup" and select the user data to save the file. The user data will be transferred to the computer.
- Page 20 a1. Firmware Version: You can check the firmware version in the lock, and update the firmware version. a2. Time Set: You can customize the lock time or sync the lock time with the computer time b.Download...
- Page 21 b1. User Download Load All Users: all users will be downloaded from the lock to the computer. Delete Selected User: only the selected users will be deleted. Delete All Users: all users will be deleted, including the master user, normal user and guest user.
- Page 22 Warranty period for this product is one year and we provide lifetime after sales services. ●Within one year of the purchase date, if the product has any quality or technical problems, we will repair or replace the product for the buyer for free. The warranty period starts from the original order date.
- Page 23 Tips: you can contact our after-sales service for lock issues Email:shanghaiaika@163.com our website:www.aigurd.net set up Guide:https//youtu.bec W kgh 6bDN8 lnstallation Guide:https//youtu.bez-klctsi Y4E...
Need help?
Do you have a question about the F22 and is the answer not in the manual?
Questions and answers