Table of Contents
Advertisement
Available languages
Available languages
Quick Links
STIKLOKERAMIKOS
KAITLENTĖS INSTRUKCIJA
VITROCERAMIC COOKTOP
User instructions
ELEKTRO-GLASKERAMIK-KOCHFELD
Montage - und Gebrauchsanweisung
PLANO VIDRIOCERAMICA
Manual de utilización
TABLE VETROCERAMIQUE
Notice d'utilisation
GLASKERAMIEK PLAAT
Gebruiksaanwijzingen
СТЕКЛОКЕРАМИЧЕСКАЯ ПАНЕЛЬ
Инструкции по пользованию
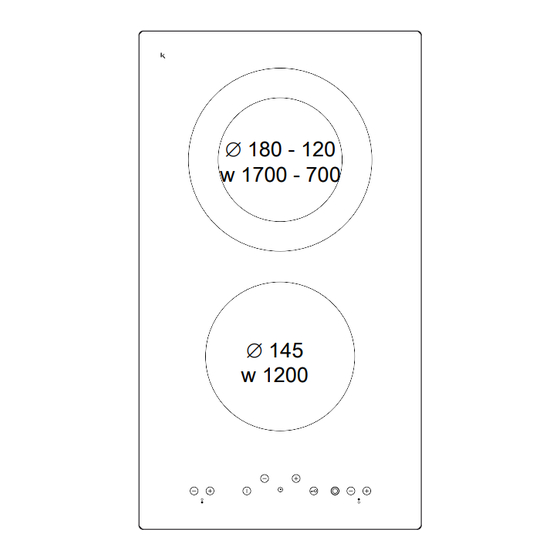
PE 29X
∅ 180 - 120
w 1700 - 700
∅ 145
w 1200
Galia / Absorption / Anschlusswert : 2,9 kW
L T
EN
DE
ES
FR
NL
RU
PE 29A
∅ 180
w 1800
∅ 145
w 1200
Galia / Absorption / Anschlusswert : 3,0 kW
C
1
Advertisement
Table of Contents

Summary of Contents for ALLENZI PE 29X
- Page 1 Montage - und Gebrauchsanweisung PLANO VIDRIOCERAMICA Manual de utilización TABLE VETROCERAMIQUE Notice d’utilisation GLASKERAMIEK PLAAT Gebruiksaanwijzingen СТЕКЛОКЕРАМИЧЕСКАЯ ПАНЕЛЬ Инструкции по пользованию PE 29X PE 29A ∅ 180 - 120 ∅ 180 w 1700 - 700 w 1800 ∅ 145 ∅ 145 w 1200...
- Page 2 Pav. pav. Ⓐ Ⓑ Pav. 40 mm ~ 2 mm min. 50 mm 20 mm Pav.
- Page 3 Pav. H05V2V2-F 3G 1,5 mm 220-240V2 220-240V Pav. Pav. Ⓐ Ⓑ Pav. A - ON/OFF sensorius - įjungimo/išjungimo sensorius H – išsipečiančios zonos LED indikatorius B - Timer Plius- laikmačio pius sensorius ne visuose modeliuose C - Timer Minus > laikmačio minus sensorius I- užrakto nuo vaikų...
- Page 4 Montavimas Kaitlentės PE 29 X/PE29A Šis prietaisas skirtas montuoti į stalviršį instrukcija kaip parodyta (Pav.1). Izoliuokite kaitlentę ir SVARBU stalviršį izoliacija (Pav.4) palei visą kaitlentės Prašome perskaityti šią prietaiso naudojimo perimetrą (žr. Pav.1 dėl stalviršio ertmės matmenų) instrukciją prieš jį pajungiant ir pradedant juo Izoliacija reikalinga, kad skysčiai nepatektų...
- Page 5 Pasirinkite norimą kaitvietę ir temparatūrą po to Sensorinis valdymas (Pav.8) laikmačio funkciją įjungsite laikmačio sensoriais . . Patvirtinkite pasirinktos kaitlentės nustatymus sensoriais arba Užsižiebs simbolis , kuris rodo , kuri kaitvietė buvo užprogramuota. Laikmatis skaičiuos ir rodys kiek min liko iki kaitvietės išsijungimo(Pav.8). Išjungti laikmatį...
-
Page 6: General Instructions
VITROCERAMIC HOB Lock the domestic appliance into place with 4 User instructions supporters, keeping in mind the width of the surface (Fig.2). GENERAL INSTRUCTIONS If the lower part of the appliance after installation, Carefully read the contents of this leaflet since it is accessible via the lower part of the furniture, it is provides important instructions regarding safety of necessary to mount a separating panel keeping in... -
Page 7: Disposal Of Old Electrical Appliances
TOUCH CONTROL (Fig.8) in the timer area to adjust the cooking time. Confirm by pressing the key in the previously switched-on cooking area. The symbol will appear on the display of the cooking area where the timer is activated and the countdown will be shown in the display M (Fig.8). -
Page 8: Montage
2. GEBRAUCH Elektro-Glaskeramik-Kochfeld Montage- und Gebrauchsanweisung 2.1 Vorbemerkungen zur Sicherheit 1. MONTAGE • Nur Kochgeschirr mit ebenem und ausreichend dickem Boden benutzen. Der Boden muss wenigstens dem Durchmesser der 1.1 Vorbemerkung zur Sicherheit Kochzone entsprechen oder darf höchstens leicht größer sein Der Einbau und der Anschluss dürfen nur von einem als diese (Abb.6). -
Page 9: Wartung
Das Gerät ist mit einer Sicherheitsabschaltung ausgestattet, geschehen ist, kann mit Hilfe der Tasten F oder G die die automatisch das Gerät ausschaltet, wenn an der Temperatur eingestellt werden. Die Leistung der einzelnen Temperatureinstellung des Grills keine Veränderungen Kochzonen kann in 9 verschiedene Positionen eingestellt vorgenommen werden. - Page 10 PLANO EN VIDRIOCERAMICA CONEXIÓN ELECTRICA (Fig.5) Manual de utilización Antes de efectuar la conexión eléctrica, asegurese que: GENERALIDADES - El cable eléctrico correspondiente a la toma a tierra Lea atentamente el contenido de este libro que le sea 2 cm más largo que los otros dos. proporcionará...
-
Page 11: Calor Residual
G - Grill / tecla - > reduce la potencia del grill presionar simultáneamente los botones de la I - Led bloqueo teclas > se enciende cuando el zona del temporizador. bloqueo de los mandos está activo L - Pantalla del grill > muestra el nivel de potencia del BLOQUEO DE LOS MANDOS grill Los mandos pueden ser bloqueados para que no... -
Page 12: Caractéristiques Générales
TABLE VETROCERAMIQUE Bloquer l’appareil électroménager sur le plan de Notice d’utilisation travail au moyen des 4 appuis, compte tenu de l’épaisseur du plan de travail (Fig.2). CARACTÉRISTIQUES GÉNÉRALES Si la partie inférieure de l’appareil, après l’installation, Lire attentivement le contenu du présent livret, est accessible du côté... -
Page 13: Chaleur Résiduelle
TOUCH CONTROL (Fig.8) minutes) pour la coupure automatique de la zone sélectionnée. Pour faire fonctionner le timer, allumer et régler la température de la zone de cuisson souhaitée, enfoncer les touches de la zone timer pour régler le temps de cuisson. Confirmer en appuyant la touche de la zone de cuisson précédemment allumée. -
Page 14: Algemene Informatie
GLASKERAMIEK PLAAT vanuit de onderkant van de kast bereikbaar is moet Gebruiksaanwijzingen een scheidingsvlak gemonteerd worden door de aangegeven afstanden in acht te nemen (Fig.3). ALGEMENE INFORMATIE Indien het onder een oven geïnstalleerd wordt is dat Lees de inhoud van dit boekje aandachtig door, want niet nodig. - Page 15 TOUCH CONTROL (Afb.8) kookzone verschijnen waarvoor de timer geactiveerd is en de terugtelling van de tijd zal op display M weergegeven worden (Afb.8). Om de timer te deactiveren, de betreffende kookzone uitschakelen of op toets o van de kookzone drukken en vervolgens gelijktijdig op de toetsen e van de timer drukken.
-
Page 16: Инструкции По Безопасности
СТЕКЛОКЕРАМИЧЕСКАЯ ПАНЕЛЬ Предварительно уложите изоляционный материал (рисунок 4) вдоль всего периметра (размеры для обрезки Инструкции по пользованию указаны на рисунке 1). Данная операция необходима для того, чтобы воспрепятствовать проникновению каких- Внимательно ознакомьтесь с содержанием данной либо жидкостей в рабочую панель, так как невозможно брошюры, так... - Page 17 СЕНСОРНОЕ УПРАВЛЕНИЕ (рисунок 8) регулируйте нужную температуру зоны нагрева, нажайте клавиши или от зоны таймера для урегулировании время варения. Утверждайте клавишей или от ранее выбранной зоны нагрева. Значок изображается тогда на дисплее от зоны нагрева активируемого таймера, и на дисплей М изображается остаток время (изобр. 8). Для...
Need help?
Do you have a question about the PE 29X and is the answer not in the manual?
Questions and answers