
Related Manuals for Wosports G500

Summary of Contents for Wosports G500
- Page 1 G500 GAME CAMERA USER’ S MANUAL Thanks for purchasing this trail camera Please read before using this equipment...
-
Page 3: Table Of Contents
CONTENTS PART LIST PRODUCT STRCTURE Front View Operation Interface Bottom View Back View CAMERA OPERATIONS How to use? LOADING BATTERIES INSERTING SD CARD USING THE CAMERA Operating Buttons ITEM SETTINGS Settings Menu 12-16 Quick Setting MOUNTING TECHNICALSPECIFICATION 18-19 20-25... -
Page 4: Part List
PARTS LIST 1.Trail Camerax1 4.Nylon Strap with Bucklex1 2.User’ s Manualx1 5.Wall Mountx1 3.USB Cablex1 6.Screwsx3 G500 GAME CAMERA USER’ S MANUAL Thanks for purchasing this trail camera Please read before using this equipment ① ② ③ ④ ⑤ ⑥... -
Page 5: Product Strcture
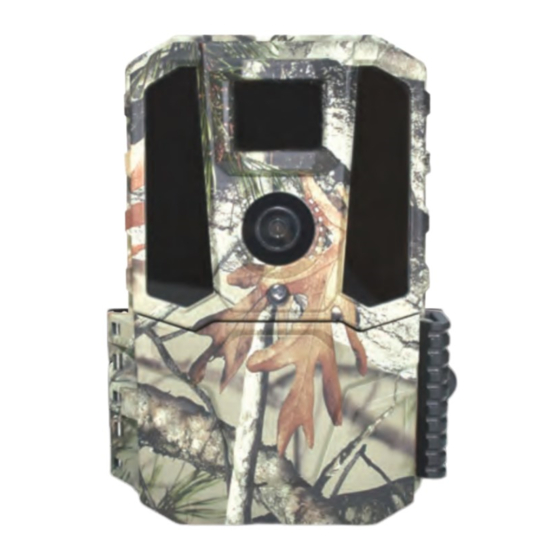
PRODUCT STRCTURE FRONT VIEW PIR Sensor Infrared LED Array Camera Lens Indication LED Latch... -
Page 6: Operation Interface
PRODUCT STRCTURE OPERATION INTERFACE LCD Screen Left UP/Video Right/Shot Down/Photo MENU Power/Mode Switch Battery Release... -
Page 7: Bottom View
PRODUCT STRCTURE BOTTOM VIEW BACK VIEW Microphone SD Card slot External Power Cover USB Port (open to use DC power port) Mounting-Bracket Screw Receptacle (Standard 1/4’ ’ -20-Tripod Mount) Belt Hole Battery Compartment Sawtooth Brackets Cable-Lock Hole... -
Page 8: Camera Operations
CAMERA OPERATIONS HOW TO USE? 1. Install 8pcs AA batteries (NOT INCLUDED). 2. Install SD card (CLASS 6 or higher class Up to 32GB max, NOT INCLUDED). 3. Put the switch to "AIM", then you can setting (Date/Time, Image resolution, video resolution, and the Interval time etc) 4. -
Page 9: Loading Batteries
LOADING BATTERIES 1.Press the Battery Tray EJECT button to release the battery tray and pull it out for loading. Switch the camera’ s power OFF when loading/unloading batteries. 2.Be sure to inset each battery so its polarity(+/- direction) matches the polarity indications at the bottom of the battery tray. -
Page 10: Inserting Sd Card
INSERTING SD CARD Make sure that the SD card is insert correctly .If you hear “ click” sounds that means it has be inserted correctly .The camera uses a standard SD memory card to save your photos or videos.SD and SDHC (high capacity)class 4 or higher seed cards up to a maximum 32GB are supported. -
Page 11: Using The Camera Operating Buttons
USING THE CAMERA Operating Buttons :Page up. :Page down. :Page left. :Page right/ Shot key : Save settings. : Review photos and videos in the AIM mode. Press OK again to exit the preview interface. EJECT ON AIM OFF : Enter the setup menu in preview mode. :Exchange between main screen and setup. -
Page 12: Item Settings Settings Menu
ITEM SETTINGS Settings Menu To view the camera settings menu, press(M) in the AIM mode. to select the sub-menu, use to select the different options, then press (OK) to save the setting and the option. Press(M)to return. Quick Setting Settings Settings Settings Set Clock/Date... - Page 13 Setting Items Sub menu Description There are 3 modes to choose from Photo Photo/Video Video, Photo& video Image Size -5MP, 16MP , 30MP Image size can be selected. Photo Capture Number -Number of photos per PIR capture. Can select 1-6 images. -Quality: HD:1280 x720P video ,FHD:1920x1080P,QHD: 2560x1440P,and VGA :640x480P video Video Size...
- Page 14 Setting Items Sub menu Description This interval means how long the PIR will be disabled 2second -60second after each triggering in the ON mode. During this time, Interval the PIR will not react motion. The minimum interval is 5minute-60minute 2 seconds and the maximum is 60 minutes. -Set the sensitivity of the sensor.
- Page 15 Setting Items Sub menu Description Off - Off means you shut down the function. Set Active Time Start 00:00 - ON The camera would always worked within the active time you set up. Stop 00:00 Off - Off Close the time lapse function -Time lapse delay: Can select 5, 10 ,15, 30, 60 minutes.
- Page 16 Setting Items Sub menu Description -Returns to default settings. Default settings are as Default Yes/No follows:English, Photo,5MP,1Pict, Serial number and so on. English -English , Japanese, Deutsche can be selected as camera Language language. 日本语 Deutsche -Set this serial number to identify different shooting locations by numbering when multiple machines are in Camera Name use at the same time.
-
Page 17: Mounting
MOUNTING After the setting the camera’ s time/date and other options to your preference , you’ re ready to take it outside and begin capturing images of animals in the area you want to monitor. When mounting the camera to a tree, use the adjustable web belt provided. Please be sure to mount it in place correctly and securely. -
Page 18: Technicalspecification
TECHNICAL SPECIFICATION Resolution 5MP Native Sensor/Up to 30MP Interpolated Trigger Speed 0.3s Camera Lens(FOV) 120 degree IR Illumination 40pcs 850 LEDs IR Flash Distance 90' Flash 2560x1440P 1920x1080P Video Resolution 1280 x720P 640x480P Detection Distance Up To 80 ft Recovery Rate Time Lapse Mode Multi Shot Mode Up to 6 Per Trigger... - Page 19 Battery Life Up to 18 mouth LCD Screen 2.0" LCD Screen Button Interface Backlit 6 Button Attachment Interface 1/4"-20 Brass Insert Bottom w/Dead Stop Case Color Camo Dipped Front Case Power Source 8AA 12V DC IN 12V DC In Cable Lock Compatible Yes, Closed Dual Slot Above Dual Strap Slot Accessories Nylon Strap with Buckle...
-
Page 20: Faq
CAMERA WON’ T POWER UP 1.Make sure that you have installed all batteries in the battery compartment, filling all battery spaces with no “gaps” . 2.We recommend using a full set of 8 Energizer® Lithium AA batteries. 3.Make sure that the batteries are installed correctly, observing proper polarity. 4.Please be sure to switch the power “OFF”... - Page 21 CAMERA STOPS TAKING IMAGES OR WON’ T TALK IMAGES 1.Please make sure that the SD card is not full. If the card is full (display indicates ” FULL” , the camera will stop taking images.) 2.Make sure that the power/mode switch is in the ON position and not set to OFF or AIM. 3.Make sure that you are using a good quality SD card in your camera.
- Page 22 BATTERY LIFE IS SHORTER THAN EXPECTED 1.Check to make sure you have used new alkaline or lithium batteries. We recommends using a full set of 8 Energize® Lithium AA batteries to obtain maximum battery life. 2. These are several variables that will determine the battery life including type of batter- ies, temperature outside, recording settings, frequency of camera activity, etc.
- Page 23 CAMERA PIR WON’ T WORK 1.Check the Interval time you settings. It won’ t take images for a long time if you setting the Interval time is too longer .You can figure out that by restore the camera to factory settings.
- Page 24 there is high heat in the foreground and any motion from wind cloud set off the camera. Setting a camera up over water is also a potential cause for this issue. To remedy this situation. 1.Try moving the camera to an area that does not have any of these issues or remove potential obstacles near the lens if possible.
- Page 25 3m from the camera. Subjects may appear too light at closer distances. If you have any questions or problems. Please contact us by email: support@wosports.com We will offer prompt and authoritative reply within 24 hours, and try our best to resolve...
Need help?
Do you have a question about the G500 and is the answer not in the manual?
Questions and answers