Table of Contents
Advertisement
Quick Links
Advertisement
Table of Contents

Summary of Contents for eChat e360
- Page 1 ENGLISH Quick Start Guide Broadband Portable Radio...
-
Page 2: Legal Information
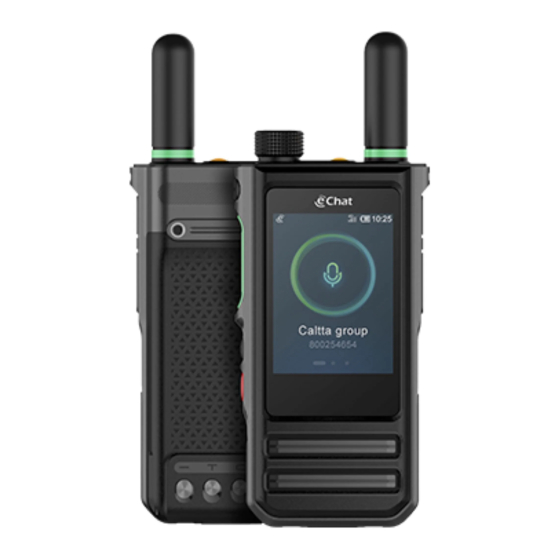
LEGAL INFORMATION Copyright ©CALTTA TECHNOLOGIES CO., LTD. 2020 No part of this publication may be quoted, reproduced, translated or used in any form or by any means, electronic or mechanical, includ- sion of CALTTA TECHNOLOGIES CO., LTD. Violators Will Be Prosecuted. CALTTA TECHNOLOGIES CO., LTD. - Page 3 GET TO KNOW YOUR RADIO 1.1 Components The e360 radio is a trunking voice intercom product based on the public network data service, which can be used in the LTE/WCDMA networks. With the help of 4G technology, the e360 achieves high- speed data connection, so that you can communicate with others in real time.
-
Page 4: Component Descriptions
1.2 COMPONENT DESCRIPTIONS Name Name F1 (Function 1) button LCD screen PTT button SOS button F2 (Function 2) button Antenna Power button Earphone/USB Type-C Interface Channel/Volume knob Nano-SIM Card Slot SYMBOLS DISPLAY The main screen of Android system is the starting point for you to access all Android system functions on your radio. -
Page 5: Led Indicator
Icon Status Mute Signal indicator Data service indicator Earphone connected 2.1 LED INDICATOR The LED indicator indicates the operating status of the radio. LED Indicator No. Working Status Color Period Charging Solid Full charge Green Solid Login failed Flashing Group selecting mode Green Solid Floor request successful... -
Page 6: Getting Started
GETTING STARTED 3.1 Insert the battery 1. Insert the battery by pushing up from lower left corner in the back 2. Install successfully, ensure the battery contacts match up with the contacts in the radio. 3.2 Insert Nano-SIM card Insert a valid Nano-SIM card into the radio before using. The Nano-SIM card can be used in any corresponding format radio (the new radio will automatically read the Nano-SIM card). -
Page 7: Battery Charging
tion. 3. Close the cover of Nano-SIM card. NOTE: • Please power off the radio before removing Nano-SIM card. It is inadvisable to insert or take out the Nano-SIM card if connected to external power source. • Please avoid touching the metal plane area of the SIM card to prevent damaging the information held inside. - Page 8 Desktop charging: 1. Place the radio in the desktop charger and the radio will be charged automatically. 2. After charging is completed, take out the radio. USB cable charging: 3. Connect the charge/data cable to the USB Type-C interface of the radio.
-
Page 9: Power Off
off. • If the battery will be not used for a long period, please take it out from the radio and store it in a cool, dry place. 3.4 Power on Press and hold the power button for 3~5s under the power off mode, after green indicator is lit, the LCD screen displays the power on picture, prompting that the radio is powering on. -
Page 10: Basic Operations
If the radio cannot login eChat system, please check the following information. Problem type Possible cause... - Page 11 the PTT button to talk. 4.2.2 Group selecting mode 1. Press the channel/volume knob to switch to the group selecting mode. 2. Rotate the channel/volume knob to switch to the required group. for 10 seconds to select the current group automatically. 4.
- Page 12 3. Press PTT button to initiate private call to the current member. 4. Press F2 button to end the private call and the radio will return to the last working group automatically. 4.6 Answer half-duplex private call 1. The radio will exit from the current working group immediately after receiving the private call.
-
Page 13: Advanced Operations
5.2 eChat application upgrade 1. When the radio is connected to the network and logged in suc- cessfully, if the server has a new eChat application version, it will push to the radio automatically, and the radio will start to download the new version package in background. -
Page 14: System Settings
Wi-Fi network via CPS, including add, imum of 5 Wi-Fi networks. Please contact with solution provider to SYSTEM SETTINGS Press and hold F2 button under the standby mode to enter system settings, and the content that can be set up includes: LCD level;... -
Page 15: Network Mode
2. Rotate the channel/volume knob to switch to LCD level setting. 3. Press the channel/volume knob to change the current LCD level, press the channel/volume knob can set from 1-5 cyclically. 4. Press F2 button to exit the main menu. 6.2 Network mode 1. - Page 16 knob to connect the Wi-Fi network which preset by the CPS. 7. Press F2 button to go back/exit main menu. 6.4 Bluetooth 1. Press and hold F2 button to enter system settings under the standby mode. 2. Rotate the channel/volume knob to switch to Bluetooth setting. 3.
-
Page 17: System Updates
2. Rotate the channel/volume knob to switch to language setting. 3. Press channel/volume knob to view language list and current system language. 4. Rotate the channel/volume knob to select other language. 5. Press the channel/volume knob to change to other system lan- guage. -
Page 18: About Phone
11. Press F2 button to go back/exit main menu. 6.8 Voice assistance 1. Press and hold F2 button to enter system settings under the standby mode. 2. Rotate the channel/volume knob to switch to Voice assistance setting. 3. Press channel/volume knob to turn on/off Voice assistance. 4. -
Page 19: Application Version
3. Rotate the channel/volume knob to see previous/next message. 4. Press F2 button to exit message list. 6.11 Default dispatcher 1. Press and hold F1 button to enter dispatcher list under the stand- by mode. 2. Rotate the channel/volume knob to view the dispatchers. 3. -
Page 20: Software Release
Memory (RAM+ROM) 512MB + 4GB WLAN 802.11b/g/n,2.4GHz Location GPS/Glonass Speaker Front: 36mm Professional Speaker Card Slot Nano SIM x 1 Charging Desktop Charger / USB Type-C(Optional) Dust and Water Resis- IP54 tance 1. Risk of explosion if battery is replaced by an incorrect type. Dispose of used batteries according to the instructions. - Page 21 This equipment is marked ENGLISH-EN CALTTA declares that the radio equipment type e360 is in compli- ance with Directive 2014/53/EU. The full text of the EU declaration of conformity is available at the following internet address: http:// www.caltta.com/en/download.aspx Your mobile device is a radio transmitter and receiver. It is designed not to exceed the limits for exposure to radio waves recommended by international guidelines.
-
Page 22: Safety Information
power level of the device to ensure it only uses the minimum power required to communicate with the network. * The tests are carried out in accordance with EN 50566, EN 62209- 2, EN 62479. SAFETY INFORMATION Do not make or receive radio calls while driving. Never text while driving. - Page 23 Turn off when asked to in hospitals and medical facilities. Turn off when told to on aircraft and at airports. Turn off when near explosive materials or liquids. Do not use at gas stations. Avoid extreme temperatures. Avoid contact with liquids. Keep your radio dry. Do not attempt to disassemble your radio.
-
Page 24: Battery Safety Information
Only use approved accessories. For pluggable equipment, the socket-outlet shall be installed near the equipment and shall be easily accessible. Do not rely on your radio as a primary device for emergency communications. BATTERY SAFETY INFORMATION Using CALTTA-unapproved or incompatible battery, charger or pow- er adapter may damage your device, shorten its lifespan or cause a operating temperature range: -20 to 55°C, Charging temperature range: 0 to 40°C and the storage temperatures are -30°C to +70°C. - Page 25 • Do not change or replace the battery in your device by yourself. The battery can only be changed or replaced by CALTTA or CALTTA authorized service provider. • Please disconnect the charger when the battery is fully charged. Overcharging may shorten the battery life. •...
- Page 26 installation. If this equipment does cause harmful interference to radio or television reception, which can be determined by turning the equipment off and on, the user is encouraged to try to correct the interference by one or more of the following measures: -- Reorient or relocate the receiving antenna.
- Page 27 FCC Note Any Changes or modifications not expressly approved by the party responsible for compliance could void the user's authority to operate the equipment. CALTTA TECHNOLOGIES CO., LTD. Address: Floor12,Building G2, International E-City,Nanshan,Shenzhen, -China,518055 Tel: +86-755-26774767 Website: www.caltta.com Privacy statement: CALTTA TECHNOLOGIES CO., LTD. is a leading pro- vider of comprehensive critical communication solutions, the company is committed to protecting personal data by the use of appropriate technical and organizational measures.
Need help?
Do you have a question about the e360 and is the answer not in the manual?
Questions and answers