Table of Contents
Advertisement
Quick Links
Farmer Invented. Farmer Tested. Farmer Proven.
®
RESIDUE MANAGEMENT UPGRADE KIT
INSTALLATION MANUAL
CASE IH* 4000 & NEW HOLLAND* 980CR
SERIES CORN HEADS
www.CalmerCornHeads.com
Weekdays 8-5 p.m. - Office (309) 629-9000
After Hours/Weekends - Marion's Cell (309) 368-1182
*Trademarks are not owned by, affiliated with, or under license to Calmer Corn Heads, Inc.
and used solely for the utility of Calmer Corn Head products mentioned herein.
Advertisement
Table of Contents

Related Manuals for Calmer BT Chopper Upgrade Kit

Summary of Contents for Calmer BT Chopper Upgrade Kit
- Page 1 Weekdays 8-5 p.m. - Office (309) 629-9000 After Hours/Weekends - Marion’s Cell (309) 368-1182 *Trademarks are not owned by, affiliated with, or under license to Calmer Corn Heads, Inc. and used solely for the utility of Calmer Corn Head products mentioned herein.
-
Page 2: Table Of Contents
WARRANTY Step 5 – Reassembly of Components Calmer Corn Heads, Inc. has been in business since 2004 and has an excellent reputation for Step 6 – Installing Oil Bath Sprockets quality and workmanship. Please contact us (the manufacturer) if you feel a component has not lasted to your expectation. -
Page 3: Before Operation
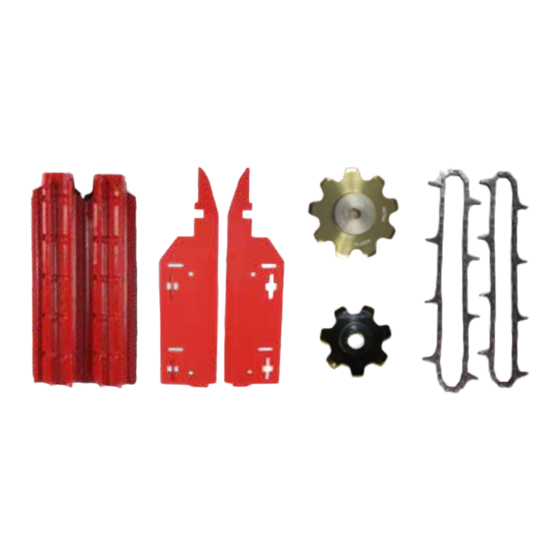
Sharp Objects signs are placed on the exterior of all stalk roll boxes. See the sign, right, for reference and understand the associated cutting dangers The Complete Calmer Residue Management Deluxe Upgrade Kit Includes Per Head: with the enclosed product. -
Page 4: Step 1 - Disassembly Of Current Components
Disassembly of Current Components Modifying Row Frames STEP 1 STEP 2 DANGER: Ensure the corn head is secured properly, combine lift cylinder stops 1. Use template provided with your kit to mark the appropriate modification lines on the are in place, equipment is turned-off, and the parking brake is engaged before row frame unit OR mark vertical line 6”... - Page 5 NOTE: The following step requires the use of an angle grinder and cut-off wheel, which are provided in the kit. 3. Grind metal burrs near the top of the row unit and along the sides of the row frame to ensure no material is hanging down.
-
Page 6: Step 3 - Modifying Stalk Roll Spirals
Modifying Stalk Roll Spirals STEP 3 DANGER: YOU MUST READ THE MANUFACTURER’S OWNER’S MANUAL 2. Cut spirals where marked on each nose cone (Image A) and smooth surface where the COVERING PROPER OPERATING AND SAFETY PROCEDURES PRIOR TO horizontal cut is made to remove the nose cone “fin.” (See image B) MODIFICATION! IF YOU HAVE ANY QUESTIONS, CALL OUR FACILITY AT (309) 629-9000 OR HIRE A QUALIFIED PROFESSIONAL TO INSTALL YOUR KIT. -
Page 7: Step 4 - Installing Calmer Bt Chopper Stalk Roll Shells
STEP 4 Stalk rolls are marked on the left (L) and right (R) shells and should be installed as a set, as packaged by Calmer Corn Heads. NOTE: Stalk rolls are to be installed from your perspective while sitting in the combine cab, looking at the corn head. - Page 8 IMPORTANT: The shells are designed to be installed so the seams of both 8. After hand tightening all bolts, torque bolts to 55 ft.-lbs., alternating from top to bottom of the rolls are both horizontal or both vertical, depending on the rotation of the corn head and middle to ends of the rolls in the order shown.
-
Page 9: Step 5 - Reassembly Of Components
To resolve this issue, install Calmer’s 26-tooth driver and 32-tooth driven oil bath sprockets with # 60 double chain or Calmer’s 19-tooth driver and NOTE: Factory grass knives should NOT be reinstalled. Instead, install Calmer... -
Page 10: Helpful Corn Head Settings And Adjustments
HELPFUL CORN HEAD SETTINGS & ADJUSTMENTS 2. Reinstall stalks guides with factory bolts. With the bevel facing forward, toward the front of Installing Stalk Guides on Poly the corn head, install the longest stalk guides closest to the end of the poly dividers. With If you are having problems with the feeding of cornstalks into the row unit, we recommend the bevels facing forward, install the shorter stalk guides in location closest to the row unit. - Page 11 What this means is that if the part breaks within the first season of use, we will replace the part with a new one without charge to you. Calmer pays for the shipping both ways as well. In the alternative, if you wish, we will refund to you all of the money you paid to Calmer for the part.