Advertisement
Quick Links
Getting Started Guide: Cobra OCT spectrometers
Introduction
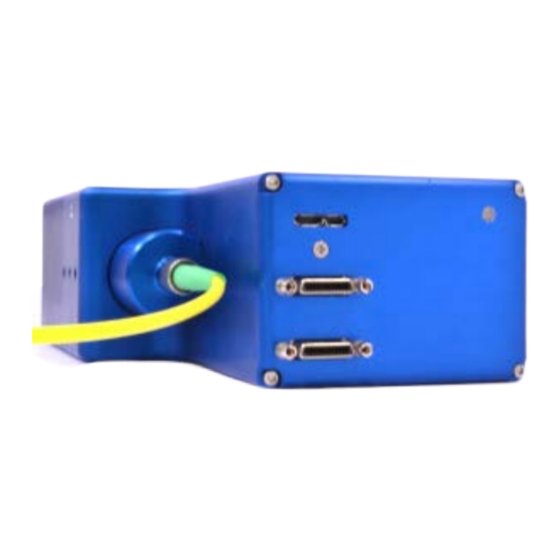
Your Cobra OCT spectrometer is an essential component of a spectral-domain optical coherence
tomography (SD-OCT) system. SD-OCT systems require spectral measurement of interferometric signals
at very high-speeds. A Cobra spectrometer with its high sensitivity and high speed is ideally suited for this
application. Cobra spectrometers receive light input via a single-mode fiber connected with an FC/PC
connector. Dispersive optics in the spectrometer direct different frequencies or wavelengths to different
pixels in the sensor. This provides spectral information about the input the light signal. The electrical
output from camera is transferred to a personal computer using a camera link connection.
Data Flow
It is important to the make right choice of camera link card and software for your application. Cobra-S
spectrometers have the ability to communicate directly with a personal computer via USB 3.0, but only at
line rates of up to 130 kHz (option 1). All of our Cobra spectrometers can communicate with a personal
computer using a Cameralink card and cable, including the Cobra-S at speeds of 250 kHz (option 2).
Need help, a detailed manual for your specific camera sensor, or a new copy of your spectrometer's
system related files?
Contact us
Getting Started Guide: Cobra OCT Spectrometers
Page 1
Advertisement

Related Manuals for Wasatch Photonics Cobra OCT


Summary of Contents for Wasatch Photonics Cobra OCT
- Page 1 Getting Started Guide: Cobra OCT spectrometers Introduction Your Cobra OCT spectrometer is an essential component of a spectral-domain optical coherence tomography (SD-OCT) system. SD-OCT systems require spectral measurement of interferometric signals at very high-speeds. A Cobra spectrometer with its high sensitivity and high speed is ideally suited for this application.
- Page 2 Step 6 Insert the power supply to the wall outlet (120-220 V/50-60 Hz). At this stage the Cobra OCT Spectrometer has been setup and we are ready to test it with control software. Control software talks to the spectrometer via the camera link card.
- Page 3 The default ICD file provided is configured for 2-taps, so we will need to verify this in the 2-taps mode and for the purposes of verifying operation, we will set the test image to be a CheckerBoard. Getting Started Guide: Cobra OCT Spectrometers Page 3...
- Page 4 Launch NI-MAX and navigate to the connected camera. This will look similar to the image below. Right click on the connected camera “Channel 0” and load the supplied camera file by right clicking, selecting “Open Camera” and then selecting the ICD file. Getting Started Guide: Cobra OCT Spectrometers Page 4...
- Page 5 Once done, you can now select the “Grab” button above the image and will now see the test checkerboard pattern begin scrolling in the window, similar to the image below. You can now go back to CommCam to disable the test image and begin using your spectrometer. Getting Started Guide: Cobra OCT Spectrometers Page 5...
- Page 6 PC and the Cobra spectrometer is connected. To test your SUI camera enabled Cobra Spectrometer with Teledyne DALSA LX1 card, make sure the card is installed in the PC and the Cobra spectrometer is connected as described in the Setting up the Cobra OCT Spectrometer section. Software Prerequisites •...
- Page 7 5. The image to the right is the spectral output shown after clicking the Graph Icon Getting Started Guide: Cobra OCT Spectrometers Page 7...
- Page 8 PC and the Cobra spectrometer is connected. To test your SUI camera enabled Cobra Spectrometer with Teledyne DALSA LX1 card, make sure the card is installed in the PC and the Cobra spectrometer is connected as described in the Setting up the Cobra OCT Spectrometer section. Software Prerequisites •...
- Page 9 5. Click the Grab button. 6. Click the Histogram button. 7. Click the ‘Save Image’ button, and save the file with a .TIF format. Getting Started Guide: Cobra OCT Spectrometers Page 9...
- Page 10 8. Open the TIF file in ImageJ, select a line of data in the image, click analyze->plot profile and you should see something like the following: Getting Started Guide: Cobra OCT Spectrometers Page 10...
-
Page 11: Typical Setup Procedure
NOTE: To stop generating lines, use lsc 0. Be sure to use an lsc 0 command BEFORE changing int, gain, or offset. NOTE2: The above commands MUST be sent prior to image capture. The instrument does not gather data until an lsc 1 command is sent. Getting Started Guide: Cobra OCT Spectrometers Page 11... - Page 12 This should only be set when the camera is NOT scanning (i.e. after an lsc 0 command). The integration time must be at least 2 microseconds less than the line time (ltm). Getting Started Guide: Cobra OCT Spectrometers Page 12...
Need help?
Do you have a question about the Cobra OCT and is the answer not in the manual?
Questions and answers