Table of Contents
Advertisement
Quick Links
Contents:
Introduction
Terminology:
MANDATORY SAFETY INFORAMTION.........................................................................6
Introduction
This set of instructions focuses on the Power Dump Dolly and the procedure
it entails to operate it successfully. It will educate any individual on how to
safely empty a trash can, or the equivalent, into a 4 yard, 6 yard, or 8 yard
dumpster with a edge height of 53" or less, or onto a trailer. Without the
control and safety of a Dump Dolly, serious injury can occur when handling
heavy loads above the knees and shoulders. The Power Dump Dolly was
designed
in 2012 by Shay Scott,
health of individuals who manually lift heavy cans of waste in a commercial
or non-commercial environment.
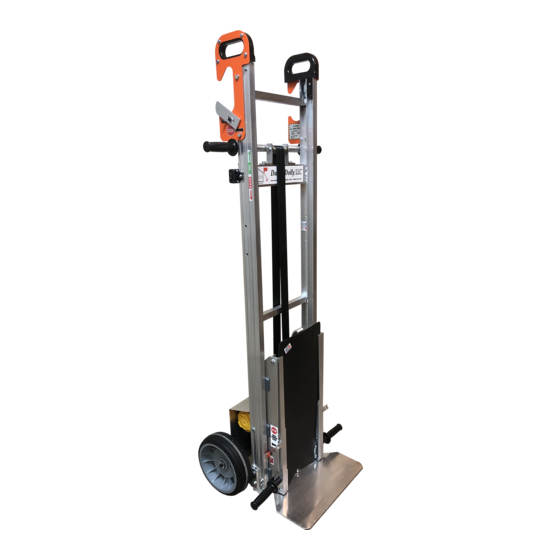
Terminology:
● Nose Plate- Metal attached to the bottom of the dolly where can is
placed.
● Elastic Cord- Secures can to the dolly and is found on the nose plate.
● Trash Can Clip (anchor)- Adjustable clip that allows can to be attached
securely to the entire dolly. Prevents can from falling into dumpster.
Not intended to use to pull the trash can and dolly backwards.
● Trash Can Clip Knob- Tightens the trash can clip to secure can. Found
behind trash can clip in back of the dolly.
Power
:
f ounder of Dump Dolly LLC,
Dump Dolly™
1
Electric
1
1
3
3
3
4
4
5
to better the
Advertisement
Table of Contents

Summary of Contents for Dump Dolly Power
- Page 1 MANDATORY SAFETY INFORAMTION……………………………………………………………….6 Introduction This set of instructions focuses on the Power Dump Dolly and the procedure it entails to operate it successfully. It will educate any individual on how to safely empty a trash can, or the equivalent, into a 4 yard, 6 yard, or 8 yard dumpster with a edge height of 53”...
- Page 2 Electric ● Dumpster Hooks- Orange/Black hooks attached to the top of the dolly to place on rim of the dumpster. ● Dumpster Latch (vary by models)- Used for 8 yard dumpsters to prevent dolly from falling forward instead of onto the dumpster.
- Page 3 Electric Steps: Step 1: Place can onto the Power Dump Dolly 1. Move nose plate under the can OR place can onto the nose plate. 2. Place the elastic cord around the base of the can. 3. Loosen the trash can clip knob.
- Page 4 Electric Step 2: Place the Power Dump Dolly onto the dumpster 1. While holding the trash can, lean the Dump Dolly backwards onto the leading edge of the dumpster and allow the dumpster latch, located near dumpster hooks, to fall in place against the dumpster lip.
- Page 5 Maintenance The battery should be charged nightly with the enclosed maintainer/charger. Connect the charging wire on the Dump Dolly to the connecting end of the maintainer/charger. Then just plug in the charger to a 115/120 volt outlet. Indicator lights on the maintainer/charger will let you when charging or charged.
- Page 6 For more detailed instructions, go to w ww.DumpDolly.com or call (325)227-8051 CST 9:00 am-4:00pm Monday through Friday **Note: Drawings do not represent the current Power Dolly design but still allow for understanding how it functions. CAUTION !!!! Operate only when leaning on dumpster THE ...
- Page 7 Electric STRAP, THE WINCH WILL EVENTUALLY BEGIN TO TIGHTEN AGAIN, IN THE OPPOSITE, BUT WRONG DIRECTION. SHOULD THIS OCCUR, I MMEDIATELY STOP PRESSING THE OUT (DOWN) BUTTON A ND PRESS THE IN (UP) BUTTON. THIS WILL TEMPORARILY ALLOW SLACK IN THE STRAP UNTIL THE STRAP BECOMES TIGHT AND THE CARRIAGE STARTS GOING UP.
Need help?
Do you have a question about the Power and is the answer not in the manual?
Questions and answers