
Summary of Contents for Charmcare ACCURO
- Page 1 Pulse Oximeter ACCURO www.charmcare.com Pulse Oximeter ACCURO User Guide Charmcare Co., Ltd. OP-EN-06...
-
Page 2: Table Of Contents
Pulse Oximeter ACCURO www.charmcare.com Pulse Oximeter ACCURO www.charmcare.com Operations Table of Contents The Screen SpO2/PR Data Area System Status Area Indications for use statement Using the Buttons and Alarm Lamp Warranty Period Using Power Battery Replacement Contact Us Part 4... -
Page 3: Indications For Use Statement
Before You Begin Alarm Categories Alarm Levels Thank you for purchasing the ACCURO pulse oximeter. For the safe operation of this device, it Alarm Indication is recommended that you read this user’s manual thoroughly before using. Pause Alarm Surveillance and Sound... -
Page 4: Battery Replacement
Manufacturer and/or the store where the product was purchased do not assume any Charmcare recommends that the li-ion battery be replaced at 1-year intervals. Refer to the monitor responsibility for any and/or all problems resulting from improper use or improper storage service manual for batter replacement and general service instruction. -
Page 5: Proper Environments For The Product
Warning Do not store or place the product in Keep product free The ACCURO pulse oximeter is a prescription device and is to be operated by places where of dust and debris, product is exposed particularly metallic qualified personnel only. -
Page 6: Maintenance And Cleaning
Classifications them by using the clinical alcohol. The ACCURO patient monitor is classified, according to IEC 60601-1 as: Do not submerge the accessories under any liquid or detergent. Also, make sure any liquid not to penetrate into the Equipment or probe. -
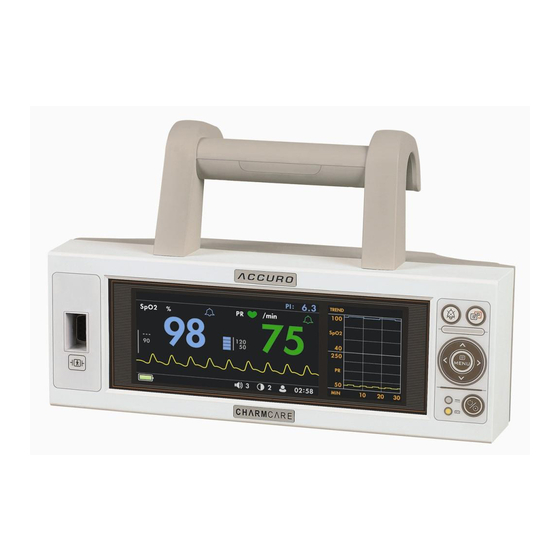
Page 7: Part 1 Product Summary
Part 1 Product Summary Nomenclature the Parts ACCURO is a pulse oximeter that measures blood oxygen saturation. Batteries may be ▣ Front view inserted to make the product portable for monitoring patient status on the go. The buttons on the front panel of the product allow you to configure the device to suit your needs and patient status results may be printed out on a printer. -
Page 8: Symbols
Pulse Oximeter ACCURO www.charmcare.com Pulse Oximeter ACCURO www.charmcare.com Part 2 Product Installation Warning First-time users: Read the installation instructions thoroughly and install the product in a safe To prevent electric shock, keep the top cover closed and do not attempt to place to ensure product longevity. -
Page 9: Installing The Stand
Pulse Oximeter ACCURO www.charmcare.com Pulse Oximeter ACCURO www.charmcare.com Step 2) Mount the stand to the pole by sliding the stand onto the pole and then, turn the handle Installing the Stand to tighten. The product may also be mounted on a stand, which can then be attached to an IV stand. -
Page 10: Part 3 Using The Product
Pulse Oximeter ACCURO www.charmcare.com Pulse Oximeter ACCURO www.charmcare.com Part 3 Using the Product This section contains information on the basic nomenclature and directions for using the *How to use antiseptic cleaning solution ․ product. Chemical Product Method Alcohol isopropyl alcohol Use soaked gauze. -
Page 11: The Screen
Pulse Oximeter ACCURO www.charmcare.com Pulse Oximeter ACCURO www.charmcare.com The Screen S p O 2 / P R D a t a A r e a Name Description NAME Description Oxygen Saturation Displays the measured value of SpO2. When SpO2 SpO2/PR data area Displays the measured SpO2, PR and related values. -
Page 12: System Status Area
Pulse Oximeter ACCURO www.charmcare.com Pulse Oximeter ACCURO www.charmcare.com measured PR value is larger or the same, the value will S y s t e m S t a t u s A r e a turn red. PR alarm status (refer to alarm Displays the alarm watch state of PR. -
Page 13: Using The Buttons And Alarm Lamp
Pulse Oximeter ACCURO www.charmcare.com Pulse Oximeter ACCURO www.charmcare.com Changes the screen brightness in the general screen. Using the Buttons and Alarm Lamp MENU button Moves to the SETUP menu when pressed in the general screen. Power Used when turning on/off the power of the product. -
Page 14: Using Power
Pulse Oximeter ACCURO www.charmcare.com Pulse Oximeter ACCURO www.charmcare.com Part 4 Measuring the SpO2 Using Power Attach the supplied AC power device to the AC power port in the rear of the product. The Attaching the SpO2 Probe green “Power Operated” light will come on. If the AC power device is not connected, the product will operate on the internal battery. -
Page 15: Measuring The Spo2
Pulse Oximeter ACCURO www.charmcare.com Pulse Oximeter ACCURO www.charmcare.com Warning Measuring the SpO2 - Measuring SpO2 on a patient undergoing an MRI may result in severe burns for the Step 1) Attach the probe to the patient’s finger patient. To minimize risk for burns, use a non-inductive wire. In the event that this does Step 2) When the display reads “LEARNING”, this means that SpO2 measurement has begun. - Page 16 Switch Screen Mode S w i t c h S c r e e n M o d e ACCURO II consists of 4 types of screens and the can be switch to the screen the user designates. Press the button once to switch the screen in the order of SCREEN1 <SCREEN 3>...
-
Page 17: Using The Setup Menu
Pulse Oximeter ACCURO www.charmcare.com Pulse Oximeter ACCURO www.charmcare.com Part 6 Using the SETUP Menu S e t u p C O N F I G E n t e r t h e S E T U P M e n u Step 1) Press the MENU button to enter the SETUP screen. -
Page 18: Setup Language
Pulse Oximeter ACCURO www.charmcare.com Pulse Oximeter ACCURO www.charmcare.com S e t u p A L A R M S e t u p L A N G U A G E Step 1) Press the button and button in the CONFIG menu after moving to the... - Page 19 Pulse Oximeter ACCURO www.charmcare.com Pulse Oximeter ACCURO www.charmcare.com SPO2 ALARM Set the level of the SPO2 ALARM LOW, MEDIUM, S e t u p A L A R M L i m i t HIGH PR ALARM LEV Set the level of the PR ALARM...
-
Page 20: Setup Patient
Pulse Oximeter ACCURO www.charmcare.com Pulse Oximeter ACCURO www.charmcare.com S e t u p C u r r e n t T i m e S e t u p P A T I E N T Step 1) Move to the ‘PATIENT TYPE’ by using the button and button. -
Page 21: Save And Confirm Trend Data
Pulse Oximeter ACCURO www.charmcare.com Pulse Oximeter ACCURO www.charmcare.com Part 7 Save and Confirm TREND data 2) View Tabular Trend Screen Moves to the Tabular Trend screen by selecting SETUP MENU>> TREND > TABULAR as shown below. S a v e M e a s u r e d D a t a Displays by the recent data order. - Page 22 Pulse Oximeter ACCURO www.charmcare.com Pulse Oximeter ACCURO www.charmcare.com 3) View Graphic Trend Screen Displays the status whether moving to the next page is possible. Move to the designated item from 1HR to 72 HR using the ⊳ (Left) button and...
-
Page 23: Part 8 Alarm
Pulse Oximeter ACCURO www.charmcare.com Pulse Oximeter ACCURO www.charmcare.com measurement. Part 8 Alarm Patient alarm and Technical alarm are prioritized according to the content, and some parts can The screen, sound and lamp alerts according to the alarm sensed alarm signaled from the be set by the user from alarm settings. -
Page 24: Pause Alarm Surveillance And Sound
Pulse Oximeter ACCURO www.charmcare.com Pulse Oximeter ACCURO www.charmcare.com Alarm sound A l a r m o f f When multiple alarms occur, alarms will beep according to the order of top priority. T h i s t u r n s t h e S p O 2 o r P R l i m i t a l a r m w a t c h o f f . I t i s e x c l u d e d i n a l a r m m e s s a g e s a n d a l a r m s o u n d o p e r a t i o n s f o r l i m i t a l a r m s . -
Page 25: Verifying Visual And Audible Alarm Indication
Pulse Oximeter ACCURO www.charmcare.com Pulse Oximeter ACCURO www.charmcare.com During the audible alarm silence period, you can press Verifying Visual and Audible Alarm Indication d o e s n o t s o u n d w h e n i t i s p a u s e d . -
Page 26: Part 9 Using The Printer
Pulse Oximeter ACCURO www.charmcare.com Pulse Oximeter ACCURO www.charmcare.com Part 9 Using the Printer Printing The printer allows you to print the patient measurements for the designated trend. Connecting the Printer Step 1) Move to the screen by SETUP>>TREND>>TABULAR. Step 1) Attach the printer jack to the serial port in the rear of the product. -
Page 27: Adding Printer Paper
Pulse Oximeter ACCURO www.charmcare.com Pulse Oximeter ACCURO www.charmcare.com Adding Printer Paper Part 10 Basic Troubleshooting Step 1) Pull on the paper tray on the left-hand side of the printer to open. Here are some basic troubleshooting hints. There may be times when the product does not work as it is supposed to and you may not know how to proceed. -
Page 28: Part 11 Product Specifications
Pulse Oximeter ACCURO www.charmcare.com Pulse Oximeter ACCURO www.charmcare.com Part 11 Product Specifications Battery Type Li-ION internal battery PERFORMANCE Charge time 5hours Saturation (SpO2) Battery Capacity Typically 5hours using new, fully charged battery Range 0~100% Warranty 6 months Resolution Accuracy Adult, Pediatric 70%~100% ±2 %... -
Page 29: Attachment 1 Default Value
Pulse Oximeter ACCURO www.charmcare.com Pulse Oximeter ACCURO www.charmcare.com Attachment 1 Default Value Extension cable, Carrying bag,Pole Bracket External mobile printer, Handle, The value maintains after setting the value of the oxygen saturation device and turning the PC software( Digi-View ™) power off and back on. -
Page 30: Attachment 2
Pulse Oximeter ACCURO www.charmcare.com Pulse Oximeter ACCURO www.charmcare.com Attachment 2 Alarm Message * When transferred to Patient mode, the alarm limit value and SPO2 Average value automatically changes to the default value. The level and cause of a single alarm is presented. ‘*’ mark can be changed according to the value, and when the value does not need to be changed it is set to a fixed value. - Page 31 Pulse Oximeter ACCURO www.charmcare.com Charmcare Co., Ltd. 714ho, Woolim Lions2-cha, Gasan-Dong Geumcheon-Gu, Seoul, Korea (ZIP 153-787) Tel. : +82-2-862-5052, Fax:+82-2-862-5065 Home Page : HTTP://www.charmcare.com Product : ACCURO E-Manual Version: 1.04 (2012.09.12) -61- OP-EN-06...
Need help?
Do you have a question about the ACCURO and is the answer not in the manual?
Questions and answers