
Summary of Contents for dentalica Endo Plus
- Page 1 Endo Plus Motore endodontico con rilevatore apicale Endomotor with apex locator Micromoteur endodontique avec localisateur d’apex Manuale d’uso User manual Manuel utilisateur...
- Page 2 Grazie per aver scelto Endo Plus Precision-Tech. Tutti i prodotti a marchio Precision-Tech sono garantiti da Dentalica. L’obiettivo di ogni dentista è prendersi cura dei suoi pazienti, il nostro è prenderci cura di ogni dentista. Selezioniamo le migliori soluzioni, le testiamo, le facciamo nostre e le garantiamo con la nostra esperienza prima e dopo l’acquisto.
- Page 3 11. Pulizia, disinfezione e sterilizzazione ...........pag. 14 12. Specifiche del prodotto ...........pag. 15 13. Garanzia ...........pag. 16 14. Smaltimento del prodotto ...........pag. 16 14.1. Smaltimento dell’unità Endo Plus ...........pag. 16 14.2. Smaltimento del materiale di imballaggio ...........pag. 16 15. Specifiche elettriche ...........pag. 16...
- Page 4 1. INFORMAZIONI GENERALI 1.1 Indicazione Endo Plus è un dispositivo combinato che incorpora un micromotore endodontico controllato da micro- processore per il funzionamento di strumenti NiTi e un localizzatore apicale per determinare la posizione dell’apice e quindi la lunghezza operativa del canale radicolare.
- Page 5 Pericolo • L’unità di controllo non può essere sterilizzata. • L’unità di controllo deve essere pulita con un panno pulito e asciutto dopo aver spento l’alimentazione. • Non utilizzare solventi organici per pulire l’unità di controllo. • Non rimuovere il cavo del motore dal motore. PRESSIONE TEMPERATURA UMIDITÀ...
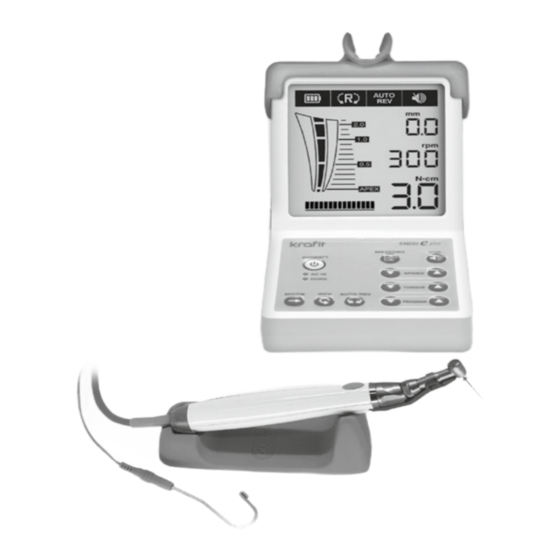
- Page 6 3.2 Assemblaggio dei componenti . Part Introduction 4. Part Introduction 4-1. Control Unit 4-1. Control Unit 4. INTRODUZIONE DELLE PARTI ① LCD – Information 4.1 Unità di controllo ② Charger connector ① LCD – Information ③ motor connector ② Charger connector 1.
- Page 7 4-3. Contra angle and motor 4.3 Testina e manipolo ① Contra angle 1. Testina ② Motor on/off button 2. Pulsante on/off manipolo ③ Motor handpiece 3. Manipolo 4.4 Display LCD 1. Indicatore della batteria - 4 livelli (Basso / 30% / 70% / COMPLETO) 2.
- Page 8 6. COME ESEGUIRE L’INSTALLAZIONE Attenzione 6-1. How to motor cord connection • L’unità di controllo deve essere installata su una superficie piana, senza interferenze da dispositivi periferici. Evitare di bloccare la ventilazione sulla base dell’unità di con- trollo. • Utlizzare il dispositivo in un luogo in cui la temperatura interna è mantenuta a un livello adeguato (0~35°C).
- Page 9 ert and remove the file(Push type) 6.3 Come inserire e e rimuovere lo strumento canalare (a pressione) -3. How to insert and remove the file(Push type) ① Lightly turn and insert the file into the chuck while pressing and holding the button. 1.
- Page 10 7. Operation 7. FUNZIONAMENTO 7. Operation 7. Operation 7. Operation 7-1. Setting button 7.1 Impostazioni 7. Operation 7-1. Setting button 7-1. Setting button 7-1. Setting button PULSANTE DI ACCENSIONE Power button 7. Operation 7-1. Setting button Per accendere e spegnere l’unità di controllo, premere il pulsante di alimentazio- Power button 7.
- Page 11 # Endo E plus can be set to operate in the following three modes. Endo Plus può essere impostato per funzionare nelle tre modalità seguenti: - When the dental handpiece is overloaded, it stops running immediately and runs in reserve direction 1) Auto Stop Reverse mode 7-3.
- Page 12 -4. Apex locator function 7-4. Apex locator function 7-4. Apex locator function 7.4 Funzione Rilevatore apicale ① Using endomotor & Apex locator at the same time 1) Uso contemporaneo del motore e del localizzatore apicale ① Using endomotor & Apex locator at the same time ①...
- Page 13 CODICE DI ERRORE CAUSA SOLUZIONE ERRORE Il manipolo è bloccato. Il torque preimpostato Aumentare il valore di torque Il carico supera il torque è stata superato. preimpostato. preimpostato Sostituire la batteria. Il tipo di batteria è diverso. La tensione della Contattare il centro di assistenza batteria è...
- Page 14 Only the contra angle attachment of Endo E plus is allowed to be lubricated. 10.1 Lubrificazione della testina The lubrication is needed after each use and before sterilization. Lubrificare solo la testina di Endo Plus. La lubrificazione è necessaria dopo ogni utilizzo e prima della sterilizzazione. Contra Angle...
- Page 15 - Quando il caricabatterie si sporca, pulirlo con un panno di cotone inumidito con alcol chirurgico. Pulizia della testina - Sterilizzare solo la testina di Endo Plus. Si raccomanda di sterilizzare la testina utilizzando l’autoclave durante o dopo il trattamento, secondo le seguenti procedure: 1.
- Page 16 - L’unità deve essere installata e messa in funzione con riferimento alle indicazioni EMC menzionate nei documenti di accompagnamento. I sistemi di comunicazione RF portatili e mobili (come i telefoni cellu- lari) possono influenzare le apparecchiature elettromedicali. - Linee guida per l’operatore per l’utilizzo del dispositivo Endo Plus in ambienti elettromagnetici.
- Page 17 EMISSIONI ELETTROMAGNETICHE Il dispositivo Endo Plus è destinato all’uso nell’ambiente elettromagnetico specificato di seguito. Il cliente o l’utente del dispositivo Endo Plus deve assicurarsi che venga utilizzato in tale ambiente. Test delle emissioni Conformità Ambiente elettromagnetico Emissioni RF CISPR 11...
- Page 18 Per valutare l’ambiente elettromagnetico riferito ai trasmettitori RF fissi, si dovrebbe condurre un’indagine specifica sul sito. Se l’intensità del campo misurata nel luogo in cui viene utilizzato Endo Plus supera il livello di conformità RF applicabile sopra, allora sarebbe necessario verificare il normale funzionamento del dispositivo Endo Plus.
- Page 19 E MOBILI E IL DISPOSITIVO ENDO PLUS Il dispositivo Endo Plus è destinato all’uso in un ambiente elettromagnetico in cui i disturbi RF irradiati sono controllati. Il cliente o l’utente del dispositivo Endo Plus può aiutare a prevenire le interferenze elettromagnetiche...
- Page 20 Thank you for choosing Endo Plus Precision-Tech. All Precision-Tech brand products are guaranteed by Dentalica. A dentist’s work is to take care of his clients, ours is to take care of every dentist. We select the best options, we test and make them our own. Our experience guarantees their quality, both before and after the purchase.
-
Page 21: Table Of Contents
11. Cleaning, Disinfection and sterilization ...........pag. 32 12. Product Specifications ...........pag. 33 13. Warranty ...........pag. 34 14. Product Disposal ...........pag. 34 14.1. Disposal of the Endo Plus ...........pag. 34 14.2. Disposal of the packaging material ...........pag. 34 15. Electrical specification ...........pag. 34... -
Page 22: General Informations
1. GENERAL INFORMATIONS 1.1 Indication Endo Plus is a combined device incorporating a microprocessor controlled endodontic micromotor for operating NiTi instruments and an apex locator to determine the position of the apex and thus the working length of the root canal. -
Page 23: Components
Danger • The control unit can not be sterilized. • The control unit must be cleaned using a clean dry cloth after turning off the power. • Do not use any organic solvent to clean the control unit. • Do not remove the motor cord from the motor. ATMOSPHERIC TEMPERATURE HUMIDITY... -
Page 24: Component Assembly
3.2 Component Assembly . Part Introduction 4. Part Introduction 4-1. Control Unit 4-1. Control Unit 4. PART INTRODUCTION ① LCD – Information 4.1 Control Unit ② Charger connector ① LCD – Information ③ motor connector ② Charger connector 1. Display LCD ④... -
Page 25: How To Charge Battery
4-3. Contra angle and motor 4.3 Head and motor ① Contra angle 1. Head ② Motor on/off button 2. Motor on/off button ③ Motor handpiece 3. Motor handpiece 4.4 Display LCD 1. Battery power indicator - 4 level (Low / 30% / 70% / FULL) 2. -
Page 26: How To Install
6. HOW TO INSTALL Caution 6-1. How to motor cord connection • The control unit must be installed on a flat surface substantially, not interfered by peripheral devices. Avoid ventilation on the bottom plate of the control unit being blocked off. •... -
Page 27: How To Insert And Remove The File(Push Type)
ert and remove the file(Push type) 6.3 How to insert and remove the file (Push type) -3. How to insert and remove the file(Push type) ① Lightly turn and insert the file into the chuck while pressing and holding the button. 1. -
Page 28: Operation
7. Operation 7. OPERATION 7. Operation 7. Operation 7. Operation 7-1. Setting button 7.1 Setting button 7. Operation 7-1. Setting button 7-1. Setting button 7-1. Setting button POWER BUTTON Power button 7. Operation 7-1. Setting button To turn the control box on&off, press power button for a second. Auto Power button 7. -
Page 29: Motor On/Off Button
7.3 Operation Modes op Reverse mode Endo Plus can be set to operate in the following three modes: # Endo E plus can be set to operate in the following three modes. he dental handpiece is overloaded, it stops running immediately and runs in reserve direction 1) Auto Stop Reverse mode 7-3. -
Page 30: Apex Locator Function
-4. Apex locator function 7-4. Apex locator function 7-4. Apex locator function 7.4 Apex locator function ① Using endomotor & Apex locator at the same time 1) Using endomotor & Apex locator at the same time - As like below picture, connecting motor cable with lip clip connected to the handpiece, ①... -
Page 31: Troubleshooting
ERROR CODE ERROR CAUSE SOLUTION When the dental handpiece is Check if the angle portion is locked. The preset torque is locked. exceeded. When the load exceeding the Increase the preset torque value. preset torque is imposed. Replace the battery. When battery type is different. -
Page 32: Maintenance
Only the contra angle attachment of Endo E plus is allowed to be lubricated. 10.1 Lubricating the head The lubrication is needed after each use and before sterilization. Only the head attachment of Endo Plus is allowed to be lubricated. The lubrication is needed after each use and before sterilization. Contra Angle... -
Page 33: Product Specifications
- When the charger becomes dirty, wipe it off with a cotton cloth moistened with surgical spirit. Autoclaving Head - Only the head attachment of Endo Plus is allowed to be sterilized. It is recommended to sterilize the head using the autoclave during or after treatment, according to the following procedures. -
Page 34: Warranty
- The unit must in reference to the mentioned EMC-hints in the accompanying documents be installed and operated. Portable and mobile RF - communicating system (such as cell phones) can have influence to medical electrical equipment. - Guidelines for the operator to use the Endo Plus device in electromagnetic environments. - Page 35 ELECTROMAGNETIC EMISSIONS The Endo Plus device is intended for use in the electromagnetic environment specified below. The customer or the user of the Endo Plus device should assure that it is used in such an environment. Emissions test Compliance Electromagnetic environment...
- Page 36 ELECTROMAGNETIC IMMUNITY The Endo Plus device is intended for use in the electromagnetic environment specified below. The customer or the user of the Endo Plus device should assure that it is used in such an environment. Compliance Immunity test IEC 60601 test level...
- Page 37 The Endo Plus device is intended for use in an electromagnetic environment in which radiated RF disturbances are controlled. The customer or the user of the Endo Plus device can help prevent electromagnetic interference by maintaining a minimum distance between portable and mobile RF communications equipment (transmitters) and the Endo Plus device as recommended below, according to the maximum output power of the communications equipment.
- Page 38 Merci d’avoir choisi le Endo Plus Precision-Tech. Tous les produits de la marque Precision-Tech sont garantis par Dentalica. L’objectif de chaque dentiste est de prendre soin de ses patients, le nôtre est de prendre soin de chaque dentiste. Nous sélectionnons les meilleures solutions, les testons, les réalisons et les garantissons grâce à...
- Page 39 Endo Plus Micromoteur endodontique avec localisateur d’apec TABLE DES MATIÈRES 1. Informations générales ...........pag. 40 1.1. Indication ...........pag. 40 1.2. Attention ...........pag. 40 1.3. Classification ...........pag. 40 2. Précaution ...........pag. 40 3. Composants ...........pag. 41 3.1. Composants du kit ...........pag. 41 3.2.
-
Page 40: Informations Générales
1. INFORMATIONS GÉNÉRALES 1.1 Indication Endo Plus est un appareil combiné en intégrant un microprocesseur contrôlé par micro-moteur endodon- tique pour faire fonctionner l’instrument NiTi et un localisateur d’apex pour déterminer la position d’apex et la longueur utile du canal radiculaire. -
Page 41: Composants
Danger • L’unité de contrôle ne peut pas être stérilisée. • L’unité de contrôle doit être nettoyée avec un chiffon propre et sec après la mise hors tension. • Ne pas utiliser de solvants organiques lors du nettoyage de l’unité de contrôle. •... -
Page 42: Assemblage De Composants
3.2 Assemblage de composants . Part Introduction 4. Part Introduction 4-1. Control Unit 4-1. Control Unit 4. INTRODUCTION DES PARTIES ① LCD – Information 4.1 Unité de contrôle ② Charger connector ① LCD – Information ③ motor connector ② Charger connector 1. -
Page 43: Écran Lcd
4-3. Contra angle and motor 4.3 Contre-angle et moteur ① Contra angle 1. Tête ② Motor on/off button 2. Bouton de moteur de Marche / Arrêt ③ Motor handpiece 3. Pièce à main 4.4 Écran LCD 1. Indication de charge de la batterie - 4 étapes (BAS / 30% / 70% / COMPLET) 2. -
Page 44: Installation
6. INSTALLATION Attention 6-1. How to motor cord connection • Installer l’unité de contrôle sur une surface plane sans être dérangée par les périp- hériques. Ne pas bloquer la ventilation à la plaque inférieure de l’unité de contrôle. • Utiliser dans un endroit où la température ambiante est appropriée (0 à 35°C). •... -
Page 45: Connexion Et Déconnexion De L'assemblage De Led Optique
ert and remove the file(Push type) 6.3 Insérer et supprimer de l'instrument (pousser) -3. How to insert and remove the file(Push type) ① Lightly turn and insert the file into the chuck while pressing and holding the button. ② Make sure the file is properly inserted into the chuck by lightly pulling the file while not 1. -
Page 46: Opération
7. Operation 7. OPÉRATION 7. Operation 7. Operation 7. Operation 7-1. Setting button 7.1 Paramètre 7-1. Setting button 7-1. Setting button 7-1. Setting button INTERRUPTEUR D’ALIMENTATION 7. Operation Power button 7. Operation Pour allumer et éteindre l'unité de côntrole, appuyer sur l’interrupteur Power button 7-1. -
Page 47: Bouton De Moteur Marche / Arrêt
# Endo E plus can be set to operate in the following three # Endo E plus can be set to operate in the following three modes. Endo Plus peut être configuré pour fonctionner selon trois modes: 1) Auto Stop Reverse mode 1) Auto Stop Reverse mode 7-3. -
Page 48: Localisation D'apex
-4. Apex locator function 7-4. Apex locator function 7-4. Apex locator function 7.4 Localisation d’apex ① Using endomotor & Apex locator at the same time 1) Utilisation simultanée du moteur Endo et du localisateur d’apex. - As like below picture, connecting motor cable with lip clip connected to the handpiece, ①... -
Page 49: Résolution De Problème
CODE ERREUR CAUSE SOLUTIONS D’ERREUR Lorsque la pièce à main est verrouillée. Couple préréglé Augmenter la valeur de couple dépassé. préréglée. Lorsqu’une charge supérieure au couple préréglé est appliquée. Lorsque le type de batterie est Remplacer la batterie. Tension de la batterie différent. -
Page 50: Entretien
Only the contra angle attachment of Endo E plus is allowed to be lubricated. 10.1 Lubrification de la tête The lubrication is needed after each use and before sterilization. La lubrification n’est autorisée qu'à la tête de Endo Plus. La lubrification est nécessaire avant chaque utilisation et stérilisation. Contra Angle Tête... -
Page 51: Spécifications
- Si le chargeur est sale, essuyez-le avec un coton-tige imbibé d’alcool désinfectant. Autoclave de la tête - Seulement la tête d’Endo Plus pent être stérilisél. Il est recommandé de stériliser la tête à l’aide de l’autocla- ve pendant ou après le traitement, conformément à la procédure suivante. -
Page 52: Garantie
- Cet appareil doit être installé et utilisé conformément aux remarques CEM dans le document ci-joint. Les systèmes de communication RF portables et mobiles (par exemple, les téléphones mobiles) peuvent affecter les appareils électriques médicaux. - Instructions pour l’opérateur à utiliser le modèle Endo Plus dans un environnement électromagnétique. - Page 53 ÉMISSION ÉLECTROMAGNÉTIQUE Le modèle Endo Plus est conçu pour être utilisés dans l’environnement électromagnétique spécifié ci-dessous. Les clients ou les utilisateurs de modèle Endo Plus doivent s’assurer qu’il est utilisé dans un tel environnement. Test d’émission Conformité Environnement électromagnétique Émission RF CISPR 11 Groupe 1 L’appareil modèle Endo Plus utilise l’énergie...
- Page 54 IMMUNITÉ ÉLECTROMAGNÉTIQUE Le modèle Endo Plus est conçu pour être utilisés dans l’environnement électromagnétique spécifié ci-dessous. Les clients ou les utilisateurs de modèle Endo Plus doivent s’assurer qu’il est utilisé dans un tel environnement. Niveau de test Niveau de Test d’immunité...
- Page 55 Le modèle Endo Plus est conçu pour une utilisation dans des environnements électromagnétiques où les perturbations RF émises sont contrôlées. Les clients ou les utilisateurs de modèle Endo Plus peuvent aider à prévenir les interférences électromagnétiques en maintenant une distance minimale entre l’équipement de communication RF portable et mobile recommandé...
- Page 56 Selezionato, distribuito e garantito da DENTALICA S.p.A. Via Rimini 22 | 20142 Milano - Italia Tel. +39 02 89.598.1 | Fax +39 02 89.50.42.49 www.dentalica.com | dentalica@dentalica.com Saeyang Indirizzo: (Galsan-dong), 348, Seongseo-ro, Dalseo-gu, Daegu, 42697, Korea Tel: +82-53-582-9001 - Fax: +82-53-581-9003 Email: marathon@saeyang.com - Web: www.saeyang.com...
Need help?
Do you have a question about the Endo Plus and is the answer not in the manual?
Questions and answers