Table of Contents
Advertisement
Quick Links
Sampinute
Analyzer (Immunoassay analyzer)
TM
Analyzer detects specific biomarker via immunoassay (MESIA; Magnetic Electro-
Sampinute
TM
chemical Sandwich ImmunoAssay) from a small amount of test sample. Sampinute
is intended to be used as an in vitro diagnostic medical device. Please read this user manual
thoroughly for correct use and keep it for future reference. For use under an Emergency Use
Authorization (EUA) only.
SAMPINUTE
User Manual
Analyzer
TM
Analyzer
TM
Advertisement
Table of Contents

Summary of Contents for Celltrion SAMPINUTE
- Page 1 Analyzer (Immunoassay analyzer) Analyzer detects specific biomarker via immunoassay (MESIA; Magnetic Electro- Sampinute chemical Sandwich ImmunoAssay) from a small amount of test sample. Sampinute Analyzer is intended to be used as an in vitro diagnostic medical device. Please read this user manual thoroughly for correct use and keep it for future reference.
- Page 2 SAMPINUTE...
-
Page 3: Table Of Contents
1. Product Introduction 1-1. Intended Use 1-2. Principle 1-3. Precautions & Warnings 1-4. Components 1-5. Symbol Guide 2. Product Description 2-1. Sampinute Analyzer 2-2. Check Cartridge 3. Screen Description 3-1. Home Screen 4. Initial Setup 5. Running a Test 5-1. How to perform RUN TEST 5-2. -
Page 4: Product Introduction
Analyzer is an instrument that performs immunoassay on test cartridges. It reads specific biomarkers within the test sample. 1-2. Principle Sampinute™ Analyzer is an instrument based on an immunoassay technique called MESIA (Magnetic Electrochemical Sandwich Immunoassay). Sampinute Analyzer can be used to analyze a single or multiple analyte(s) by detecting electrochemical signals on the test cartridge, which is for a one-time in vitro diagnostic (IVD). -
Page 5: Components
COVID-19 under Section 564(b)(1) of the Federal Food, Drug, and Cosmetic Act, 21 U.S.C. § 360bbb-3(b)(1), unless the authorization is terminated or revoked sooner. 1-4. Components The following are the components you should check upon opening the package of Sampinute Analyzer. Please check that all components are included in the box. -
Page 6: Symbol Guide
1-5. Symbol Guide Please refer to the following symbols that can be found on the external package, package descriptions, enclosed papers, etc. Manufacturer Prescription Use Only Use by/Expiry date Date of Manufacture (for test cartridge) Batch code Catalogue number (for test cartridge) (for test cartridge) Serial number To indicate the temperature limitation in which... -
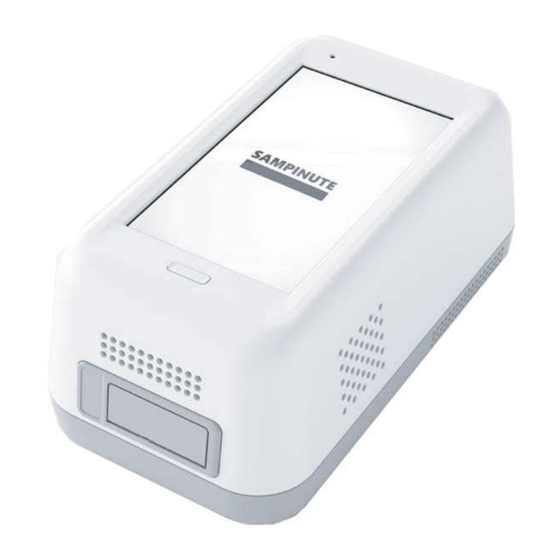
Page 7: Product Description
2. Product Description 2-1. Sampinute Analyzer (1) Screen Interface that the user can touch to operate the analyzer and check the results. (2) Power Button Button to turn the device on or off. (3) Tray (closed) A component to insert the test catridge. -
Page 8: Check Cartridge
An alignment sensor is embedded in the check cartridge to check the alignment of magnets at the top and bottom of the analyzer. Check Cartridge insert Cartridge contact pad Contact pad for the operation check of Sampinute Analyzer Product Description... -
Page 9: Screen Description
3. Screen Description 3-1. Home Screen (1) Status bar Indicates Sampinute Analyzer’s network connection, battery level and time. (2) Status indicating icon is displayed when QC test result shows “fail” or the QC test is not carried out. is displayed when battery level is 15% or lower. -
Page 10: Initial Setup
4. Initial Setup STEP 1 STEP 2 Connect the power adapter. Touch the ‘power’ button to start. STEP 3 Time Zone setting Touch the ‘Select Time Zone’ Select the time zone where the user is located. * When setting is completed, touch the ‘DONE’ button. 10 Initial Setup... - Page 11 STEP 4 Wireless network (Wi-Fi) setting Connect Wi-Fi Select the Wi-Fi to connect to. When connected, the ‘DONE’ b utt o n i s activated. Touch the ‘DONE’ button. CelltrionUSAinc CelltrionInc CelltrionPharm CelltrionHealthcare CelltrionWelfare CelltrionUSAinc CelltrionSkincure Icon Connection Status Description Connected Wi-Fi is connected and active.
- Page 12 STEP 5 Create Admin Password Enter admin password Touch the ‘OK’ button • Administrator ID is automatically set as ‘Admin’. • Please set your own admin password. • Password is case-sensitive and must be a combination of letters and numbers. •...
- Page 13 After entering hospital code, touch the ‘DONE’ button to connect to hospital server. c. Once connected to server, initial setup is completed and the home screen will be displayed. SAMPINUTE • If there is no hospital code for device registration, touch the ‘Register device later’ button.
- Page 14 Barcode Scanner Connection a. Connect the barcode scanner to the USB Port on the back of Sampinute Analyzer. b. Barcode scanner automatically starts operation when connected to the USB port. *Barcode scanner has to be purchased separately. Printer Connection a. Turn the printer on.
-
Page 15: Running A Test
Touch the ‘RUN TEST’ button to start test • Run the test at a temperature range of 15-30°C (59-86°F). SAMPINUTE • If the temperature is out of range, the test cannot be run. • When the battery level is 15% or lower, you cannot start the test. - Page 16 STEP 3 Scan the patient code a. Scan the patient code with a barcode scanner or manually enter the patient code using the keypad. Touch the ‘OK’ button only if entered manually. b. The operator ID and the patient code are displayed on the screen. The screen subsequently resumes to cartridge QR code scan.
- Page 17 STEP 5 Test cartridge insertion a. Remove the aluminium tape attached on top of the cartridge. b. Insert the test cartridge to the tray according to the instructions on the screen. c. When the test cartridge is inserted in the correct position, the screen automatically proceeds to the sample injection stage.
- Page 18 STEP 6 Test sample injection and starting test a. Prepare a test sample. b. Before injecting the sample, check injection location of the test sample and whether a suffi- cient amount of test sample is prepared. c. Inject the test sample within 2 minutes after inserting a cartridge. d.
- Page 19 STEP 7 Check the result of the test a. When test is completed, the result of the test is displayed on the screen. b. Check the result and remove the cartridge from the tray. c. Touch the ‘DONE’ button Return to the home screen. TEST RESULT: Positive or Negative - Normal operation of test cartridge If the warning sign is displayed as shown: *warning: unexpected signal detected., a retest is recommended.
-
Page 20: Result Management
5-2. Result Management Check the results of the test. The results can be checked by touching the ‘TEST RESULTS’ button on the home screen. 20 Running a Test... -
Page 21: Running A Qc Test (Control Solution Test)
6. Running a QC Test (Control Solution Test) STEP 1 Touch the ‘Run QC Test’ button. • Run the test at a temperature range of 15-30°C (59-86°F). • If the temperature is out of range, the test cannot be run. •... - Page 22 STEP 3 Scan the test cartridge QR code a. Scan the QR code on the cartridge pouch with the barcode scanner. b. UponscanningtheQRcode,testlevel,thecartridgetypeandLOTwillbedisplayedonthescreen. • The barcode scanner has to be purchased separately. • If QR code recognition fails, scan a new cartridge pouch. •...
- Page 23 STEP 5 Inject the positive control solution a. Prepare positive control solution of the same cartridge type as the inserted test cartridge. b. Add2-3dropsofthepositivecontrolsolution intothesample inlet ofthetestcartridge within 2 minutes. c. Touch the ‘OK’ button. STEP 6 Discard the used cartridge a.
- Page 24 STEP 7 Discard the used cartridge (continued) When touching the ‘OK’ button, the screen will proceed to the ‘QR Code Scan’ screen. STEP 8 Test cartridge QR code scan a. Scan the QR code on the cartridge pouch with the barcode scanner. b.
- Page 25 STEP 9 Insert the test cartridge • Ensure that the correct operator ID is entered before insert- ing the cartridge. • Checkthat you scanned the QR code of the cartridge to be inserted. • Double check whether you are using the test cartridge for the correct target analyte.
- Page 26 STEP 11 Check the result of QC test a. When test is completed, the result of QC test is displayed on the screen. b. Check the result and remove the cartridge from the tray. c. Touch the ‘DONE’ button Return to the home screen. TEST RESULT: Pass - Successful operation of the test cartridge TEST RESULT: Fail - Accuracy of the test cannot be verified,...
-
Page 27: Function Setting
7. Function Settings 7-1. Setup Screen Settings Settings Menu Settings menu • Administrator Settings • Wi-Fi Settings • Printer Settings • Date & Time Settings • Lock Settings • System Check • Version Information • Device Registration • Power Off Settings Function Settings 27... -
Page 28: Administrator Settings
7-2. Administrator Settings Administrator Information a. Enter admin password to proceed to administrator settings. b. Touch the ‘Administrator Information’ button to check the administrator information. Change Administrator Password a. Touch the ‘Reset Password’ button. Enter the current password. b. Entera new password in ‘New password’ and ‘Re-enter password’. Touch the ‘OK’... - Page 29 Forgot Password a. If you forgot admin password, touch ‘Forgot password?’. b. Master password input screen will be displayed. Input the Master Password Type the master password. Enter the new admin password. Touchthe ‘OK’ button. ‘serial number of the device’ + ‘0001’. •...
-
Page 30: Wi-Fi Settings
7-3. Wi-Fi Settings Turn Wi-Fi On or Off & Connect to a Wi-Fi. [Wi-Fi Settings On/Off]: Turn Wi-Fi network on or o f f . Select ‘On’: Select Wi-Fi to connect to. CelltrionUSAinc CelltrionInc CelltrionPharm CelltrionHealthcare CelltrionWelfare CelltrionSkincure 30 Function Settings... -
Page 31: Printer Settings
USB printer. • Printing may be unavailable if you use a mobile printer incompatible with Sampinute Analyzer. • Changing printer connection mode may cause a delay for two seconds. Please wait until the message ‘Please wait’... -
Page 32: Date & Time Settings
7-5. Date & Time Settings Date & Time Settings Enter the admin password to access ‘Date & Time Settings’. Touch ‘Date & Time Settings’. Touch ‘Select Time Zone’. Select the location. 32 Function Settings... - Page 33 Touch the ‘OK’ button. Adjust ‘Set Date & Time’. Function Settings 33...
-
Page 34: Lock Settings
7-6. Lock Settings STEP 1 Lock Settings Enter the admin password to access Lock Settings. STEP 2 Lock Settings QC Test [ON] The QC Test result must be a ‘PASS’ to be able to run a test. [OFF] A test can be run regardless of QC Test result. •... - Page 35 STEP 3 QC Test interval setting [ON] A sample test is available after conducting QC test at the intervals you set up. [OFF] You can continue QC test without setting up intervals. • You can set the intervals for QC test. •...
-
Page 36: Maintenance
8. Maintenance 8-1. System Check STEP 1 Touch the ‘Run System Check’ button • Run the test at a temperature range of 15-30°C (59-86°F) • If the temperature is out of range, the test cannot be run. • When the battery level is 15% or lower, you cannot start the test. •... - Page 37 STEP 3 Insertion of check cartridge tray a. Insert a check cartridge to the tray according to instructions on the screen. b. Insert the check cartridge in the correct position. c. Touch the ‘OK’ button. STEP 4 Start ‘System Check’ •...
- Page 38 STEP 5 Confirm the system check results a. The test results are displayed upon completion. b. After checking the results, remove the used cartridge from the tray. c. Touch the ‘DONE’ button to move to the home screen. • Pass: Indicates that the device is working properly and a V mark is displayed on the screen. •...
- Page 39 System Check System Check Result The System Check Results are displayed in order from the oldest to the newest. Maintenance 39...
-
Page 40: Version Information And Update
8-2. Version Information and Update STEP 1 Check the Version Information a. Type the admin password and access device registration menu. b. Confirm the latest version Sampinute Version 40 Maintenance... - Page 41 STEP 2 Update new version Option 1. Software update by USB connection a. Connect the USB containing the updated version to the USB port on the back of the analyzer. b. Select ‘USB Update’. (A message to update to new version will be displayed if the software needs to be updated.) c.
- Page 42 Select ‘WI-FI Network update’. (A message to update to new version will be displayed if the software needs to be updated.) b. Touch the ‘OK’ button to update to the latest software. • The update starts when Sampinute Analyzer’s battery level is 15% or higher. • Unstable wireless network connectivity may cancel the update.
-
Page 43: Device Registration
8-3. Device Registration STEP 1 Settings Device Registration a. Input the admin password to access device registration menu. b. Enter the hospital code on the device registration screen. c. Type the hospital code and touch the ‘DONE’ button. The device will try to access the hospital server. *If you have already regis- tered the device during initial setup, you do not... -
Page 44: Auto Power Off Settings
8-4. Auto Power Off Settings a. Select the ‘Power Off Settings’ button. b. Input the admin password. c. Select ‘PowerOff’ Option 1. On/Off Setting of Auto Power Off Select on or off by touching [Auto Power Off Settings On/Off] to enable or disable the function. •... - Page 45 Select the ‘Power off’ button. b. Touch the ‘YES’ button to finally turn the power of the device off. • It is recommended to turn Sampinute Analyzer off, if the instrument is not used for a long period of time.
-
Page 46: Cleaning
*Make sure to turn off when cleaning the device. Test Tray Cleaning The blood, moisture or dust that enters the tray may lead to failure of the Sampinute Analyzer. Wipe the tray carefully with an alcohol-moistened swab if needed. *Make sure to turn off the device when cleaning the tray. -
Page 47: Error Messages
9. Error Messages 9-1. Notifications Error Notifications Descriptions and Solutions Please input the admin password. Admin password is not inputted. Displayed when touching the ‘OK’ button without having entered the admin password. Solution: Input the admin password and then touch the ‘OK’ button. Please input the hospital code. - Page 48 The fan is activated due to increased inter- Fan activated nal temperature of the analyzer. Displayed when the fan is activated by the Celltrion Sampinute™ Analyzer’s temperature sensor operation. Invalid ID. Please check the ID again. Wrong operator ID Displayed when wrong operator ID is entered.
- Page 49 Error Notifications Descriptions and Solutions Please input the operator ID. Operator ID has not been entered. Displayed when touching ‘OK’ without enter- ing the operator ID. Solution: Enter the operator ID. Patient code has not been entered. Please input the patient code. Displayed when touching ‘OK’...
-
Page 50: Error Pop-Ups
9-2. Error pop-ups Error pop-ups Descriptions and Solutions Inappropriate temperature Case1. Pops up when the ‘RUN TEST’ button is touched on the home screen, or the ‘RUN QC TEST’ button is touched. Case2. Pops up when the temperature is out of test range after the ‘RUN TEST’... - Page 51 Error pop-ups Descriptions and Solutions System Check Error Pops up when the ‘RUN TEST’ button is touched on the home screen under the condition that the system check result is ‘Fail’. Solution: Conduct system check again. If the system check is a fail, then contact the system administrator.
- Page 52 Descriptions and Solutions Error pop-ups The QR code of the check cartridge is scanned. Pops up when the check cartridge’s QR code is scanned instead of the test cartridge. Solution: Scan the QR code of a test cartridge. Tray ejection failure Pops up within 10 seconds after tray ejection fails.
- Page 53 Error pop-ups Descriptions and Solutions Pops up when the printer cover is open. Solution: Close the printer cover. Pops up when there is no paper left in the printer. Solution: Re-fill printer with paper. Printer disconnection Pops up when the printer is not connected and the user touches the ‘Print’...
- Page 54 Error pop-ups Descriptions and Solutions Analysis failure Pops up when analysis is failed. Solution: Either try the analysis again or contact the administrator. Insufficient solution Pops up when a solution test fails due to either timeout, insufficient solution injec- tion, or solution reading failure. Solution: Insert at least 50 µL of the control solution again into the inlet.
- Page 55 Error pop-ups Descriptions and Solutions USB Device Connection Error The alert pops up when USB is removed or disconnected during software update. Solution: Connect the USB device and try again in 5 seconds. Pops up when the firmware update fails. Solution: Try updating the firmware again.
-
Page 56: Technical Information
10. Technical Information Model Name MB-100 MT8163B (Quad core) Display type 5.5” HD display, Touch screen Memory capacity 8GB ROM / 1GB RAM Battery Main battery : 2,700mAh 3.8V Sub battery : 2,500mAh 14.4V (3.7V 18650 4cell) Power rating : 12VDC, 1.5A plug interface : 5.5mm * 2.5mm Dimension/weight 114 x 206 x 86mm / 1,300g... -
Page 57: Product Warranty
11. Product Warranty Product Warranty Manufacturer guarantees to the original Purchaser of Sampinute™ Analyzer that the Instrument is free from material defects in material and workmanship for a period of one (1) years from the date of the original purchase. This warranty does not guarantee the uninterrupted operation of the Instrument. - Page 58 SAMPINUTE...
- Page 59 One Evertrust Plaza Suite 1207, Jersey City, New Jersey, 07302 USA Phone: 201-499-1844 | Email: Sampinute@celltrion.com | www.celltrion.com BMD006BMUS-0A Issue date:2020.10...
Need help?
Do you have a question about the SAMPINUTE and is the answer not in the manual?
Questions and answers