Advertisement
Quick Links
TWS 353094
Congratulations on purchasing one of the finer aftermarket resin kits sets available.
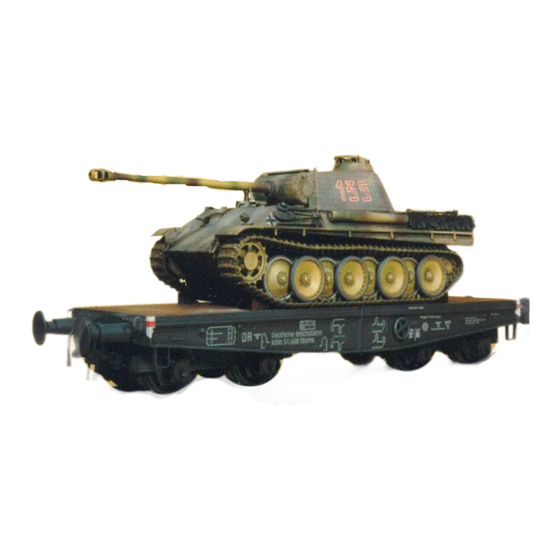
The photo below is of the completed kit. The Panther tank is not included with this kit. You will note
that we have broken the build into several sub-assemblies. Please note each sub assembly will have it's
own parts list as well as part numbers. So look over these instructions to get familiar with what will be
involved in the construction of this kit. You will also need to have some additional supplies to complete
this kit. You will need some 5 minuet epoxy, wood glue and several drill bits. The drill bit numbers will
be called out on the respective sub assemble. We also recommend you have a set of track to aid in the
truck assembly. Tank Workshop sells a three piece set of track TWS 354003. We can also recommend
Trumpeter's German Railway Track set kit #00213.
15
14
We recommend washing the parts in warm soapy water or a commercially available mold release
cleaner to remove any residual mold release agent. We also recommend leaving the parts on the
casting blocks until called out for. Once the part is called out for dry fit to make sure the parts fit
and align properly
Assembly
The first sub-assembly will be the frame of the car. Please reference the next page for the parts
list and the assembly steps. We recommend you use a square to make sure the frame is perfectly
square. You may use the provided wooden deck to make sure you fit the frame together squarely.
SCHWERE PLATTFORMWAGON
TYPE SSY 60TON
13
12
Advertisement

Subscribe to Our Youtube Channel
Summary of Contents for Tank Workshop SCHWERE PLATTFORMWAGON SSY 60TON
- Page 1 We also recommend you have a set of track to aid in the truck assembly. Tank Workshop sells a three piece set of track TWS 354003. We can also recommend Trumpeter's German Railway Track set kit #00213.
-
Page 2: Frame Parts List
Frame Parts List Frame Sub-Assembly Use the below line drawings as a reference to the basic layout of the frame. Join parts 1 and 2 together. Then join parts 3 to one set of the side frame reference figure 1. Check to make sure parts 3 are square to parts 1&2. - Page 3 Note how part 3 is joined to the side frame. The side frame will have a little overhang from the end piece Fig. 1 Fig. 2 Note center support beam not included with kit. This can be added for extra support but is not necessary...
- Page 4 Truck Parts 6x16 7x16 10x8 11x2 Not shown 3/16 plastic tube & .062” plastic rod Truck Sub-assembly Begin by installing parts 3 into the wheel axel support slots on parts 1. See figure 1 for reference. Note that the flanges on part 3 will be on the back side of part 1. Next install part 5 to the lower end of the wheel bearing box support slot.
- Page 5 Fig. 1 Fig. 2 NOTE: You may need to sand the bearing box block (3) flat with the truck frame (1) before installing part 5. Part 5 should sit flat against the truck frame Fig. 3. .062” Rod NOTE direction of brake bar support...
- Page 6 Fig. 4 Next you will need to assemble the truck. We recommend slow setting super glue for this step. This is where a set of track becomes useful. Slide the axel/wheel assembly into the bearing boxes. Now set the assembly onto the rails and make sure it sits flat. If it sits flat disassemble and then glue the axels into the bearing boxes while holding the assembly on the track.
- Page 7 Final step in the truck assembly is installing the truck pivot plate to the to the top of the truck assembly. This plate should be centered on the truck. See figure 6. Fig. 6 Hitch/Bumper Parts 15x4 16x4 14x4 12x2 11x2 10x4 Not shown 17, 18, .040”...
- Page 8 Hitch/Bumper Assembly Now we will assemble the bumpers and hitches to the car ends. Using figure 1 make the appropriate measurements and then glue the called out parts to the measurements. Before gluing part 13 to the car end you will need to drill out the top of the hook with a #60 drill bit at the locator holes.
- Page 9 Fig. 3 4 install at 4 corners approx 1.5cm from end Fig. 4...
- Page 10 Final Assembly Now for final assembly. First you will need to glue the upper and lower decks together using a wood glue or epoxy. Note the alignment of the bolt holes . The lower deck hole should be close to the center of the upper deck hole. I recommend using a flat weight to aid in the two pieces of decking to dry flat together.
- Page 11 Decals & Painting Use the below figure to locate the decals. Note if you are building the Panther car please reference the notes on the figure for the applicable car’s decals. For painting we recommend you browse the various railroad car colors at your local hobby shop or on-line shop.
Need help?
Do you have a question about the SCHWERE PLATTFORMWAGON SSY 60TON and is the answer not in the manual?
Questions and answers