Table of Contents
Advertisement
Quick Links
Advertisement
Chapters
Table of Contents

Summary of Contents for Brinckers Bafang C300
- Page 1 Additional User manual for models with a Bafang C300 LCD display...
-
Page 2: Table Of Contents
Index Introduction The battery 1.1 First use ■ 1.2 The charger ■ 1.3 Battery mainenance instructions ■ 1.4 Other instructions for the battery ■ 1.5 Battery safetyprecautions ■ Maintenance & cleaning 2.1 Monthly ■ 2.2 Yearly ■ 2.3 Cleaning ■ Warranty Contact User manual Bosch Electronic System... -
Page 3: Introduction
To make sure you fully enjoy your new bike, we advise you to maintain the bike and have it chec- ked regularly (at least once a year) at your Brinckers dealer. This manual provides basic instructi- ons on how to use your bike. For maintenance and repair you are always welcome to swing by one of our service partners. -
Page 4: The Battery
Battery & first use 1.1 First checks 1.2 The battery charger Make sure to check the state of charge of the When you connect the battery to the charger battery before you start your first ride. Batte- a red LED should lit. This LED keeps red until ries are best stored with half (or less) charge the battery is fully charged. -
Page 5: Battery Mainenance Instructions
1.4 Battery do’s and don’ts The state of charge LED’s show a % of the You can always charge the battery. It does ■ ■ current state of charge: 4 LED’s is 25% per not harm to charge more often or when LED. -
Page 6: Battery Safetyprecautions
Only use the battery in combination with ■ ■ carrying out any work (e.g. inspection, your Brinckers bicycle. This is the only way repair, assembly, maintenance, chain work, to protect the battery against dangerous etc.) on the e-bike, transport it or store it by overload. -
Page 7: Maintenance & Cleaning
To achieve the best performace, it is Below you will find some tips to consider recommended to get your bike checked when cleaning: by your Brinckers dealer regularly (at Spray the bike with a garden hose and dry ■ least once a year). Inbetween the yearly it with a piece of dry cloth. -
Page 8: Warranty
Warranty 1. Warranty/ maintenance The warranty claim does not apply Defects in the product that are demonstrably to shortcomings caused by: traceable to a material and/or production Necessary periodic checkups/maintenance; ■ fault and which occur within the following Repairs or replacements of parts due to ■... - Page 9 Defects caused by lack of maintainte- For a valid claim on the warranty, you must ■ nance in a timely, accurate and/or regular report the defects to the seller as soon as pos- manner, in accordance with this manual sible, to a maximum of 14 days after discovery. (a demonstration of such maintenance You must provide the seller with the original should be possible);...
-
Page 10: Contact
- 10 Contact Disclaimer Do you have any questions in response to this manual? At Brinckers we have compiled this manual with the utmost care. Please contact the customer service. It could, however, be possible that we have info@brinckers.nl made a mistake. Nonetheless, liability due www.brinckers.nl... -
Page 11: User Manual Bosch Electronic System
Manual Bafang Electronic System... - Page 12 - 12 Index About the user manual Function summary & Button definition Function summary ■ Full viewing area ■ Normal viewing area ■ Button definition Installation instruction Normal operation ON/OFF ■ Display interface ■ Push Cruise Control ■ Turn ON/OFF Backlight ■...
-
Page 13: About The User Manual
- 13 About the User Manual www.bigstone-nj.com Page 2/15 10/20/ About the User Manual Dear users, To ensure better performance of your e-bicycle, please read Dear users, To ensure better performance of your e-bicy- through the C300 product introduction carefully before using it. cle, please read through the C300 product introduction carefully before using it. -
Page 14: Function Summary & Button Definition
- 14 Function Summary & www.bigstone-nj.com Page 3/15 10/20/ Function Summary & Button Definition Button Definition Function Summary C300 provides a wide range of functions and indicators to fit the Function Summary users’ needs. The indicated contents are as follow: C300 provides a wide range of functions and indicators to fit the users’... -
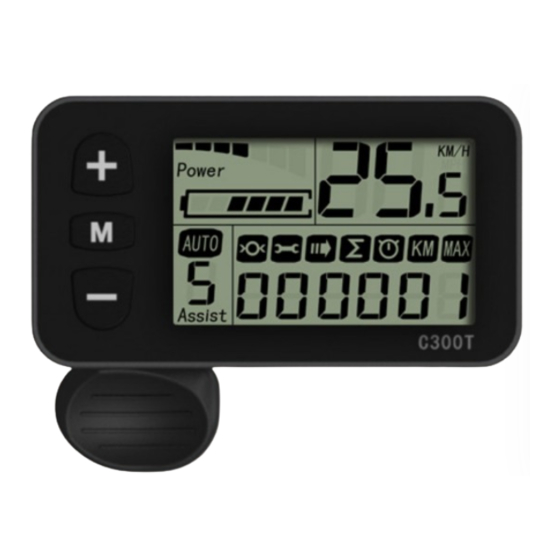
Page 15: Full Viewing Area
- 15 www.bigstone-nj.com Page 4/15 10/20/ Full Viewing Area www.bigstone-nj.com Page 4/15 10/20/ Full Viewing Area Full Viewing Area Normal Viewing Area Normal Viewing Area Normal Viewing Area... -
Page 16: Installation Instruction
C300 has four buttons. They are ON/OFF, SET, U - 16 DOWN. www.bigstone-nj.com Button Definition C300 has four buttons. They are ON/OFF, SET, UP DOWN. Button Definition Installation Instruction C300 has four buttons. They are ON/OFF, SET, UP and DOWN. Fix display in the handlebar, adjust to the appro perspective;... -
Page 17: Normal Operation
Normal Operation Normal Operation Normal Operation Normal Operation ON/OFF ON/OFF ON/OFF ON/OFF - 17 Press ON/OFF and start the display , The display will Press ON/OFF and start the display , The display will Press ON/OFF and start the display , The display will Press ON/OFF and start the display ,... -
Page 18: Push Cruise Control
Hold UP for 2 seconds and enter into the mode of power assist walk. The e-bicycle will go on at a uniform speed of - 18 6km/h. It shows“6KM”on the screen. www.bigstone-nj.com Push Cruise Control Hold UP for 2 seconds and enter into the mode of power assist walk. -
Page 19: Battery Indicator
- 19 www.bigstone-nj.com www.bigstone-nj.com Page 8/15 10/20/ Battery Indicator Battery Indicator When the battery capacity is high, the six battery segments When the battery capacity is high, the six battery segments Battery Indicator are all light. When the battery is in low voltage, the outside edge When the battery capacity is high, the six bat- are all light. -
Page 20: User Settings
- 20 www.bigstone-nj.com Page 9/15 10/20/ User Setting User Setting www.bigstone-nj.com Preparation before Starting ※ ※ Press UP or DOWN to choose the wheel diamete Make sure the connector is linked properly to the motor setting, press SET to exit the setting. controller on the bike and the power is on. -
Page 21: Faq
- 21 Q: Why the display is not able to start up? A: Checking the connector that between display and controller. Q: How to deal with the error code? A: Fix it to the maintenance place immediately Quality assurance and Warranty scope Warranty: Other items:... -
Page 22: Error Code Definition
- 22 Error code definition Code Definition Current Abnormality Throttle Abnormality Motor Abnormality Motor Hall Signal Abnormality Brake Abnormality Low voltage Motor stop Controller Communication Abnormality Panel Communication Abnormality...
Need help?
Do you have a question about the Bafang C300 and is the answer not in the manual?
Questions and answers