
Summary of Contents for Precision Biosystems BlotCycler
- Page 1 USER MANUAL BlotCycler automated western blot processor. ™ Revision 10.0.2., 02-2014 software ver 3.1...
-
Page 2: Table Of Contents
Table of Contents Specifications and Safety…………………………………………………………………3 Unpacking and Testing....................5 Overview ........................7 Programming ......................8 Instrument Set up and Operation…………..............11 Appendix........................16 Troubleshooting ..............17 Fuse replacement..............18 Packing Instruction..............19 Accessory Products..............21 Technical Support..............23... -
Page 3: Specifications And Safety
The BlotCycler complies with the European Community Safety requirements. Operation of the BlotCycler is subject to the conditions described in this manual. The protection provided may be impaired, if the equipment is used in a manner not specified by Precision Biosystems. - Page 4 Safety certifications: CE directive 2006/95/EC and 2004/108/EC, standard used EN61010-1, IEC61010-1, EN 61326- 1:2006, IEC 61326-1:2005 Installation location conditions Operation site: Indoors Maximum operating altitude: 2500 m or lower Operating temperature 3ºC to 42ºC WARNING: (1) Do not operate the instrument under voltage fluctuations exceeding 10% of the recommended line voltage. Large fluctuations may cause the instrument to fail.
- Page 5 Using the upper part of the green Styrofoam as a handle, pull BlotCycler out of the box and put it on a flat surface. Gently remove front and back of the protective Styrofoam; it is a good idea that you have a lab colleague help with the system removal from the box.
- Page 6 Check that the silicone plug is inserted in the tank between the black pumps. Make sure that the waste tubing is going down and is not bent (Remember there is no pump in BlotCycler the solution moves under gravity). It is important for solution removal that the waste tubing is not bent allowing the solutions to drain properly, also the outlet of the tubing should not be immersed in the waste solution.
-
Page 7: Overview
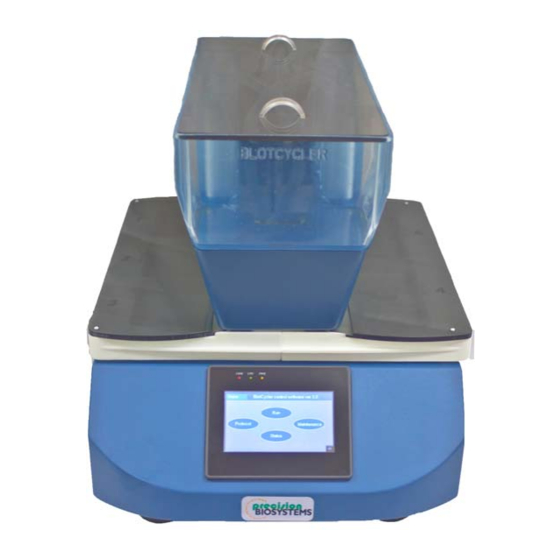
Overview BlotCycler™ consists of programming display, four to six trays for blots (trays #1-3 on the left side and trays #4-6 on the right side), tank with container for primary (P) and secondary (S) antibodies and pumps for cleaning. Pump Tank Antibody container. - Page 8 A. Programming the BlotCycler Before starting actual western blot processing get familiar with programming interface A1. User Interface overview User interface contains 4 buttons: press this button to select existing or set up a new protocol. press this button to start a protocol...
- Page 9 A2. Protocol overview. BlotCycler is set up to run standard protocol for western blot starting with blocking, washing after blocking, and then primary antibody incubation, washing after primary antibodies, secondary antibodies incubation and washing after secondary antibody incubation. Each step can be programmed independently. At the end of all steps the trays are filled with washing solution and shaking is stopped;...
- Page 10 On the following screen you can change any protocol parameters: Set the incubation time for blocking, primary (PA) and secondary (SA) incubation by touching adjacent white area. Note: The minimum time for blocking is 5 minutes, the minimum time for PA and SA incubation is 10 minutes.
- Page 11 B2. Loading of the Blot Cycler Note: If the BlotCycler has not been used for several days, run a cleaning cycle first. Remove tray covers, place membranes in the trays ...
- Page 12 B3. Start Cycling Note: you do not need to change any settings, if you are using the same protocol as before. Press button to open a following screen: Press corresponding start button to start cycling for left (Tray 1-3) or right side (Tray 4-6). A new screen will appear that show the status of current protocol: Red blinking dot indicates the current step, the number above it indicate the time to completion of the current step.
- Page 13 B4. Pause Cycling you can pause protocol by pressing button. Shaking will not stop To continue protocol press button for left or right side. Note: protocol will start from next step if it was close to the end of the previous step. to stop shaking while loading blot into trays.
- Page 14 Note: to remove the excess of cleaning solution from the tank you can repeat the cleaning cycler or just remove the plug located between the pumps. Note: you can stop cleaning at any time but need to restart BlotCycler before starting a new protocol.
- Page 15 At least once in a week perform intensive cleaning with cleaning solution (cat #CL500). If the BlotCycler is not intended to be used within next 24h, run cleaning cycle with cleaning solution and then with deionized or distilled water and open all valves. It is a good idea to keep all valves open all the time while BlotCycler is not in operation.
-
Page 16: Appendix
Appendix Troubleshooting Problem Possible Cause Solution No power (the digital AC power cord is not connected. Check AC power cord connections at both ends. display remains black Use the correct cords. Replace the fuse Fuse has blown. when the power is If the problem still persists after verifying that turned on) correct power cord is used and the fuse is... - Page 17 Short blocking time or washing Increase blocking time and the number of intensity washes High concentration of primary Determine optimal antibody concentration by and/or secondary antibody performing dilution series using all six trays. Decrease antibody concentration as necessary. Protein is overloaded Reduce load or dilute concentration of sample.
- Page 18 Replacing the Fuse Follow the instructions below to replace the 250V, 5A rated fuse for the power socket. 1. Turn off BlotCycler using switch on the back of the instrument and detach the power cord from the rear of the instrument.
- Page 19 Repackaging the Instrument Find an original box; take out an insert a flat box (originally contained tray and tank covers and dummy vials). Find a small T-bar and place between pumps into the tank. (If you cannot find T-bar, use any appropriate material to secure pump inside tank) There are two green Styrofoam covers: front and back (they are slightly different): Back Front...
- Page 20 Using upper part of green Styrofoam as handles put BlotCycler in the box: Place insert flat box over instrument (if you cannot find flat box use any soft material to fill the gap between instrument and box top surface): Close and tape the box.
-
Page 21: Accessory Products
Accessory Products The following products are for use with the BlotCycler and are available separately from Precision Biosystems. For more information visit www.precisionbiosystems.com or contact Customer Support. Catalog # Description vi100 Antibody collection vial per 100 vi50 Antibody collection vial per 50... - Page 22 Warranty The BlotCycler is warranted for one (1) year against defects in materials and workmanship. If any defects should occur during this warranty period, Precision Biosystems will repair and replace the defective parts without charge. However, the following defects are specifically excluded: 1.
- Page 23 Technical Help For more information or technical assistance, call, write, fax, or email. Call: 888-490-4443 x 2 Fax: 617-812-2672 Email: customersupport@precisionbiosystems.com Write : Customer Support Precision Biosystems 241 Francis Avenue Mansfield, MA 02048...
Need help?
Do you have a question about the BlotCycler and is the answer not in the manual?
Questions and answers