Table of Contents
Advertisement
Quick Links
Advertisement
Table of Contents

Summary of Contents for Osculati 13.226.12
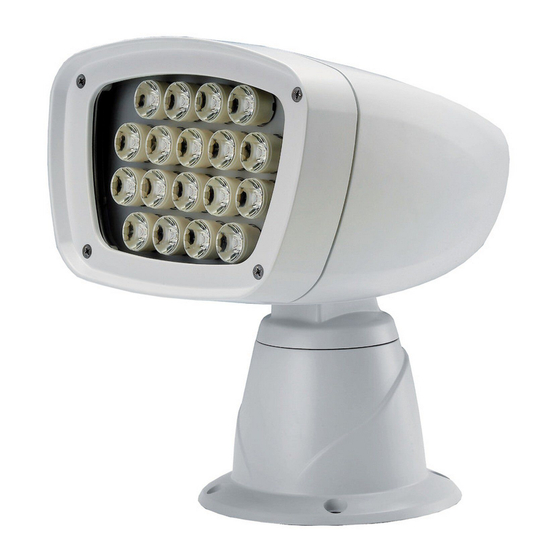
- Page 1 Installation & Operation Instructions Deluxe LED Spot Light Model 13.226.12/13.226.24 To avoid the risk of accidents or damage to this product, it is essential to read these instructions thoroughly EN Edition before this product is installed and used. Sep 2020...
-
Page 2: Table Of Contents
Contents Product Highlights ....................2 Specifications ......................2 Installation ......................... 2 Spot Light Installation ..................2 Joystick Control Panel Installation ............... 3 Remote Control Bracket Installation ..............4 Mounted Remote Control Installation (allows multiple controls for one light) ..4 Electrical Wiring .................... -
Page 3: Product Highlights
Product Highlights Certified in compliance with IEC 60598-2-5:1998 (safety), EN 55015 + EN 61547 (CE), EN 301 489-1/-3 + EN 300 440-2 (RF), FCC Part 15B/15C (FCC), EN 60945 (marine), IP67. Powered by latest LED technology. Brighter than 100 Watts halogen bulb, power usage as low as 54 Watts. ... -
Page 4: Joystick Control Panel Installation
! Do not mount on metal surface; remote control will not work. ! Provide at least 1-1/4 inch (32 mm) clearance underneath the mounting surface to allow reception of remote signal. Remote control may not work if clearance is insufficient. Joystick Control Panel Installation 1. -
Page 5: Remote Control Bracket Installation
! Provide water and weather protection for the location where joystick control panel is installed. Remote Control Bracket Installation 1. Take off mounting plate from the back of bracket. Secure mounting plate on selected location with the two (2) self-tapping screws that come with the product. 2. -
Page 6: Electrical Wiring
Electrical Wiring 1. Provide DC 12 Volt input power for 13.226.12. (Provide DC 24 Volt input power for 13.226.24) 2. Protect input power positive (+) terminal with 8 A fuse or circuit breaker. (Use 4 A fuse for 13.226.24) 3. Use 12-gauge power cable for wiring distance not more than 30 ft (9 m), and use 10-gauge power cable for longer wiring distance. -
Page 7: Operation
( a ) ( b ) ( c ) Operation Joystick Control 1. The control of spot light by joystick is straightforward. 2. The speed switch (see picture below) is for horizontal rotation only. -
Page 8: Remote Control
Caution ! Model 13.226.12 and 13.226.24 have over-heating protection. Upon activation of over-heating protection, the product will turn off 6, 12, or all LED. The product will resume normal operation after 30 to 60 minutes typically. Continuous operation for more than two (2) hours should be avoided. -
Page 9: Maintenance
Maintenance How to conduct general care … 1. Use diluted neutral cleanser for general cleaning. ! Do not use other chemicals or abrasives. 2. No need to provide additional lubrication. How to replace battery for remote control … 1. Remove remote control from bracket. 2. -
Page 10: Troubleshooting
Control Light Model 13.226.39 13.226.40 13.226.41 13.226.42 13.226.12 13.226.24 4. Main PC board 5. Lower motor 6. Upper motor 7. Digital cable (RJ11 6P4C Pin 1-1 straight through, 15 ft / 25 ft / 35 ft) for 13.226.39. Troubleshooting Installation work and repairs to electrical components of this product must only be carried out by a suitably qualified and competent person in accordance with current local and national safety regulations. -
Page 11: Limited Warranty
Limited Warranty For one (1) year from the date of original purchase, Osculati will, at its discretion, repair or replace for the original consumer, free of charge, any parts found defective in material or workmanship. All transportation charges under this warranty must be borne by the consumer. - Page 12 Osculati s.r.l. Via Pacinotti, 12 20090 Segrate (MI) - Italy Tel: +39 02 2699 111 Fax: +39 02 2699 1120 info@osculati.it www.osculati.it Distributor All rights reserved / EN-Sep-2020...
Need help?
Do you have a question about the 13.226.12 and is the answer not in the manual?
Questions and answers