
Summary of Contents for Animark PREGSCAN
- Page 1 PREGSCAN Instruction Manual Animark Inc. 876 Ventura Street Aurora Co 80011 303-343-8342 / 800-532-4048 www.Animark.us info@animark.us Pregscan Ultrasound for Large Animals, Z30374 • eNasco.com/farmandranch...
-
Page 2: Table Of Contents
Battery care instructions ...................25 Owner responsibility for return shipping ............25 Warranty and service ....................27 Warranty validation ....................27 Service after warranty period ..................27 Warranty exclusions ....................27 Voided warranty ......................27 Customer service /Assistance .................28 Pregscan Ultrasound for Large Animals, Z30374 • eNasco.com/farmandranch... - Page 3 Summary ..........................28 Other instruments by Animark ................30 Ovascan breeding predictor ..................30 Pregtest pregnancy detector ..................30 Pregscan Ultrasound for Large Animals, Z30374 • eNasco.com/farmandranch...
- Page 4 Ovascan Ovatest We have since added several other products to our line, including the new Pregtest and Pregscan. Each type of Animark instrument can do its individual function better than any other product in its class. Better accuracy, better performance, better value.
-
Page 5: What Is Ultrasound And Why Does It Work For Pregnancy Detection
“echoed” back to the source is measured and then reproduced in the Pregscan as a column of lights indicating how far the signal has traveled before it came to the tissue interface or other obstacle. The denser the tissue interface the stronger the signal. This is represented by the height of the signal and is reflected on the Pregscan display. - Page 6 Experience and practice with the Pregscan will pay off in providing reliable reproductive status of your herd. The Pregscan, like any tool, has its proper uses and its limitations. It is up to you to use the capabilities of the Pregscan to your best advantage. The following suggestions will help you achieve the success you are looking for.
-
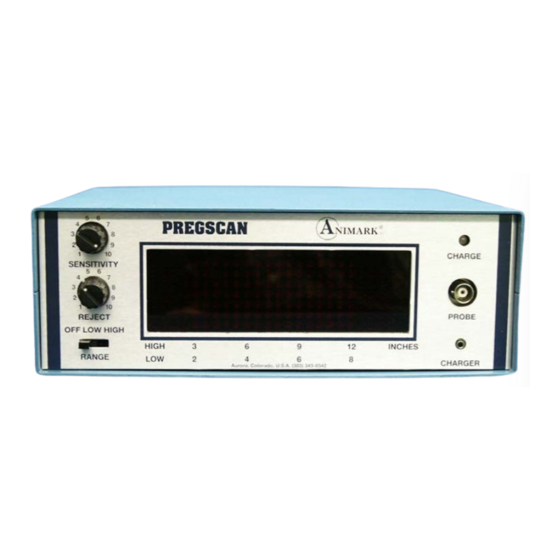
Page 7: Pregscan Instrument Features
Pregscan instrument features The Pregscan has several features available to assist in getting the best possible signal display. The Ultrasound signals are displayed on a red screen on the face of the instrument. The display is a digital bar graph (series of vertical lines) that shows from what depth the sound signal has been reflected or echoed back to its source. -
Page 8: Display Screen
The sliding switch at the lower left of the instrument turns the machine ON and selects the desired scale. Select High for pregnancy checking and Low for back-fat checking. Fig 2-1. Pregscan instrument face and control descriptions. Pregscan Ultrasound for Large Animals, Z30374 • eNasco.com/farmandranch... -
Page 9: Pregscan Set Up
Remember, ultrasound will not travel through air or gas, so press firmly. When using the Pregscan on animals with a very thick coat, use a large amount of oil or lubricant. In rare cases clipping or shaving may be necessary. -
Page 10: Using The Pregscan With Mares
This is why it is important to continue checking. Sensor placement on mares To use the Pregscan with mares, work from the left flank of the animal (See figure 3-1). Checking from the left flank is required as the cecum, which contains air, is located in the right side of the animal’s abdominal cavity, and can cause interference to the ultrasound signal... - Page 11 It is not uncommon to have multiple spikes at the very beginning of the display. These are not pregnancy spikes but tissue interfaces you expect to see. Skin, muscle and fat are all tissue interfaces that will be displayed on the Pregscan. You can ignore these initial spikes. Fig 3-3. Pregnancy spike.
-
Page 12: Late Pregnancy Testing
After each use, disassemble, clean and store the Pregscan in its case to prevent damage. For best results, do not recharge your Pregscan until it has been used for some time in the On position or until the charge light turns yellow or red. Each charge can last from 8-10 continuous hours, or longer in the machine is turned off between testing animals. - Page 13 Fig 3-5. Possible late pregnancy display. Please refer to the illustrations on the following pages for more information on sensor placement on mares. Pregscan Ultrasound for Large Animals, Z30374 • eNasco.com/farmandranch...
- Page 14 Fig. 3-6 Sensor Placement on a Mare – side view Pregscan Ultrasound for Large Animals, Z30374 • eNasco.com/farmandranch...
- Page 15 Fig. 3-7 Sensor Placement on a Mare – top view Pregscan Ultrasound for Large Animals, Z30374 • eNasco.com/farmandranch...
-
Page 16: Conditions Other Than Pregnancy
If there is concern that scar tissue may be present in the uterus, use the Pregscan before the mare is bred, either during the winter period when she is not cycling or between two heat periods. It may also be necessary to use other methods of establishing whether or not this particular animal is pregnant. -
Page 17: Record Keeping
Record keeping Adequate records are very valuable for efficient use of the Pregscan. Before testing a mare, check to see about how far along her pregnancy should be if she is pregnant. Upon taking the readings, the user can record what is seen, their initials, the date, and the settings on the unit for that particular reading. -
Page 18: Using The Pregscan With Cows
If your animal has aborted or absorbed, the Pregscan may still show a pregnancy spike or tissue interface, as the uterus has not returned to its normal non-pregnant state. Until it has returned to normal, the pregscan will show the tissue interface on the display. - Page 19 Skin, muscle and fat are all tissue interfaces that the will be displayed on the Pregscan. You can ignore these initial spikes. If possible, start out by testing one or two animals known to be pregnant and adjust the control knobs so that the spikes are easy to recognize.
-
Page 20: Late Pregnancy Testing
A typical late pregnancy will look different from an early pregnancy spike. The Pregscan will pick up more of the fetus’ bone and organ structure as well as the uterine wall. A typical late pregnancy will show a strong spike from the bottom to the top followed by several more but smaller spikes. -
Page 21: Conditions Other Than Pregnancy
After each use, disassemble, clean and store the Pregscan in its case to prevent damage. For best results, do not recharge your Pregscan until it has been used for some time in the On position or until the charge light turns yellow or red. Each charge can last from 4-5 continuous hours. - Page 22 Fig. 4-5 Sensor Placement on a Cow – Side View Pregscan Ultrasound for Large Animals, Z30374 • eNasco.com/farmandranch...
- Page 23 Fig. 4-6 Sensor Placement on a Cow – Top View Pregscan Ultrasound for Large Animals, Z30374 • eNasco.com/farmandranch...
-
Page 24: Checking Your Pregscan ((Tupperware Test) Optional)
Sharp bends in the connector cable, especially near the ends, should be avoided. During field use, the Pregscan unit should be kept as clean and as dry as possible. Although the case is designed to protect the instrument's components from the elements, common sense should prevail and the unit should not be used in thunderstorms, dust storms, etc. -
Page 25: Battery Care Instructions
To charge the batteries, push the charger plug into the jack marked "charger" on the face of the Pregscan. Plug the charger into any standard 115 to 120 volt power source (or any standard 220 volt power sources when using the optional 220 volt charger). Fully charged, the batteries can supply the unit for approximately 4 to 5 hours of continuous use, even longer if the unit is turned off between tests. -
Page 26: Pregscan Trouble Shooting Guide
Unit not drawing enough power. No whine audible. Turn Off. Then turn back on. Sensitivity too Low. Turn Sensitivity up. Turn control clockwise. Use Pregscan "tupperware test". If it does not work Defective Transducer. call Animark. Turn Sensitivity control down. Turn Too many spikes on display Sensitivity too High. -
Page 27: Warranty And Service
Warranty and service All instruments manufactured by Animark, Inc. are warranted to be free from defects in materials and workmanship for a period of two (2) years from date of purchase. Within this time, the instrument, or part of it, will be repaired or replaced at our discretion if found to be defective by our examination. -
Page 28: Customer Service /Assistance
Animark personnel are always happy to provide telephone assistance or, when possible, to visit an owner who needs more intensive instruction for use of the Pregscan. Animark has an existing network of breeders who are willing to review their operation and use of Animark equipment. If you are provided an existing customer reference please understand that they are simply happy customers that do not mind taking calls on occasion. - Page 29 When you first get your new equipment, please review the Owner’s Manual and Training Video. Review your records and continue to watch your mares or cows for obvious signs of estrus (heat). The Ovascan is used to get the mare or cow bred and the Pregscan to verify they are pregnant.
- Page 30 Pregtest pregnancy detector The Pregtest is the same as the Pregscan but has been designed and calibrated specifically for Miniature Mares, Llamas, Alpacas, Swine, Sheep and Goats and other small animals. Because palpation is not usually a practical option for smaller animals, an ultrasound (the Pregtest) is the best option available for the determination of pregnancy.
Need help?
Do you have a question about the PREGSCAN and is the answer not in the manual?
Questions and answers