Table of Contents
Advertisement
Quick Links
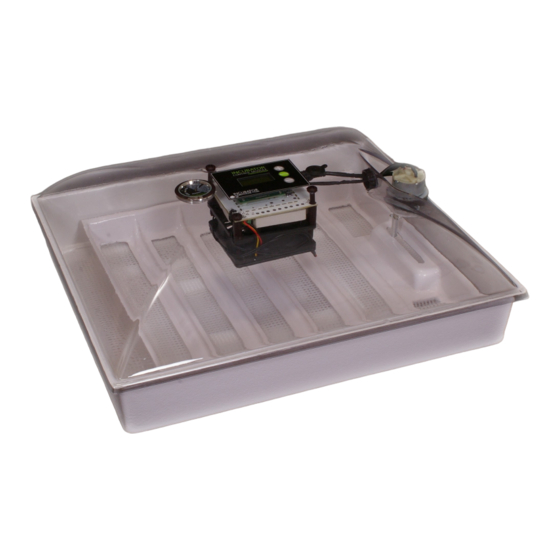
Setup & Assembly
Step 1 - Turner Linkage
Slide the end of the arm that has a small hole for the retaining pin onto the motor shaft and se-
cure with the retaining pin.
Step 2 - Dome Installation
Align turner arm with slot in the turning tray (See Picture)
Step 3 - Remove Protective Film
Remove the protective plastic film from the clear dome
Selecting a good location for the incubator is a critical factor to having a successful hatch. The ideal location for the incubator
meets the following criteria:
Between 70—80⁰F (21-26.5⁰C). For average room temperatures above and below see the "Technical, Troubleshooting &
FAQ" section)
Out of direct sunlight
Without drafts (Away from heating and air conditioning vents).
Maintaining the correct temperature is the most critical factor in having a successful hatch. The incubator control module uses
proportional heat control to maintain the set temperature of your egg incubator (preset to 99.5⁰F/37.5⁰C). To change the set
temperature see the "Technical, Troubleshooting & FAQ" section
NOTE: It is normal for the temperature in the incubator to fluctuate a small amount above and below the set temperature. The
temperature of the eggs changes much slower than the air temperature so the eggs will be the average temperature of the air.
Species
Days
Temperature
Poultry (Chicken)
21
99.5⁰F/37.5⁰C
Quail
16-25
99.5⁰F/37.5⁰C
Duck
28
99.5⁰F/37.5⁰C
For a more detailed list of incubation times see
http://incubatorwarehouse.com/incubating-eggs/how-long-to-hatch-an-egg
IncuView
All-In-One Egg Incubator
by
Species
Days
Temperature
Geese
28-30
99.5⁰F/37.5⁰C
Turkey
28
99.5⁰F/37.5⁰C
Pheasant
22-29
99.5⁰F/37.5⁰C
™
The second most important factor of having a successful hatch is keeping the correct humidity during incubation. Humidity is the
amount of moisture in the air. The IncuView™ has two tools to help you manage humidity:
1. Built in hygrometer (measures relative humidity)
● Incubation Period— Keep humidity in this range during incubation period.
● Hatching Period— Keep humidity in this range during the hatching period (three days before
the hatch date)
2. Humidity Channels
Based on the reading of the built-in hygrometer you will need to add water to the incubator. Start by add-
ing room temperature water to the outer water reservoir first and then allow the incubator to stabilize for one hour. If more hu-
midity is required then add more water to the first reservoir and the connecting overflow channels will allow the second reservoir
to be filled. Again, allow the incubator to stabilize for one hour before adding more water.
After you have done the following:
1. Placed the incubator in a good location
2. If your average room temperature is not between 70—80⁰F (21-26.5⁰C), change thermostat settings (See technical section)
3. Added water
Allow the incubator to run and completely stabilize for 12-24 hours before adding eggs. Stabilizing your incubator will make sure
that the incubator is operating correctly before adding any eggs.
When setting the eggs inside the turning tray it is important to align the eggs parallel to the channels to ensure proper turning.
Note: Eggs may roll end over end or "walk" in the turning tray. This is acceptable and imitates how eggs are turned in nature. If
the eggs become bunched simply spread them back out.
CORRECT
Turning the eggs is also an important factor in a successful hatch. Turning prevents the yolk from sticking to the shell and exercis-
es the embryo. The control module on the IncuView™ is preset to turn the eggs six times per day which is sufficient for most spe-
cies. If you require a different number of turns per day see the table in the "Technical, Troubleshooting & FAQ" section.
Turning eggs by hand: If you prefer to turn the eggs by hand, turn off turner motor in the settings menu. With a pencil mark
one side of the egg with an "O" and the other with an "X", place eggs on their side on the mesh floor with the "X" side up, turn
eggs three times a day. One turn equals turning the "X" side up to the "O" side up or turning the "O" side up to the "X" side up.
Tip: When handling the eggs make sure to wash your hands. Handle the eggs on the ends to avoid clogging the pores.
During the incubation period it is important to maintain the correct level of humidity inside the incubator to keep the eggs from
drying out. The "Incubation Period" zone on the built in hygrometer is the recommended humidity level for most species of birds.
If the humidity level drops below the "incubation period" zone simply add water just as you did when setting up the incubator to
maintain the appropriate humidity level. If after adding water, the humidity level goes above the "Incubation Period" zone don't
try and remove water, just let the water evaporate and be more careful when adding water next time.
Incubation Period
INCORRECT
Advertisement
Table of Contents

Subscribe to Our Youtube Channel
Summary of Contents for Incubator Warehouse IncuView
- Page 1 Maintaining the correct temperature is the most critical factor in having a successful hatch. The incubator control module uses es the embryo. The control module on the IncuView™ is preset to turn the eggs six times per day which is sufficient for most spe- proportional heat control to maintain the set temperature of your egg incubator (preset to 99.5⁰F/37.5⁰C).
- Page 2 Average temperature too warm or too cool Check thermostat settings water, mild soap, and a cloth. Make sure to completely dry before storage. It is important to store the IncuView™ out of direct by ½ to 1-1/2 degrees Fahrenheit Calibrate thermostat if needed sunlight to avoid sun damage of the plastic.
Need help?
Do you have a question about the IncuView and is the answer not in the manual?
Questions and answers