Advertisement
Hello!
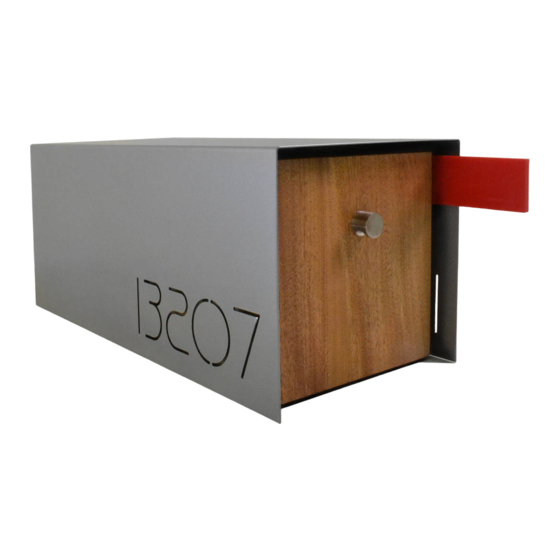
Congratulations on your new custom handcrafted modern mailbox! Hopefully
everything delivered has met or exceeded your expectations, but please do not
hesitate to contact us if this is not the case. We want you to be happy!
If everything is correct please refer to the basic installation guide below as well as
some maintenance tips to keep your new mailbox looking beautiful.
Thanks again!
Mailbox Post Instructions
Included:
1 – Mailbox Post
1 – Hardware kits for mailbox attachment: 4 washers and 4 nuts
Needed:
Gloves for protection
Post Hole diggers
Short‐handle Phillips head screwdriver
Wrench or Pliers
Level
Quick Setting Concrete (60 lb bag)
Access to water (approx 5 gal.)
Installing the Post
1. In your desired location, dig a hole roughly 12" round by 16" deep. Place the
post into the hole making sure it is properly oriented so that the blank face of
the 6" x 6" post is facing the same direction the mailbox will face. If you have
purchased a 3" round post, make sure to orient the shortest edge of the post
mounting bracket in the same direction the mailbox will face.
2. With post in the hole, pour dry mix Quickset concrete around the post to fill
the hole ½ way full while keeping the post as level as possible.
3. Fill the hole with water. We recommend using a stick or rod to poke the
concrete mix to help it settle and allow the water to penetrate.
Advertisement
Table of Contents

Summary of Contents for Aesh Design Mailbox Post
- Page 1 Hello! Congratulations on your new custom handcrafted modern mailbox! Hopefully everything delivered has met or exceeded your expectations, but please do not hesitate to contact us if this is not the case. We want you to be happy! If everything is correct please refer to the basic installation guide below as well as some maintenance tips to keep your new mailbox looking beautiful. Thanks again! Mailbox Post Instructions Included: 1 – Mailbox Post 1 – Hardware kits for mailbox attachment: 4 washers and 4 nuts Needed: Gloves for protection Post Hole diggers Short‐handle Phillips head screwdriver Wrench or Pliers Level Quick Setting Concrete (60 lb bag) Access to water (approx 5 gal.) Installing the Post 1. In your desired location, dig a hole roughly 12” round by 16” deep. Place the post into the hole making sure it is properly oriented so that the blank face of the 6” x 6” post is facing the same direction the mailbox will face. If you have purchased a 3” round post, make sure to orient the shortest edge of the post mounting bracket in the same direction the mailbox will face. 2. With post in the hole, pour dry mix Quickset concrete around the post to fill the hole ½ way full while keeping the post as level as possible. 3. Fill the hole with water. We recommend using a stick or rod to poke the concrete mix to help it settle and allow the water to penetrate.
- Page 2 4. Using a level, level the post on two adjacent vertical sides. The concrete should hold it stable. 5. Add more Quickcrete to fill the hole to a few inches below the surface of the ground if you plan to fill dirt or mulch back in around for a clean look. 6. Check level again, secure as needed and allow to dry per concrete directions before installing the mailbox. Attaching Modern Mailbox to Modern Post 1. If you have purchased a post with your mailbox, then your mailbox has been preassembled with a mailbox mounting bracket. Place the mailbox on top of the installed post, making sure to align the attachment bolts on the mailbox mounting bracket with the mounting slots of the post mounting bracket. 2. From the additional bag of hardware, add a washer and nut from the underside and tighten until snug. Do not to over tighten. Do this for all 4 attachment bolts. Mailbox Care The mailbox wood is finished with Teak Oil. It is recommended to apply additional coats as needed to areas showings signs of wear, approximately every 8‐12 months. The wood will grey naturally if this is not done, which can be a beautiful aesthetic. This is easily done with a clean rag and a bottle of Teak Oil available at hardware stores for about $10. Cover metal surfaces with protective tape as needed to keep free of Teak Oil. Powdercoated shells may be cleaned with a soft, non‐abrasive towel and soap and water. Do not use strong chemical cleaners. Stainless Steel shells may be cleaned with a soft non‐abrasive towel and stainless steel cleaner. Should you have any questions about your new mailbox please contact us via email at Hello@AeshDesign.com. Thank you so much for your order! ‐Aesh Design Team...
Need help?
Do you have a question about the Mailbox Post and is the answer not in the manual?
Questions and answers