Table of Contents
Advertisement
Quick Links
BlindShell Lite User Guide
BlindShell Lite is a fully vocalized phone for visually impaired and blind users. The
main features of the phone are its simplicity and its physical keyboard, by which the
phone can be fully controlled.
Getting started
Package content
• BlindShell Lite phone
• Battery - the flat-shaped rectangular object. It has a notch on its bottom edge.
• USB charger - one side of the charger goes into a wall socket, the other side
has a USB connector for the USB cable. Input 110V~240V, 50Hz~60Hz, output
DC 5V.
• USB cable - one side of the cable plugs into the USB charger, other side of the
charger plugs into the phone's USB slot.
• Earphones - one side of the earphones has a jack connector which plugs into
the phone, the other side has two earbuds.
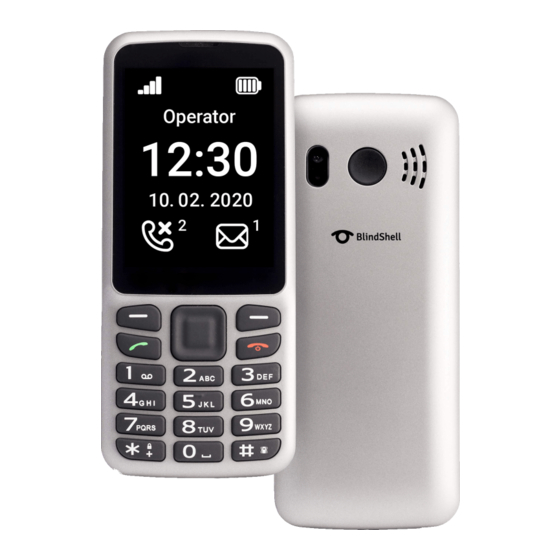
Phone's description
Front side of the phone
Upper part of the phone is occupied by a LCD screen - a smooth area covering
about half of the front side of the phone. The notch right above the LCD screen is an
earpiece, which is used as speaker during phone calls. Below the LCD screen is a
keypad.
LCD screen - displays information in large font with high contrast. Keypad - controls
the phone; used for inputting text and numbers. Earpiece - used as a speaker
during phone calls.
Rear side of the phone
A round indentation in the middle of the upper part of the phone is an SOS
emergency button. On the right hand side of the SOS emergency button is a grill,
covering the loudspeaker.
SOS emergency button - used in emergency situations to call a previously assigned
emergency contact. Speaker grill - used for voice and audio output.
Edges of the phone
Upper edge of the phone is occupied by a USB slot and audio jack connector. The
bottom edge of the phone hosts a microphone. Opening slit for the back cover is
placed in the left bottom corner of the phone (When the rear side of the phone is
facing upwards).
Audio jack - earphones plugs into this connector. USB connector - used for charging
the phone. Microphone - used as voice input during a phone call. Opening slit - used
for taking the back cover off the phone.
Advertisement
Table of Contents

Summary of Contents for Matapo BlindShell Lite
- Page 1 BlindShell Lite User Guide BlindShell Lite is a fully vocalized phone for visually impaired and blind users. The main features of the phone are its simplicity and its physical keyboard, by which the phone can be fully controlled. Getting started Package content •...
-
Page 2: Volume Buttons
Taking off the back cover On your new BlindShell Lite phone the back cover is loosely attached to the phone. There is a paper insole protruding from the base of the phone, which will help you with taking the back cover off for the first time; you can dispose of the paper insole afterwards. -
Page 3: Directional Pad
side is a confirm or a dial a button, the one on the right side is a back or a cancel button. • long pressing the cancel button will take you to the main screen of the phone. Directional pad Upper part of the keypad, in the middle, is occupied by a directional pad. -
Page 4: Sos Emergency Button
• The asterisk button contains the rest of the special characters. • Button zero contains number 0, space and a newline character. • The hash button changes the capitalization of the letters, and switches between numeric and alphanumeric keyboard. • Long pressing a key will input a number. •... - Page 5 Dial contact Selecting the dial contact menu item will produce a list of contacts. To find the contact you want to call move in the list by pressing the back and forward keys on the D-pad. Alternatively you can use the find function to locate the contact faster (this is especially useful for contact lists containing a lot of entries).
- Page 6 Conversations The conversations menu item contains all incoming and outgoing messages, which are grouped under a corresponding contact or phone number. Selecting a specific contact or a phone number will bring up a list of all messages belonging to that contact or a phone number.
- Page 7 persistent service contacts). When you edit a SIM card contact it will be saved as a new contact to the phone and the original one will be removed from the SIM cards. Add new contact New contact can be added to the contact list through the add new contact menu item.
- Page 8 • Set time - accepts 4 digits as a time. The first pair of digits represents hours and the second pair of digits represents minutes. • Set repeating - governs the days of the week on which the alarm will go off. If you do not select any day the alarm will go off daily.
- Page 9 • Resume stopwatch - resumes the stopwatch from the time where it was stopped. • Restart stopwatch - starts running the stopwatch from zero. • Zero stopwatch - resets the stopwatch and sets the time to zero. Calculator Calculator allows you to perform basic arithmetic operations - addition, subtraction, multiplication and division.
- Page 10 Volume This menu item allows you to set the volume levels for alarm, incoming calls and notifications, and feedback sounds. Melodies This menu item allows you to set a melody for incoming calls, notifications, and alarms. Feedback Allows you to set methods which the phone uses to provide you with feedback (other than the speech output).
- Page 11 • To enter a custom time and date first disable the automatic time and date setting. This option might not be displayed, when date and time were not able to be obtained from the network. • Set time menu item accepts 4 digits as a time. The first pair of digits represents hours and the second pair of digits represents minutes.
-
Page 12: Turn Off The Phone
the Service menu, which can be used to perform advanced operations, like backup or factory reset of the phone. Manual The manual menu item contains this document divided to sections to allow for better readability. Turn off the phone By selecting this menu option the phone will be switched off after a confirmation. Safety Information Personal use •... -
Page 13: Battery And Charging
Recycling Always return your used electronic products, batteries, and packaging materials to dedicated collection points. Do not dispose of these products as unsorted municipal waste. Battery and charging • Always keep the battery between 59°F and 77°F (15°C and 25°C) for optimal performance. -
Page 14: Potentially Explosive Environments
medical devices recommend a minimum separation of 15.3 centimeters (6 inches) between a wireless device and the medical device. Persons who have such devices should: • Always keep the wireless device more than 15.3 centimeters (6 inches) from the medical device. •... -
Page 15: Emergency Communications
• Consult the dealer or an experienced radio/TV technician for help. Changes or modifications not expressly approved by Matapo s.r.o. could void your authority to operate the equipment. This device complies with Part 15 of the FCC Rules. Operation is subject to the following two conditions: •... -
Page 16: Regulatory Information - Canada
B est conforme à la norme NMB-003 du Canada. Notice: The ISED Canada regulations provide that changes or modifications not expressly approved by Matapo could void your authority to operate this equipment. Innovation, Science, and Economic Development (ISED) Canada Notices BlindShell Classic model no.:BSCUS01 comply with Innovation, Science and Economic... - Page 17 You and Matapo each agree that all disputes with Matapo arising in any way from this limited warranty or the sale, condition or performance of the products shall be resolved exclusively through final and binding arbitration, and not by a court or jury.
-
Page 18: Technical Specification
You may opt out of this dispute resolution procedure by providing notice to Matapo no later than 30 calendar days from the date of the first consumer purchaser’s purchase of the Product.
Need help?
Do you have a question about the BlindShell Lite and is the answer not in the manual?
Questions and answers