Table of Contents
Advertisement
Quick Links
Advertisement
Table of Contents

Summary of Contents for ARA Pharmaceuticals First Canadian Health SPIRIT
-
Page 2: Table Of Contents
Table of Contents Information Important Information Specifications First Canadian Health SPIRIT Blood Glucose Monitoring System Inserting or Replacing the Batteries Caring for your System First Canadian Health SPIRIT Blood Glucose Test Strip First Canadian Health SPIRIT Blood Glucose Meter First Canadian Health SPIRIT Blood Glucose Meter Display... -
Page 3: Important Information
• The First Canadian Health SPIRIT Blood Glucose Meter should Blood Glucose Monitoring System should not be used for the be used only with the First Canadian Health SPIRIT Test Strips. diagnosis of diabetes or for testing newborns. Testing sites include the traditional fingertip testing along with alternate •... -
Page 4: Specifications
Specifications First Canadian Health SPIRIT Blood Glucose Monitoring System Product specifications First Canadian Health SPIRIT BGM System includes the Measurement range 1.1 ~ 33.3 mmol/L following items: Sample size Minimum 0.5 μL First Canadian Health SPIRIT Blood Glucose Meter Test time... -
Page 5: Inserting Or Replacing The Batteries
Inserting or Replacing the Batteries Caring for Your System The First Canadian Health SPIRIT Meter comes with two 3.0 V Use a soft cloth or tissue to wipe the meter exterior. If necessary, lithium batteries. Before using the meter, check the battery dip the soft cloth or tissue in a small amount of alcohol. -
Page 6: First Canadian Health Spirit Blood Glucose Test Strip
The First Canadian Health SPIRIT blood glucose monitoring Warning! system measures blood glucose quickly and accurately. It • The First Canadian Health SPIRIT test strip should be used only automatically absorbs the small blood sample applied to the with fresh capillary whole blood samples. -
Page 7: First Canadian Health Spirit Blood Glucose Meter
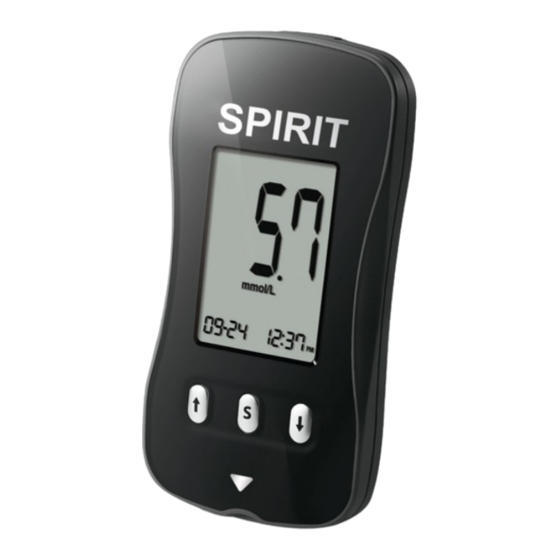
First Canadian Health SPIRIT Blood Glucose Meter Display First Canadian Health SPIRIT Glucose Meter Mute symbol appears when test appears only when Data Port results stored in the sound is set to Used to transfer data the memory are from the meter to a... -
Page 8: Setting Up Your System
Setting up Your System Press and hold the S button for 3 seconds to enter the SET mode. Step 3 Setting the Month After all settings are finished, press and hold the S button for 3 A number indicating the month will blink on seconds to turn off the meter. -
Page 9: Setting The Sound On/Off
Step 6 Setting the Hour Step 8 Setting the Sound On/OFF Press or button until the correct hour On pressing or , the screen will display the appears. After the hour is set, press the S button On or OFF. Press the S button to confirm the to go to the next step. -
Page 10: Setting The 'Test Result Reset
Notes: To delete all the stored test results, press the • Use only the First Canadian Health SPIRIT Control Solution. S button while the screen displays ‘YES’ . Then, • Check the expiration dates printed on the bottle. When you... -
Page 11: Control Solution Testing
Caution: The range printed on the test strip vial is for the of control solution onto a clean First Canadian Health SPIRIT Control Solution only. It has non-absorbent surface. It helps to nothing to do with your blood glucose level. -
Page 12: Comparing The Control Solution Test Results
Using the Lancing Device You will need a lancing device in order to collect a blood sample. Comparing the Control Solution Test Results The test result of each control solution should be within the You may use the lancing device included in the First Canadian range printed on the label of test strip vial. -
Page 13: Preparing The Lancing Device
Preparing the Lancing Device Step 4 Step 1 Select a desired depth of one-to-five (1-5) on lancing device’s adjustable tip. Wash hands and sample site with Choose a depth by rotating the top soap and warm water. Rinse and dry portion of the adjustable tip until the thoroughly. -
Page 14: Preparing The Meter And Test Strip
Preparing the Meter and Test Strip Applying Blood Sample Step 6 Step 8 Insert a test strip with the contact bars facing upwards into the Obtain a blood sample using the lancing meter’s test strip port. Push the strip in gently until the meter device. -
Page 15: Discarding Used Lancets
Discarding Used Lancets Note: The meter may switch off if the blood sample is not Step 1 applied within 2 minutes of the symbol appearing on the Unscrew lancing device tip. screen. If the meter turns off, remove the strip, reinsert it and start from step 2. -
Page 16: Alternative Site Testing
Alternative Site Testing Things To Know When Using AST What is AST(Alternative Site Testing)? Please read the following before testing at alternative sites Usually, we take the blood sample from the tip of the finger. (forearms, palms, thighs, and calves). However, since there are many nerve endings in the fingertip, it The capillary whole blood of the fingertips reflects changes in can be quite painful. -
Page 17: Hi And Lo Messages
HI and Lo Messages AST Precautions HI Message The meter displays results between 1.1 ~ 33.3 • Do not ignore the symptoms of hyperglycemia or mmol/L. "HI" appears when the blood glucose hypoglycemia. level is greater than 33.3 mmol/L and indicates •... -
Page 18: Target Blood Glucose Ranges
Target Blood Glucose Ranges Meter Memory The meter can save up to 250 glucose test results with time and Reminders Your target ranges date. If the memory is full, the oldest test result will be deleted from your healthcare professional Time of day and the latest test result will be stored. -
Page 19: Setting The Alarm Function
Setting the Alarm Function Four types of alarms can be set in the meter: one post-meal alarm Step 3 (PP2 alarm) and three time set alarms (alarm1 ~ 3). The PP2 alarm Use the button to scroll through the test results, starting from goes off 2 hours after setting the alarm. -
Page 20: Setting The Time Alarms (Alarm 1 ~ 3)
Setting the Time Alarms (alarm 1 ~ 3) Step 4 On pressing , the number indicating the Step 1 minute will start blinking. Press to set the Without inserting a test strip, press and the minute. S button simultaneously for 3 seconds to enter the time alarm mode. -
Page 21: Understanding Error And Other Messages
Understanding Error and Other Messages Message What It Means What To Do Message What It Means What To Do A used test strip was Repeat the test with The blood sample Repeat the test after inserted. a new test strip. has abnormally high inserting a new test viscosity or... -
Page 22: General Troubleshooting
General Troubleshooting Performance Characteristics The performance of First Canadian Health SPIRIT Blood Glucose Problem Troubleshooting Monitoring System has been evaluated in laboratory and in • Check whether the test strip is clinical tests. inserted with the contact bars facing Accuracy: The accuracy of the First Canadian Health SPIRIT The display is •... -
Page 23: Warranty Information
Any claim must be made within the warranty period. *Blood avg. 6.9 mmol/L CV = 4.1% ARA Pharmaceuticals will, at its discretion, repair or replace a *Blood avg. 10.5 mmol/L CV = 2.6% defective meter or meter part that is covered by this warranty. -
Page 24: Www.arapharma.com
Memo 46 www.arapharma.com...
Need help?
Do you have a question about the First Canadian Health SPIRIT and is the answer not in the manual?
Questions and answers