Advertisement
Quick Links
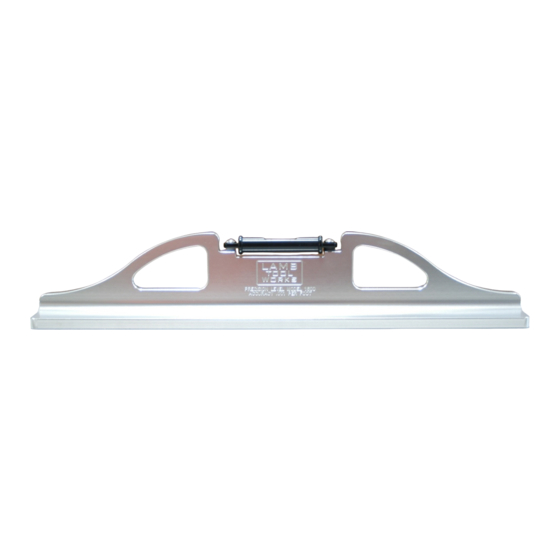
LAMB TOOL WORKS
PRECISION LEVEL MODEL 1600
The Lamb Tool Works Precision Level has been designed to perform numerous tasks,
which include helping to accurately and precisely set up European style sliding table
saws, setting jointer tables, milling machines, lathes, and just about any other piece of
equipment where flatness or level becomes important to the accuracy of the machine.
The LTW level can be used in two ways, one, as shipped it will be set to "level", so
anything can be checked to be level. But, most machines in woodworking aren't level to
begin with and don't have feasible options of being set level. The LTW level is
adjustable so that surfaces can be set coplanar to each other, regardless of whether
the whole machine is "level to the world" or not. This is accomplished by having the vial
attached firmly at one end, while the other side is adjustable and spring-loaded. This
lets you set the vial level on a specific surface and then make any other surface
coplanar within less than .001" per foot (the accuracy per division on the vial) by
comparing readings from surface to surface.
The following pages detail some of the methods of use, and also, how to reset the LTW
level to be "level" if you have used it in the comparison mode. These are just examples
of some of the many uses the LTW level has. It would be impossible to detail all the
uses of this versatile tool.
If you have any questions, feel free to contact us at
Customer Service
if we can be of
any help. This document is also available at
www.lambtoolworks.com
for download.
Please read all the directions before making adjustments to the Lamb Tool Works
Precision Level.
Page 1
Advertisement

Summary of Contents for LAMB TOOL WORKS PRECISION LEVEL 1600
- Page 1 LAMB TOOL WORKS PRECISION LEVEL MODEL 1600 The Lamb Tool Works Precision Level has been designed to perform numerous tasks, which include helping to accurately and precisely set up European style sliding table saws, setting jointer tables, milling machines, lathes, and just about any other piece of equipment where flatness or level becomes important to the accuracy of the machine.
- Page 2 Unboxing the Level The LTW level comes shipped in the box shown to the right. It is double boxed in another, larger box to adequately protect it during shipment. The box flap is tight, it might be helpful to use a putty knife inserted to help open so as not to tear off the flap.
- Page 3 This is a close up of the vial, showing the ability to adjust it for level. One side is fixed permanently using the socket screw and a nylon washer under the vial with Loctite. Do not adjust this side. The right side is where adjustments for level are made, where there are a stack of spring...
- Page 4 Comparative Method by Adjusting the Vial Determine which side of the bubble is high and put the adjusting screw on the opposite side by spinning the level 180º if necessary. This is because the spring stack has limited travel going down, with a lot more adjustability going up.
- Page 5 When the saw table flatness is established, you can use the same settings on the LTW level to adjust the sliding table. It is best to have your slider’s bearings directly between the position of the level and the support bolts on the lower slider carriage so things are solid and you get a consistent reading.
- Page 6 Leaving the Vial Level and Using Shims If you would prefer to leave the LTW level as set from the factory at level, you can always use feeler gages to achieve level and then transfer the feeler gages to wherever you are getting comparison readings.
- Page 7 This method of using shims is probably not the best idea if you intend to use the LTW level to also adjust your slider. Because the position of the feeler gages needs to be consistent, on a narrower sliding table, the feeler gages would be off the table, or the opposite end of...
- Page 8 Reseting the Vial to Level If you have used the adjusting screw to set the vial to a level reading on your machine and would like to reset the vial to be truly level again, this is the procedure to accomplish this. 1) It might be wise to find a reference surface to use for calibration, something static, that doesn’t change.
- Page 9 3) Place the LTW level in the same location on the slider, using the calculated stack of feeler gages if necessary. Adjust the vial to read level, remember, there is a limited amount of travel in the vial adjustment, so if the springs start to compress too much, spin the level and attempt to use the adjustment with it facing the opposite direction.
- Page 10 5) It was estimated to be four marks on the vial off-center. So you would adjust the screw to bring it back to two-off the original reading (again, camera angle makes it appear slightly to the left). 6) Now you can spin the LTW level and verify that the reading, whether it is exactly centered or not, is the same in either direction.
- Page 11 We hope you enjoy your new Lamb Tool Works Precision Level and find it useful in many ways. A few specifications for those that are interested: Length:! 16” Width:!! 3” Height:! 3” Vial Sensitivity:! .001” per foot Flatness of bottom surface:! .0005-.001”...