Table of Contents
Advertisement
Advertisement
Table of Contents
Troubleshooting

Related Manuals for Metene TD-4116

Summary of Contents for Metene TD-4116
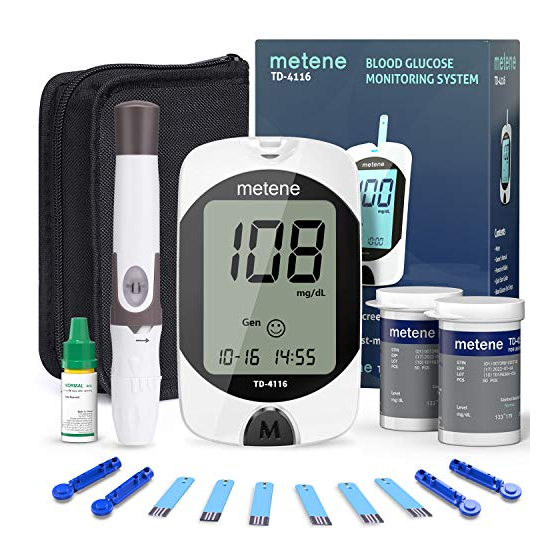
- Page 1 Blood Glucose Monitoring System Owner’s Manual...
- Page 3 If you have other questions regarding this product, please contact the local customer service or place of purchase. Intended Use TD-4116 Blood Glucose Monitoring System is intended to be used for the quantitative measurement of glucose (sugar) in fresh capillary whole blood from the finger and alternative sites (palm, forearm and upper arm).
- Page 4 IMPORTANT SAFETY PRECAUTIONS READ BEFORE USE The meter and lancing device are for single patient use. Do not share them with anyone including other family members! Do not use on multiple patients! All parts of the kit are considered biohazardous and can potentially transmit infectious diseases, even after you have performed cleaning and disinfection.
- Page 5 4. Do NOT use the equipment in places where aerosol sprays are being used, or where oxygen is being administered. 5. Do NOT under any circumstances use the device on neonates or infants. 6. This device does NOT serve as a cure for any symptoms or diseases.
-
Page 6: Table Of Contents
TABLE OF CONTENTS BEFORE YOU BEGIN Important Information Test Principle Contents of System Meter Overview Display Screen Test Strip SETTING THE METER THE FOUR MEASURING MODES BEFORE TESTING Control Solution Testing Performing a Control Solution Test TESTING WITH BLOOD SAMPLE Preparing the Lancing Device for Blood Testing Preparing the Puncture Site Performing a Blood Glucose Test... -
Page 8: Before You Begin
BEFORE YOU BEGIN Important Information Severe dehydration and excessive water loss may cause readings which are lower than actual values. If you believe you are suffering from severe dehydration, consult a healthcare professional immediately. If your blood glucose results are lower or higher than usual, and you do not have any symptoms of illness, first repeat the test. - Page 9 Limitation The device should not be used on individuals in hyperglycemic- hyperosmolar state, with or without ketosis; not for neonatal use; not for use on critically ill patients. This device is not intended for use in healthcare or assisted-use settings such as hospitals, physician offices, or long-term care facilities because it has not been cleared by FDA for use in these settings, including for routine assisted testing or as part of glycemic control procedures.
-
Page 10: Test Principle
Test Principle Your system measures the amount of sugar (glucose) in whole blood. The glucose testing is based on the measurement of electrical current generated by the reaction of glucose with the reagent of the strip. The meter measures the current, calculates the blood glucose level, and displays the result. -
Page 11: Meter Overview
Meter Overview Test Strip Slot & Strip Indicator Insert test strip here to turn the meter on for testing. Display Screen M Button (M) Enter the meter memory and mute a reminder alarm. Data Port Transfer test results with a cable connection. Battery Compartment SET Button (S) Enter and confirm the meter settings. -
Page 12: Display Screen
Display Screen Test Result Ketone warning Error Warning Memory symbol Control solution mode QC – control solution test Measurement modes AC – before meal PC – after meal Gen – any time of day Date Time Day average Reminder alarms Measurement unit Low battery symbol Test strip symbol... -
Page 13: Setting The Meter
SETTING THE METER Before using your meter for the first time or if you change the meter battery, you should check and update these settings. Entering the Setting Mode (a) Start with the meter off (no test strip inserted). Press SET (S). Setting the date The sequence of the date setting is: YEAR MONTH... -
Page 14: The Four Measuring Modes
Setting the reminder alarm Your meter has four reminder alarms. The meter will display ”. If you don’t want to set an alarm, press S to “OFF” and “ skip this step. To set an alarm, press M to select “On”, then press S. With the hour/minute flashing in sequence, press M to select the correct hour/minute. -
Page 15: Before Testing
BEFORE TESTING Control Solution Testing Our Control Solution contains a known amount of glucose that reacts with test strips and is used to ensure your meter and test strips are working together correctly. Do a control solution test when: You first receive the meter At least once a week to routinely check the meter and test strips You begin using a new vial of test strips You suspect the meter or test strips are not working properly... - Page 16 WARNING: When doing the control solution test, you have to mark it so that the test result will NOT mix with the blood glucose TEST RESULTS stored in the memory. Failure to do so will mix up the blood glucose test results with the control solution test results in memory.
-
Page 17: Testing With Blood Sample
TESTING WITH BLOOD SAMPLE WARNING: To reduce the chance of infection: Never share a lancet or the lancing device. Always use a new, sterile lancet. Lancets are for single use only. Avoid getting hand lotion, oils, dirt, or debris in or on the lancets and the lancing device. - Page 18 Please follow the suggestions below before obtaining a drop of blood: Wash and dry your hands before starting. Select the puncture site at fingertips or another body parts (please see section “Alternative Site Testing” (AST) on how to select the appropriate sites).
-
Page 19: Performing A Blood Glucose Test
Performing a Blood Glucose Test To perform a blood glucose test, you will need: meter (b), strip (c), sterile lancet (f) and lancing device (e). Insert the test strip to turn on the meter Wait for the meter to display “ ”... - Page 20 NOTE: Do not press the punctured site against the test strip or try to smear the blood. If you do not apply a blood sample to the test strip within 3 minutes, the meter will automatically turn off. You must remove and reinsert the test strip to start a new test.
-
Page 21: Alternative Site Testing
WARNING: The used lancet and test strip may be biohazards. Please follow your healthcare provider’s recommendations for proper disposal. Wash your hands thoroughly with soap and water after handling the meter, lancing device and test strips to avoid contamination. For more information, please refer to the “Cleaning and Disinfection”... - Page 22 When to use AST? Food, medication, illness, stress and exercise can affect blood glucose levels. Capillary blood at the fingertip reflects these changes faster than capillary blood at other sites. Thus, when testing blood glucose during or immediately after a meal, physical exercise, or any other event, take a blood sample from your finger only.
-
Page 23: Meter Memory
METER MEMORY The meter stores the 450 most recent blood glucose test results along with respective dates and times in its memory. To enter the meter memory, start with the meter switched off. Reviewing Test Results Press and release M. “ ”... -
Page 24: Downlading Results To A Computer
Obtaining the required cable and installing the software. To download the Health Care Software System, please visit the metenecare, website at http://metene.com. Connecting to a personal computer Connect the cable to the USB port on your computer. With the meter switched off, connect the other end of the USB cable to the meter data port. -
Page 25: Maintenance
MAINTENANCE Battery Your meter comes with one 1.5 V AAA size alkaline battery. Low Battery Signal The meter will display one of the messages below to alert you when the meter power is getting low. The “ ” symbol appears along with display messages: The meter is functional and the result remains accurate, but it is time to change the batteries. -
Page 26: Caring For Your Meter
period (i.e., 3 months or more). Properly dispose of the batteries according to your local environmental regulations. After replacing the battery, the meter will enter the setting mode. Caring for Your Meter To avoid the meter and test strips attracting dirt, dust or other contaminants, please wash hands thoroughly with soap and water before and after use. -
Page 27: Disinfecting Procedures
Disinfecting Procedures 1. Wipe all meter’s exterior surface display and buttons by three passes vertically and three passes horizontally with a folded disinfecting towelette. Hold the meter with the test strip slot pointing down and wipe the area around the test slot but be careful not to allow excess liquid to get inside. -
Page 28: Caring For Your Test Strips
NOTE: Do NOT clean and disinfect the meter while performing tests. If the meter is being operated by a second person, the meter and lancing device should be decontaminated prior to use by the second person. Do NOT allow cleaning and disinfecting solution to get in the test slot, battery compartment, or strip-ejection button. -
Page 29: Important Control Solution Information
For further information, please refer to the test strip package insert. Important Control Solution Information Use only Control Solutions with your meter. Do not use the control solution after the expiration date or 3 months after first opening. Write the opening date on the control solution vial and discard the remaining solution after 3 months. -
Page 30: Measurement Result Readings
MEASUREMENT RESULT READINGS Result Readings MESSAGE WHAT IT MEANS Appears when your result is below measurement limit, which is less than 20 mg/dL (1 mmol/L). This indicates hypoglycemia (low blood glucose). You should seek medical assistance immediately. Appears when your result is equal to or higher than 240 mg/dL (13.3 mmol/L). -
Page 31: Reference Values
Reference Values Blood glucose monitoring plays an important role in diabetes control. A long-term study showed that maintaining blood glucose levels close to normal can reduce the risk of diabetes complications by up to 60%* . The results provided by this system can help you and your healthcare professional monitor and adjust your treatment plan to gain better control of your diabetes. - Page 32 While staying at the lab: Make sure that the samples for both tests are taken and tested within 15 minutes of each other. Wash your hands before obtaining a blood sample. Never use your meter with blood that has been collected in a gray- top test tube.
-
Page 33: System Troubleshooting
SYSTEM TROUBLESHOOTING If you follow the recommended action but the problem persists, or error messages other than the ones below appear, please contact your local customer service. Do not attempt to repair yourself and never try to disassemble the meter under any circumstances. Error Messages MESSAGE WHAT IT MEANS... -
Page 34: Troubleshooting
Troubleshooting If the meter does not display a message after inserting a test strip: POSSIBLE CAUSE WHAT TO DO Battery exhausted. Replace the battery. Test strip inserted upside Insert the test strip with contact bars down or incompletely. end first and facing up. Defective meter or test strips. -
Page 35: Specifications
SPECIFICATIONS Model No: TD-4116 Dimension: 89.8 (L) x 52.4 (W) x 17.3 (H) mm Weight: 46.6 g Power Source: One 1.5 V AAA alkaline batteries Display: LCD Memory: 450 measurement results with respective date and time External output: USB Cable... - Page 36 Distributed by limited. 20947 Currier Road Suite O,Walnut,CA,91789 USA Toll Free: +12133786121 (7:00 am - 6:00 pm PST, Mon.-Fri.) For assistance outside of these hours, please contact your healthcare professional. www. .com For Self-testing. Read instructions before use.
- Page 37 Attention: The front side of test strip should face up when inserting test strip in vitro diagnostic use. fully IMPORTANT: Front Chemical Components Performance Characteristics Distributed by metene limited. About Alternative Site Testing (AST) IMPORTANT: Accuracy • Capillary Blood Study www.metene.com ≧ Use only with the metene TD-4116 Blood Glucose Monitoring System.
- Page 38 Hold your fingers on the Distributed by metene limited. For assistance outside of these hours, please contact 5. Hold the cap to select the depth of 6.
Need help?
Do you have a question about the TD-4116 and is the answer not in the manual?
Questions and answers
I need a charging cord
The Metene TD-4116 does not come with a USB cable in the kit. It is an accessory for data transmission and can be obtained by contacting local customer service or the place of purchase.
This answer is automatically generated
My meter just keeps flashing M & then it goes to off if I press it.
When the Metene TD-4116 meter keeps flashing "M" and then turns off, it likely indicates that the meter is idle in setting mode for 3 minutes, after which it automatically switches off.
This answer is automatically generated