Advertisement
Quick Links
【Used Parts List】
Designation
Lubic-160
Lubic-192
Lubic-256
Lubic-384
Lubic-448
Lubic-LP
Lubic-3S-20
Lubic-2S-20
Lubic-SS-20
SC6M4-40
SC8M4-40
Lubic-CAP8
Lubic-CAP135
Lubic-MBSC
SC16H-4
SC6H-40
SC10M3-40
Lubic-SWR2
Lubic TANK Assembling Instructions
Contents
160mm Frame
192mm Frame
256mm Frame
384mm Frame
448mm Frame
Bracket
Metal Slide (3-hole type)
Metal Slide (2-hole type)
Metal Slide (1-hole type)
M4 Millimeter Screw (6mm length)
M4 Millimeter Screw (8mm length)
Corner Bracket (three-sided)
Corner Bracket
Motherboard Fixing Screw
Power Supply Fixing Screw
HDD Fixing Inch Screw
Drive Fixing Millimeter Screw
Power Supply, Reset Switch
Used No.
Required No.
8 pcs
8 pcs
7 pcs
7 pcs
13 pcs
13 pcs
2 pcs
2 pcs
3 pcs
3 pcs
58 pcs
3 bags
134 pcs
7 bags
9 pcs
1 bag
56 pcs
3 bags
52 pcs
2 bags
130 pcs
4 bags
2 pcs
1 set
14 pcs
4 sets
9 pcs
1 bag
4 pcs
1 bag
4 pcs
1 bag
4 pcs
1 bag
1 pc
1 set
□
□
□
□
□
□
□
□
□
□
□
□
□
□
□
□
□
□
Advertisement

Summary of Contents for KAIREN Lubic TANK
- Page 1 Lubic TANK Assembling Instructions 【Used Parts List】 Designation Contents Used No. Required No. □ Lubic-160 160mm Frame 8 pcs 8 pcs □ Lubic-192 192mm Frame 7 pcs 7 pcs □ Lubic-256 256mm Frame 13 pcs 13 pcs □ Lubic-384 384mm Frame...
- Page 2 【Introduction】 We appreciate for purchasing our product of “Lubic TANK” series. This product is a kit for assembling PC case by using aluminum frames, joint parts and panels. □Expansion and remodeling applicable to the used environment is enabled by combining this product with option parts that are separately sold.
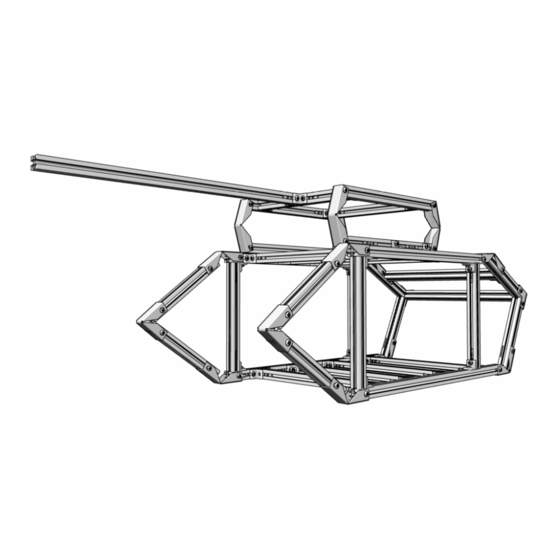
- Page 3 Top Part : Battery Assembly Basic Assembly Fix 256mm frame with CAP135 Refer to “Connecting Frames” and connect with192mm frame. Basic Assembly Refer to “Connecting Frames with Making Angles”. Insert metal slides (3S) into the external side of the frame beforehand.
- Page 4 Bottom Part: Vehicle Creation ・Create side surface of vehicle Assemble 160mm frame x4, 192mm frame x2, 384mm frame (top) and 448mm frame (bottom) Insert metal slides (3S) x 6 into as shown in the below diagram. the internal side of the frame beforehand.
- Page 5 ・Connect side surface of vehicle Connect side surface of vehicle with 256mm frame. Point ! Insert metal slides into 256mm frame (3 pcs above) used for connecting side surface of vehicle beforehand in order to mount top part and battery. Mounting motherboard will be done easily by placing an extra metal slide into 256mm frame (4 pcs below) used for connecting side surface of vehicle.
- Page 6 ・Mounting power supply fixing frames Mount 256mm frame for fixing power supply. Refer to Basic Assembly “Create corner with frames”. Point ! Mounting power supply and switch will be done easily by placing an extra metal slide into 256mm frame beforehand. Refer to Basic Assembly<...
- Page 7 Battery and Vehicle Connection Connect battery and vehicle with “brackets”. Now Completed! Please mount assembly parts according to your taste. * Please refer to “Basic Assembly of Lubic” for mounting assembly parts.
Need help?
Do you have a question about the Lubic TANK and is the answer not in the manual?
Questions and answers