
Subscribe to Our Youtube Channel
Related Manuals for Meiwa RP300X

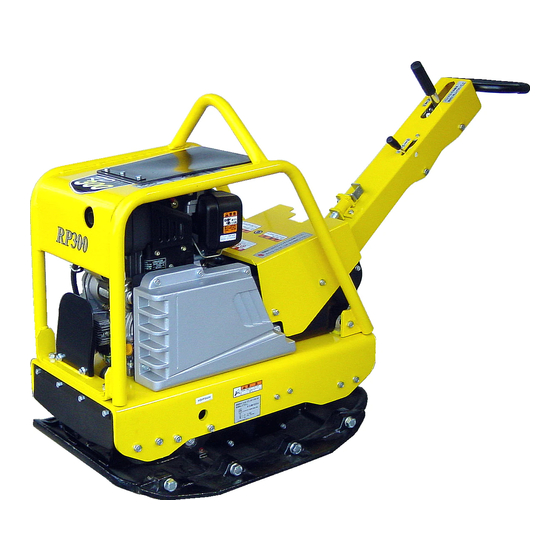
Summary of Contents for Meiwa RP300X
- Page 1 OPERATION / MAINTENANCE AND PARTS MANUAL For RP300(X) REVERSIBLE PLATE COMPACTOR July 23, 2009...
-
Page 2: Pre-Start Inspection
SECTION 1 - SAFETY PRECAUTIONS AND GUIDELINES Contents ......................................Page OVERVIEW ..................................1 PRE-START INSPECTION..............................1 OPERATING ..................................2 MAINTENANCE ................................. 2 OERATING PROCEDURES ..........................………….. 3 OVERVIEW BEFORE YOU OPERATE, MAINTAIN OR IN ANY OTHER WAY, OPERATE THIS MACHINE: READ and STUDY this manual. KNOW how to safely use the unit’s controls and what you must do for safe maintenance. The machine has been built in accordance with state-of-the-art standards and the recognized safety rules. -
Page 3: Maintenance
SECTION 1 - SAFETY PRECAUTIONS AND GUIDELINES CHECK for WARNING tags placed on the machine. DO NOT operate the equipment until repairs have been made and the WARNING tags have been removed by authorized personnel. KNOW the location of the Emergency Shut-Down Control if the machine is so equipped. OPERATING In the event of safety-relevant modifications or changes in the behavior of the machine during operation, stop the machine immediately and report the malfunction to the competent authority/person. - Page 4 SECTION 1 - SAFETY PRECAUTIONS AND GUIDELINES Any safety devices removed for set-up, maintenance or repair purposes must be refitted and checked immediately upon completion of the maintenance and repair work. Ensure that all consumables and replaced parts are disposed of safely and with minimum environmental impact. AVOID, whenever possible, servicing, cleaning or examining the unit with the engine running.
-
Page 5: Section 2 - Introduction
Each publication is reviewed and revised, as required, to update and include these changes in later editions. MEIWA reserves the right to modify or make changes within a specific model group without notice and without incurring any liability to retrofit units previously shipped from the factory. - Page 6 SECTION 3 - SYMBOL IDENTIFICATION AND METRIC CONVERSION Contents Page INTERNATIONAL MACHINE SYMBOLS ______________________________________________________________1 INTERNATIONAL HIGHWAY SYMBOLS ______________________________________________________________2 METRIC CONVERSIONS __________________________________________________________________________ 4 INTERNATIONAL MACHINE SYMBOLS The following explains the meaning of international symbols that may appear on your machine OIL PRESSURE BRAKE HOURS WATER...
- Page 7 SECTION 3 - SYMBOL IDENTIFICATION AND METRIC CONVERSION INTERNATIONAL HIGHWAY SYMBOLS The following symbols may also appear in a yellow square instead of a red triangle. Road bends Uneven road Dangerous bend Ridge Double bend Dangerous descent Slippery road Steep ascent Loose gravel entry for power driven...
- Page 8 SECTION 3 - SYMBOL IDENTIFICATION AND METRIC CONVERSION Two-way traffic “give way” sign Other dangers Stop sign (new) Level crossing Stop sign (old) Level crossing “priority road” sign No entry for vehicles exceeding No entry weight Closed to all vehicles in both entry vehicles axle...
- Page 9 SECTION 3 - SYMBOL IDENTIFICATION AND METRIC CONVERSION TO CONVERT INTO MULTIPLY BY OMREGNET FRA MULTIPLICERES MED Pound/sq.in 14.50 Kilopascals 100. Centigrade Fahrenheit (C° x 9/5) + 32 Centimeters Inches 0.3937 Centimeters Millimeters 10.0 Circumference Radians 6.283 Cubic centimeters cu.inches 0.06102 Degrees (angle) Radians...
-
Page 10: Section 4 - Operating Instructions
SECTION 4 - OPERATING INSTRUCTIONS Contents Page SAFETY CHECKS - PRE-STARTING _________________________________________________________________1 INSPECTION PRIOR TO OPERATION ________________________________________________________________2 OPERATION _____________________________________________________________________________________2 STORAGE ______________________________________________________________________________________6 Improper maintenance can be hazardous. Read and understand SECTION 1 - SAFETY PRECAUTIONS AND GUIDELINES before you perform any maintenance, service or repairs. -
Page 11: Start-Up Procedures
SECTION 4 - OPERATING INSTRUCTIONS INSPECTION PRIOR TO OPERATION START-UP PROCEDURES ELECTRIC START Remove the operating handle by pulling the handle pin. Move the operating handle manually down to the operating position. 1. Position the throttle lever (1, Figure 4-1)to the “high” position. 2. -
Page 12: Shutdown Procedure
SECTION 4 - OPERATING INSTRUCTIONS Avoid pulling the rope completely out, the recoil starter could be damaged and the rope broken. Allow the rope to return to the original position. COMPACTOR OPERATION 1. After start-up of the engine, allow the engine to warm up at slow speed without load for about 5 minutes. 2. - Page 13 SECTION 4 - OPERATING INSTRUCTIONS TOWING In the event of an engine problem or other malfunction, it may be necessary to remove the compactor from the job site. The lifting hook has been provided in the machine’s center of gravity for ease of lifting the compactor onto or off of the transporter.
-
Page 14: General Information
SECTION 5 - FUEL AND LUBRICATION SPECIFICATIONS Contents Page GENERAL INFORMATION ________________________________________________________________________ 1 GENERAL INFORMATION Lubrication is an essential part of preventive maintenance, affecting to a great extent the useful life of the unit. Different lubricants are needed and some components in the unit require more frequent lubrication than others. Specific recommendations of brand and grade of lubricants are not made here due to regional availability, operating conditions, and the continual development of improved products. - Page 15 SECTION 6 - INITIAL BREAK-IN MAINTENANCE Contents Page ENGINE OIL ___________________________________________________________________________________ 2 BATTERY _____________________________________________________________________________________ 2 OIL FILTER ____________________________________________________________________________________ 3 VIBRIATION SHAFT CASE OIL ____________________________________________________________________ 3 Improper maintenance can be hazardous. Read and understand SECTION 1 - SAFETY PRECAUTIONS AND GUIDELINES before you perform any maintenance, service or repairs.
-
Page 16: Battery Electrolyte
SECTION 6 - INITIAL BREAK-IN MAINTENANCE ENGINE OIL Drain the engine oil after the first 20 hours of operation. Rremove engine oil plug (1, Figure 6-1) and drain engine oil. Fill with the correct amount of the recommended oil and check the oil level with the oil check gauge (2, Figure 6-1). Figure 6-1 BATTERY ELECTROLYTE Check the liquid level of battery electrolyte every month and refill with distilled water if the liquid level is low. -
Page 17: Engine Oil
SECTION 7 - 10 HOUR OR DAILY ROUTINE MAINTENANCE Contents Page TROUBLE SHOOTING _____________________________________________________________________ 1 GENERAL MAINTENANCE _________________________ ________________________________________ 2 Improper maintenance can be hazardous. Read and understand SECTION 1 - SAFETY PRECAUTIONS AND GUIDELINES before you perform any maintenance, service or repairs. -
Page 18: Air Cleaner
SECTION 7 - 10 HOUR OR DAILY ROUTINE MAINTENANCE FUEL Fuel is flammable. May cause severe injury or death. Shut down the engine, extinguish all open flames and do not smoke while filling the tank. Always wipe up any spilled fuel. Shut down the engine before filling with fuel. - Page 19 SECTION 8 - 10 HOUR OR DAILY ROUTINE MAINTENANCE Contents Page ENGINE OIL _____________________________________________________________________________ 1 AIR CLEANER ___________________________________________________________________________ 2 FASTENING HARDWARE __________________________________________________________________ 2 It is recommended that the following steps be performed at the beginning and end of each 8 to 10 hour shift or daily, whichever comes first.
- Page 20 SECTION 8 - 50 HOUR OR WEEKLY ROUTINE MAINTENANCE * No 50 hour or weekly routine maintenance is required. *...
-
Page 21: Oil Filter
SECTION 9 - 100 HOUR OR MONTHLY ROUTINE MAINTENANCE Contents Page ENGINE OIL ____________________________________________________________________________________ 1 OIL FILTER _____________________________________________________________________________________ 1 FUEL FILTER ELEMENT __________________________________________________________________________ 1 V-BELT ________________________________________________________________________________________ 1 It is recommended that the following steps be performed at the beginning and end of each 100 hours shift or monthly, whichever comes first. - Page 22 SECTION 9 - 100 HOUR OR MONTHLY ROUTINE MAINTENANCE GAS-SPRING Check the gas-spring after 100 hours of operation. Change the gas-spring if oil leakage occurs. TIMING-BELT Check the tension of the timing-belt after 100 hours of operation. Adjust the tension of the timing-belt if necessary. Proper tension is a bend of 10mm between the pulleys with load of 58.8N(6kgf).
-
Page 23: Timing Belt
SECTION 10 - 300 HOUR OR ANNUAL ROUTINE MAINTENANCE Contents Page VIBRATOTRY SHAFT _____________________________________________________________________________ 1 TIMING BELT ____________________________________________________________________________________ 1 It is recommended that the following steps are performed at the beginning and end of each 300 hours or annually whichever comes first. - Page 24 SECTION 11- 500 HOUR OR SEMI-ANNUAL ROUTINE MAINTENANCE NOTE * No 500 Hour or Semi-Annual Routine Maintenance is required.* 11-1...
- Page 25 SECTION 12 - 1000 HOUR OR ANNUAL ROUTINE MAINTENANCE NOTE * No 1000 Hour or Annual Routine Maintenance is required. * 12-1...
-
Page 26: Section 13 - Routine Adjustments
SECTION 13 - ROUTINE ADJUSTMENTS NOTE * See Engine Manual for Engine Routine Adjustments. * 13-1... -
Page 27: Section 14 - Miscellaneous And Optional Equipment
SECTION 14 - MISCELLANEOUS AND OPTIONAL EQUIPMENT NOTE * No Miscellaneous and Optional Equipment. * 14-1... - Page 28 SECTION 15 - SCHEMATICS NOTE * No Schematics are necessary for this unit.* 15-1...
Need help?
Do you have a question about the RP300X and is the answer not in the manual?
Questions and answers