Advertisement
Quick Links
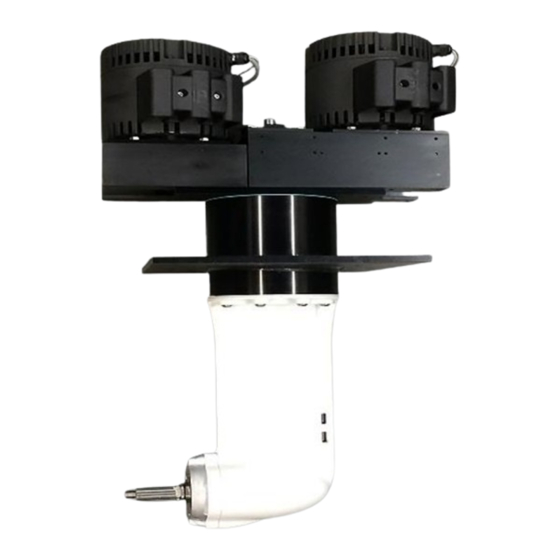
Instructions for Installing Your Electric QuietTorque™
QT 20.0SD, QT 30SD or QT 40SD Motor System
List of Equipment Supplied:
1 - Motor Assembly
2 – Motor Controller Assembly
1 - Battery Power Switch
1 – 400A Class-T Fuse and holder
2 - Relays (also commonly called a "contactor" or "solenoid")
1 - Throttle assembly w/ key switch and attached cable (p/n 01005)
8 - #8 x ½" Phillips head screws
1 - Battery Monitor (display) w/ attached cable (p/n 01036)
2 - #6 x 1" Phillips head screws
2 - #6 x 1 ¾" Phillips head screws
1
Electric Yacht Copyright 2012
Advertisement

Summary of Contents for Electric Yacht QuietTorque QT 20.0SD
- Page 1 1 - Throttle assembly w/ key switch and attached cable (p/n 01005) 8 - #8 x ½” Phillips head screws 1 - Battery Monitor (display) w/ attached cable (p/n 01036) 2 - #6 x 1” Phillips head screws 2 - #6 x 1 ¾” Phillips head screws Electric Yacht Copyright 2012...
- Page 2 Be sure to allow some space and access above the batteries for watering and terminal cleaning. 2. Locate all the batteries and secure in place. This is usually the most time consuming part of the installation. Electric Yacht Copyright 2012...
- Page 3 12. Route cables together, as shown in the sample connection below. This helps minimize electrical interference to your VHF radio and minimizes any risk of magnetic interference that could affect your compass. Long runs may also be twisted. Do not bundle with other wiring. Electric Yacht Copyright 2012...
- Page 4 Electric Yacht Copyright 2012...
- Page 5 3. Drill the appropriate holes. 4. Apply sealant around the holes and drive in provided screws from the back side. Use the shortest screws that will work. 5. Run the cable to the engine area and secure. Electric Yacht Copyright 2012...
- Page 6 5. Install the motors on the saildrive. The belts should be tensioned such that there is less than ¼” deflection between pulleys with moderate finger pressure. 6. Remove plug above mounting plate and fill with ATF (approx. 2L). Put pipe dope on plug and install tightly. Electric Yacht Copyright 2012...
- Page 7 The throttle has 6 pins. They also have an alignment post. Make sure to connect the correct connectors together and rotate until the alignment post is aligned. Do not force them together. They go together easily when properly aligned. Rotate the locking collar clockwise to secure. Electric Yacht Copyright 2012...
- Page 8 The “light bulb” key sets the backlight brightness for night time use. 5. Use the left or right arrow to choose your battery type. Press the “ENTER” key. Electric Yacht Copyright 2012...
- Page 9 (astearn) direction, press the other direction key to move the number through zero. Move the throttle fully ahead and advance the number until no further increase in motor speed occurs. Press the “ENTER” key. Electric Yacht Copyright 2012...
- Page 10 A number between 20 and 30 is a good starting point. This value will be fine tuned later. Press “ENTER” again. Several numbers will be shown briefly. Then, you will be returned to the normal operating screens and the settings will have been saved. Electric Yacht Copyright 2012...
- Page 11 10. Secure the covers as shown below. Electric Yacht Copyright 2012...
- Page 12 The display will emit a beeping sound when the battery SOC reaches 50%, 20%, 10% and 5%. At 5% it will continue to beep until all power is depleted or the motor is turned off. At the other percentages, it will beep at 10 second intervals for 1 minute. Electric Yacht Copyright 2012...
- Page 13 4. Clean the battery tops and terminals once per year or when corrosion is evident. Recoat the terminals with dielectric grease. 5. It is recommended to replace the timing belt every five years. It can be done in about an hour with hand tools. Happy Sailing! Electric Yacht Copyright 2012...
- Page 14 4 – Logic Power to Motor Controller (ORG) 5 – Potentiometer Common (BLU) 6 – Unused Motor Controller to Motor Connection: M1 to U (Stamped into motor case near terminal) M2 to V M3 to W Electric Yacht Copyright 2012...
- Page 15 4. Slide the belt off the motor pulley. 5. Make a pulley holding tool by passing a 6’ (approx.) piece of 1/8” or 3/16” rope line through the handle of a Crescent wrench (or similar) and tying the ends. Electric Yacht Copyright 2012...
- Page 16 A deflection of ¼” with light pressure is good. 16. Tighten the four motor plate bolts. 17. Re-install controller and sheet metal guard. Re-connect battery and you are ready to go. Electric Yacht Copyright 2012...
- Page 17 3. Loosen the four bolts (on back side of motor assembly) that hold the motor plate to the frame. 4. Slide the belt off the motor pulley. 5. Remove the four bolts securing the forward bearing plate to the motor frame and slide off bearing plate. Electric Yacht Copyright 2012...
- Page 18 ¼” deflection with moderate finger pressure is ok. 10. Tighten the four motor plate bolts. 11. Re-install controllers and sheet metal covers. Re-connect battery and you are ready to go. Electric Yacht Copyright 2012...
- Page 19 AND SECURE WITH GLASS ALONG WITH FRAME 15.0” (381mm) 15.0” (381mm) 9” DIAMETER HOLE HARDWOOD FRAME THROUGH HULL SECURELY GLASSED TO HULL Note: ALTENATELY, THE SAILDRIVE CAN BE MOUNTED ON A 15” DIAMETER ROUND FIBERGLASS PLATFORM Electric Yacht Copyright 2012...
- Page 20 Template for Display (Figure 2): 1.00” 0.156” dia 1.00” dia min 1.25” 3.25” 0.156” dia 1.25” 1.00” 4.40” Fig. 2 Electric Yacht Copyright 2012...
Need help?
Do you have a question about the QuietTorque QT 20.0SD and is the answer not in the manual?
Questions and answers