Advertisement
Quick Links
Advertisement

Summary of Contents for Treyco 3000
- Page 1 Treyco Model 3000 Instruction Manual ...
-
Page 2: Table Of Contents
TABLE OF CONTENTS Safety and Unpack Machine 2 Features of Model 3000 3 Assembly 6 Charge honing disc 7 Sharpening A‐5 Style Clipper Blades 9 Blade Charts 14 Honing Disc Replacement 15 Page 1 ... - Page 3 SAFETY PRECAUTIONS Wear safety glasses and dust mask when operating Treyco Model 3000. Do not operate machine with loose fitting clothing that can catch in moving parts. Keep hair pulled back to avoid contact with moving parts.
-
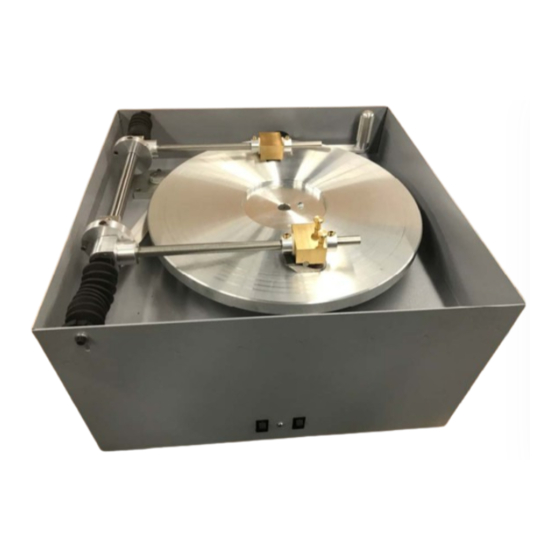
Page 4: Features Of Model 3000
FEATURES OF MODEL 3000 Linear ball bushing slide completely sealed with rubber bellows Brake for quick stopping of honing disc Magnetic holders that require no adjustments when sharpening various size blades Page 3 ... - Page 5 TWO SPEED HONING DISC Model 3000 is equipped with a 2‐speed drive, machine arrives set on low speed. To change to high speed move orange belt from upper pulley groove on drive plate to lower pulley groove then move belt from upper pulley groove on motor to lower. To return to low speed reverse above directions. Low speed setting High speed setting Page 4 ...
- Page 6 HONING DISC BRAKE Machine features a brake for stopping the honing disc quickly, the brake pad that presses on the outer edge of the disc will wear and when this happens remove the screw on top of pad and lift pad off and index to a different keyway and reattach with screw. Remove screw to lift off brake pad Brake pad with 4 keyways Page 5 ...
-
Page 7: Assembly
ASSEMBLY Machine is received fully assembled with the exception of mounting the honing disc and preparation of the disc for sharpening as follows: STEP 1: Place machine on sturdy table or bench. STEP 2: WASH HONING DISC Wash both sides of honing disc with warm water and mild dish washing detergent (suggest Dawn Dish soap, DO NOT use detergent for automatic dishwashers). -
Page 8: Charge Honing Disc
CHARGING HONING DISC STEP 1 Atomizer spray bottle comes already filled with honing oil, you must pressurize the bottle with air. This can be done the same as filling a car tire with air or use a bicycle tire pump. Fill to 50 – 90 pounds air pressure. Add honing powder into supplied powder dispenser (salt shaker). - Page 9 4. Apply honing powder evenly on disc with supplied shaker covering the disc lightly (approximately 1-2 teaspoons). 5. Place wooden charging stick on honing disc in line with center of disc and narrow edge of stick on honing disc. Make two revolutions around honing disc with charging stick to evenly distribute honing powder.
- Page 10 SHARPENING A‐5 BLADES STEP 1: SET METAL REMOVAL GAUGE 1. Disassemble blade set and wipe off any dirt, fur or hair. 2. Place side of comb blade to be sharpened on metal removal gauge with the 2 pins on gauge face entering the 2 screw holes on comb blade. 3. While holding comb tight to gauge rotate dial of indicator so needle points to zero. After sharpening Pins the screw holes Hold comb blade needle should be 2 in comb blade fit on tight to gauge and lines from zero rotate dial to zero Page 9 ...
- Page 11 STEP 2: MOUNT COMB BLADE ON HOLDER 1. Place comb blade on holder labeled A‐5 COMB BLADE with the 2 floating magnets in the counterbores that the blade screws go into. Teeth of blade should be pointing down. 2. With disc OFF (not rotating) lower comb blade to honing disc. Visually check that both teeth and wear bar are sitting on disc surface. 3. Lift arm to vertical position Counterbores that floating magnets fit into Floating magnets Comb blade mounted on holder Teeth and wear bar sitting on disc Page 10 ...
- Page 12 STEP 3: MOUNT CUTTER BLADE 1. Place cutter on holder labelled OSTER CUTTER by having the 2 formed magnets fit into the groove that the blade guide rides and the screw head on holder fits into cutout in cutter where the lever fits that drives cutter back and forth when mounted to clipper motor. 2. With disc OFF (not rotating) lower cutter blade to honing disc. Visually check that both teeth and wear bar are sitting on disc surface. 3. Lift arm to vertical position. Blade guide groove Screw head Cutout for lever Formed magnets Teeth and rear wear bar both Cutter mounted on holder sitting on disc Page 11 ...
- Page 13 STEP 4: APPLY OIL AND POWDER This process is similar to charging the disc. 1. Spin disc by hand. 2. Hold atomizer 8‐10 inches above disc. 3. Apply a 1 – 2 second burst of oil from atomizer as disc rotates 4. Apply honing powder evenly around disc with the supplied shaker. 5. Place wooden charging stick on disc and make 2‐3 revolutions around disc spreading powder and filling the fine grooves on the disc. 6. This is to be done with each blade sharpened. STEP 5: SHARPEN BLADES 1. Turn on disc and automatic arms. 2. Lower comb onto disc setting down between inner and outer edges of disc. 3. Lower cutter onto disc setting down between inner and outer edges of disc. 4. Cycle for 2 minutes on low speed (reduce cycle to 1 minute if disc is set to high speed). 5. Lift arms off disc when holders are between inner and outer edges of disc. 6. Inspect powder residue on blades, powder should be moist enough to adhere to blades, if powder is dry like sand or flour then you are not using enough oil, if powder is wet like grease or toothpaste then you are using too much oil. If powder is too wet simply apply powder only (no oil) until powder residue is correct. 7. Wash blades in blade wash, mineral spirits or kerosene to remove all powder from blades. We recommend 2 containers the first container is what the blade is washed in and the second container is for rinsing the blade. Recommend using small paint brush to clean between the teeth of blade. 8.
- Page 14 STEP 6: REASSEMBLE BLADE 1. Tighten spring tension if needed by squeezing spring where shaped like horseshoe with pliers closing the opening of the horseshoe slightly, do not close so much that socket cannot slide back into spring, if you have overtightened bend horseshoe open with flat blade screwdriver. 2. Assemble spring and socket together and attach to comb blade with 2 screws. 3. Align cutter to comb and examine tips of cutter teeth in relation to tips of comb teeth, cutter teeth should be slightly behind comb teeth so the sharp needle like tips of the cutter teeth are not protruding past the comb teeth as this could scratch or cut the surface of the animal or person the blade is being used on. (see chart) 4. Place blade on clipper motor and turn on, if blade rattles the ears of the socket must be squeezed closer together to eliminate rattle (this can be done without disassembling blade). 5. Test cut on rabbit pelt. Adjusting socket Tightening Cutter set back ears to stop spring tension blade rattle Page 13 ...
-
Page 15: Blade Charts
A‐5 BLADE CHART Blade Size Cutter Set Back 7 and larger 1/16 8 ½ thru 30 1/32 40 and finer 1/64 OSTER 10, 11, and 111 BARBER BLADES ANDIS BG BLADES Blade Size Cutter Set Back 0000 and 00000 1/64 000 thru 0 1/32 0A thru 18 1/16 Page 14 ... -
Page 16: Honing Disc Replacement
HONING DISC REPLACEMENT When a new or resurfaced honing disc is installed on machine the following adjustments must be verified before machine can be used (this is not required if turning disc over to use other side). This is due to variations in thickness of honing discs. - Page 17 CENTER HOLDERS Raise arms to vertical position. Mount an A-5 comb blade size 10 or 15 on Comb Holder. Lower arm so comb blade is resting on top of honing disc. Turn on automatic arms (switch on left) and observe if the comb blade overlaps the inner and outer edge of honing disc the same amount at each end of its stroke.
Need help?
Do you have a question about the 3000 and is the answer not in the manual?
Questions and answers